Operate a Page

Home > User guide > BOT > How to use the BOT editor > Operate a page
This page explains how to operate an element in the Page.
- 1. Click an element
- 2. Get a value in the element
- 3. Get a URL of the link
- 4. Get an attribute value in the element
- 5. Get the overview of the selection range
- 6. Extend a selection and Undo a selection
- 7. Input a value in the text box
- 8. Input a value in the select box
- 9. Input a value in the checkbox
- 10. Input a value in the radio button
- 11. Specifying an element selector
- 12. Record the operation by specifying the ID
- 13. Other functions
- 14. Export/Import cookie
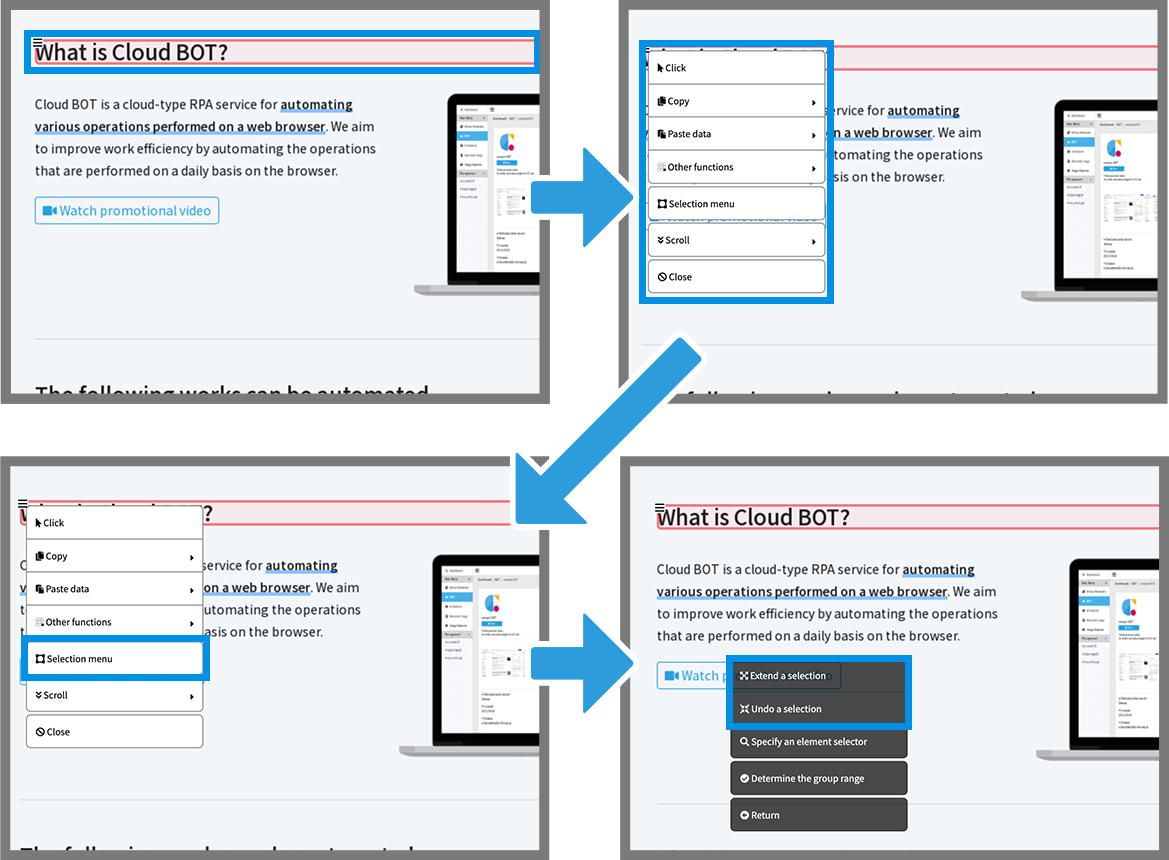
Click an element
Click and Select the element. The operation menu appears by clicking again while the element is selected. Click "Click" on the operation menu.
Get a value in the element
Click and select the element. The operation menu appears by clicking again while the element is selected. Click "Copy" on the operation menu, and then click "copy the text". Input the data name, and then click "Copy".
Get a URL of the link
Click and select the element. The operation menu appears by clicking again while the element is selected. Click "Copy" on the operation menu, and then click "Copy the link URL". Input the data name, and then click "Copy".
Get an attribute value in the element
Click and select the element. The operation menu appears by clicking again while the element is selected. Click "Copy" on the operation menu, and then click "Copy the attribute value", the list of attribute values will appear. Select an attribute value out of them. Input the data name, and then click "Copy".
Get the overview of the selection range
Click and select the element. The operation menu appears by clicking again while the element is selected. Click "Copy" on the operation menu, and then click "Copy the selection range". Input the data name, and then click "Copy".
Extend a selection and Undo a selection
The range of the selected elements can be adjusted.
- Click to select an element.
- Click again to display the action menu.
- Select "Selection menu" from the action menu.
- Adjust using "Extend a selection" or "Undo a selection."
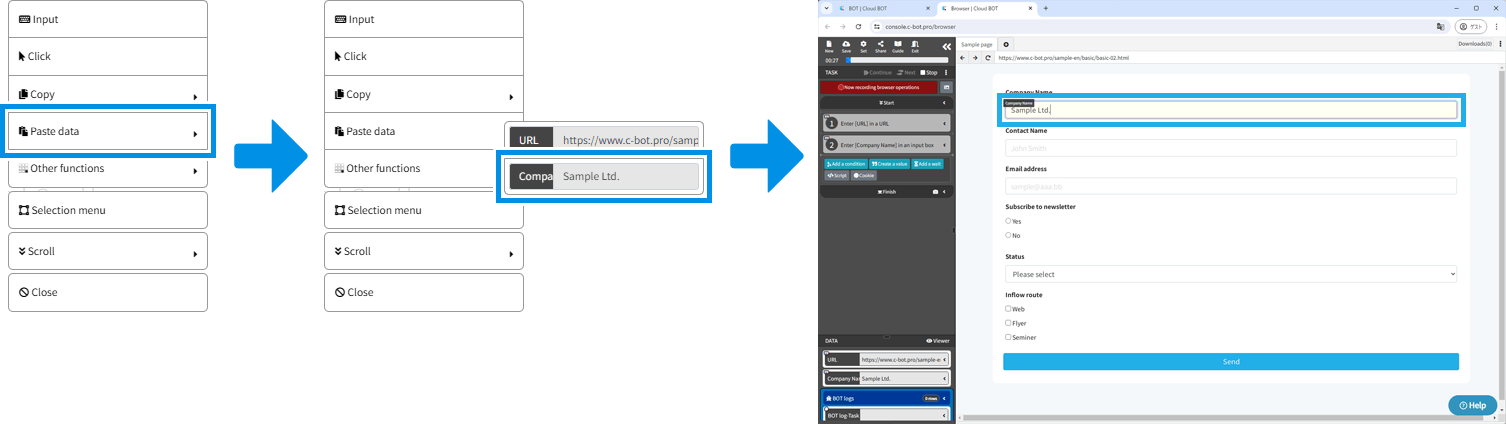
Input a value in the text box
Input any string
Click and select the element. The operation menu appears by clicking again while the element is selected. Click "Input" on the operation menu. Input characters, and then press the button.
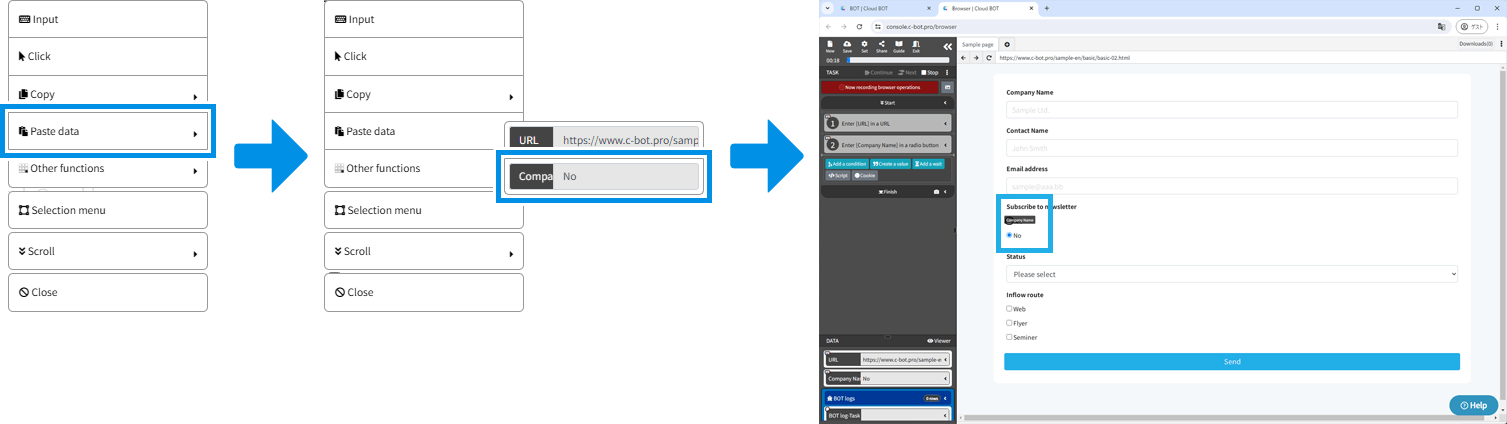
Pasting data
Pasting the value stored as data within the BOT into the text box.
- Select "Paste data" from the operation menu.
- Select the desired data for pasting.
Differences by data type
| Data type | Pasting content |
|---|---|
| Text | Pasting plain text. |
| Multiple text | Pasting multiple text items separated by commas. |
| Files | Pasting the URL of the file. |
Input a value in the select box
Input any string
Click and select the element. The operation menu appears by clicking again while the element is selected. Click "Input" on the operation menu. Click the select box, then the pull-down menu appears. Select a value.
Select by pasting data
Values stored as data within the BOT can be pasted into the select box to make a selection.
If there is data that matches the value attribute of an option within the select box, that option will be selected.

Differences by data type
| Data type | Select by pasting |
|---|---|
| Text | Will be selected if the data matches the value attribute of an option in the select box. |
| Multiple text | Will be selected if the first data matches the value attribute of an option in the select box. |
| Files | Pasting is not possible. |
Switch selection method
[Select an item with a matching Value]:The item that matches the value attribute of the option in the select box with the entered value will be selected.

[Select an item with a matchng Label]:The item that matches the display text of the option in the select box with the entered value will be selected.

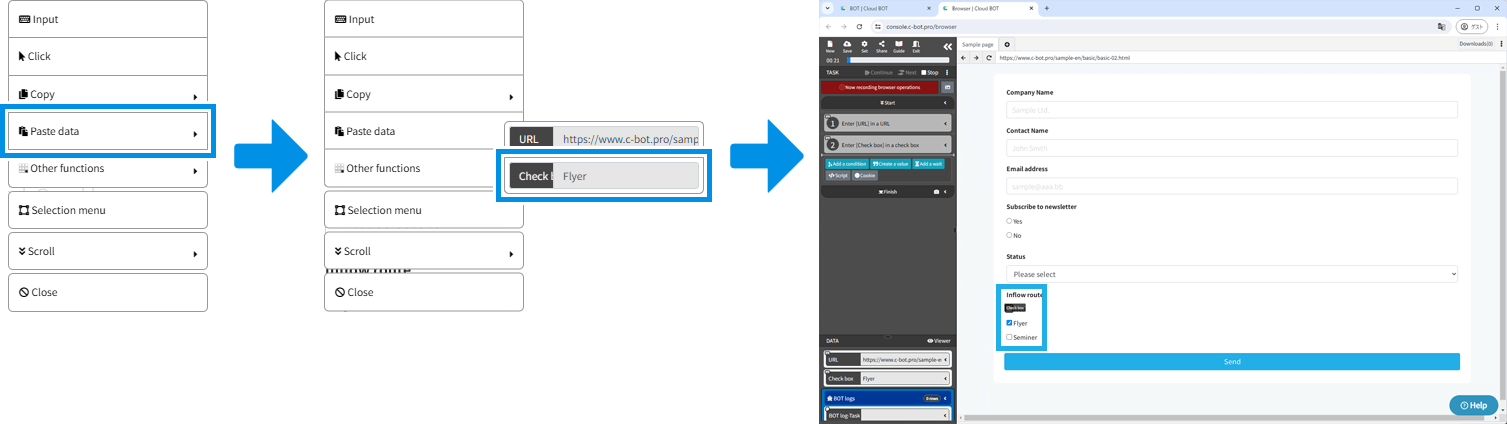
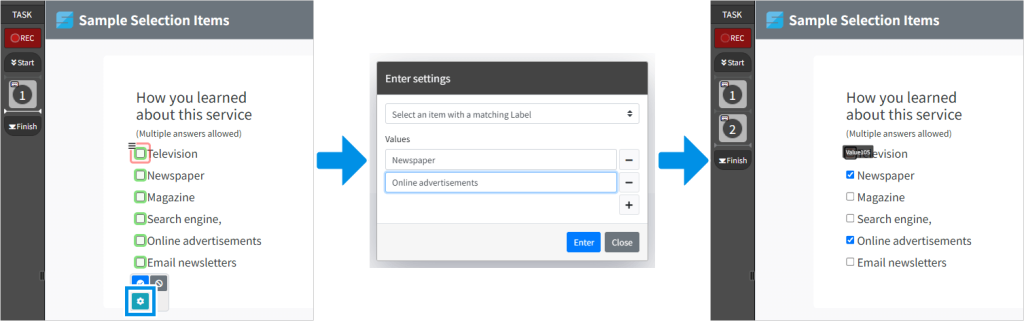
Input a value in the checkbox
Input any string
Click and select the element. The operation menu appears by clicking again while the element is selected. Click "Input" on the operation menu. Confirm that the checkbox is checked, and then press the button.
Select by pasting data
Values stored as data within the BOT can be pasted into the checkboxes to make a selection.
If there is data that matches the value attribute of a checkbox, that checkbox will be selected.
Differences by data type
| Data type | Select by pasting |
|---|---|
| Text | Will be selected if the data matches the value attribute of a checkbox. |
| Multiple text | All will be selected if multiple data items match the value attributes of multiple checkboxes. |
| Files | Pasting is not possible. |
Switch selection method
[Select an item with a matching Value]:The item that matches the value attribute of the checkbox with the entered value will be selected.
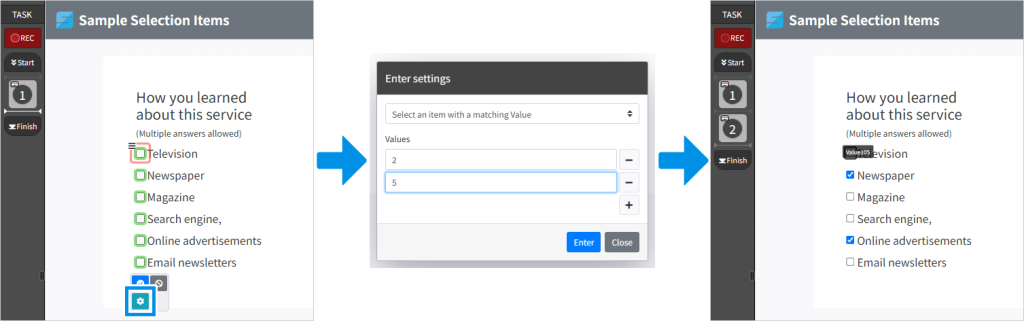
[Select an item with a matching label ]:The item that matches the display text of the checkbox with the entered value will be selected.
Input a value in the radio button
Input any string
Click and select the element. The operation menu appears by clicking again while the element is selected. Click "Input" on the operation menu. Confirm that the radio button is checked, and then press the button.
Select by pasting data
Values stored as data within the BOT can be pasted into the radio buttons to make a selection.
If there is data that matches the value attribute of a radio button, that radio button will be selected.
Differences by data type
| Data type | Select by pasting |
|---|---|
| Text | Will be selected if the data matches the value attribute of a radio button. |
| Multiple text | Will be selected if the first data matches the value attribute of a radio button. |
| Files | Pasting is not possible. |
Switch selection method
[Select an item with a matching Value]:The item that matches the value attribute of the radio button with the entered value will be selected.
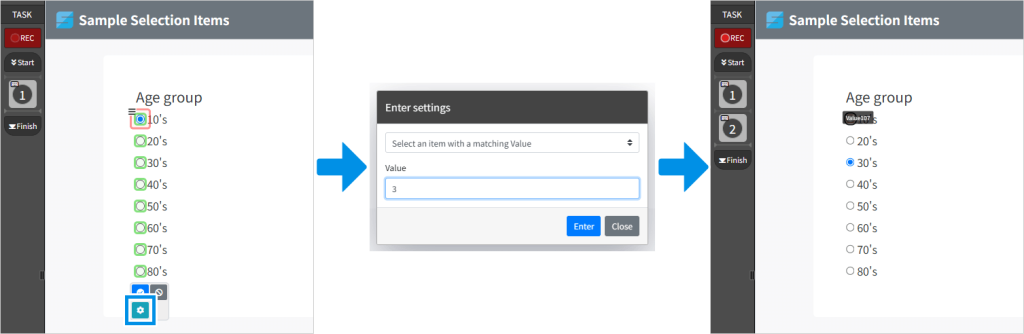
[Select an item with a matching label ]:The item that matches the display text of the radio button with the entered value will be selected.

Specifying an element selector
The currently selected element is confirmed. The element selector for the selected element will be shown in the "Specify an element selector" field.
* For adjusting the range of the selected element, refer to "Extend a selection and Undo a selection."
- Select "Selection menu" from the action menu.
- Choose "Specify an element selector."
* This can also be selected from the menu at the top right of the screen.
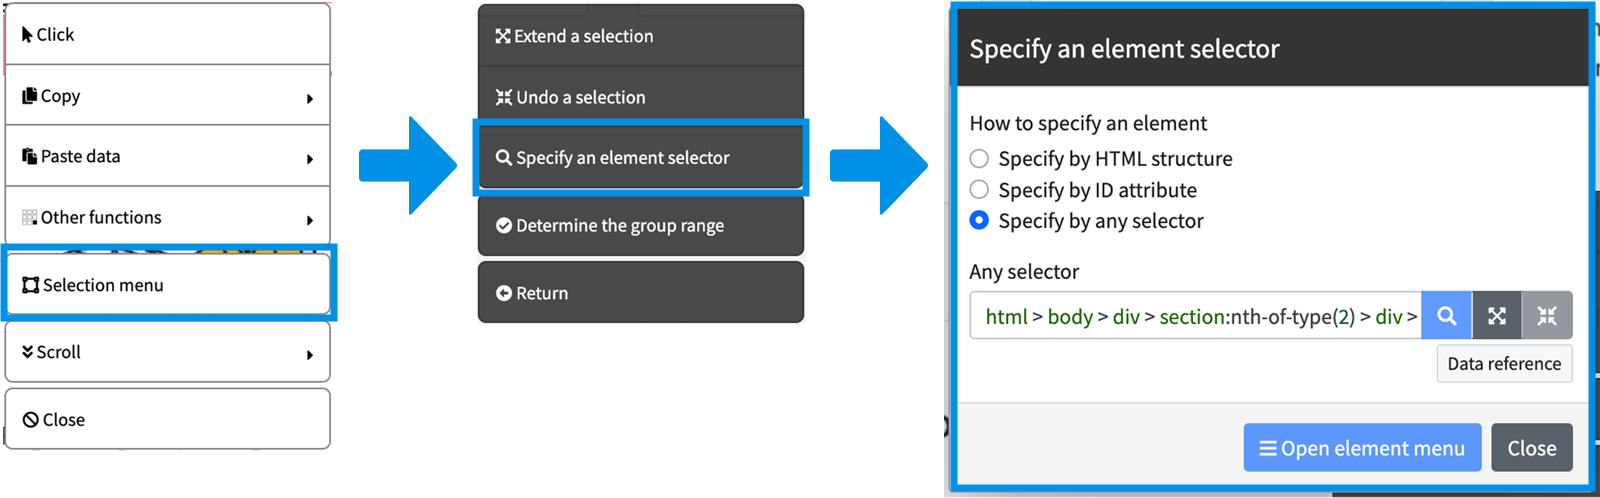
How to Specify an element selector
In "Specify an element selector," the element selector for the selected element is checked.
It is also possible to input any element selector to reselect an element.
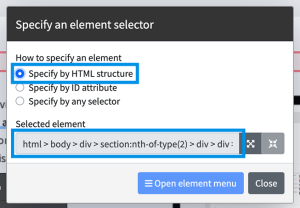
Specify by HTML structure
Express the element selector using the hierarchical structure of HTML leading to the element.
Example: html > body > div > section:nth-of-type(2) > div > div > div > div > div > h2
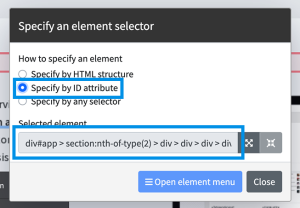
Specify by ID attribute
Express the element selector starting from an element with a specified ID attribute.
Example: div#app > section:nth-of-type(2) > div > div > div > div > div > h2
Specify by any selector
Input any element selector to specify an element.
When specifying with any selector, it is also possible to reference data stored in Cloud BOT.

Record the operation by specifying the ID
Select the operation you want to record (click, copy, etc.). Click "How to specify an element" at the bottom left of the confirmation dialog. Click "Convert to ID attribute specification".
Other functions
Download
Download the linked file or image file.
- For instructions on how to download linked files, click here.
- For instructions on how to download image files, click here.
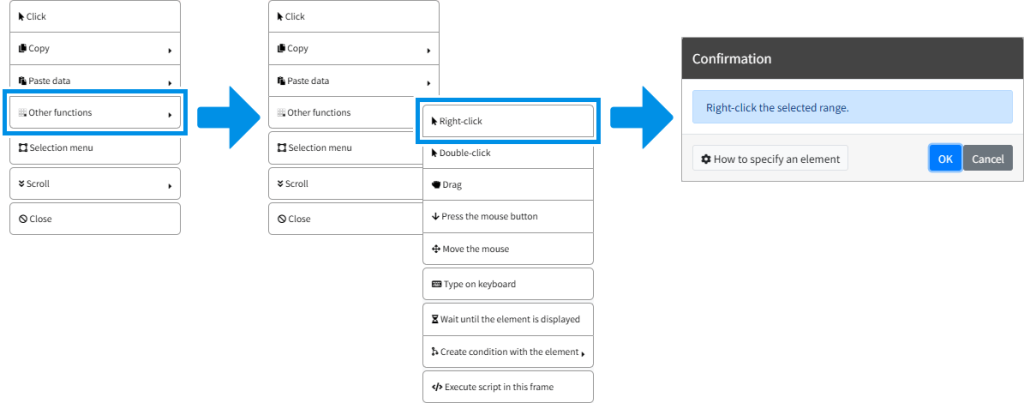
Right-click
Right-click an element.
- Click "Other functions" from the operation menu.
- Click "Right-click."
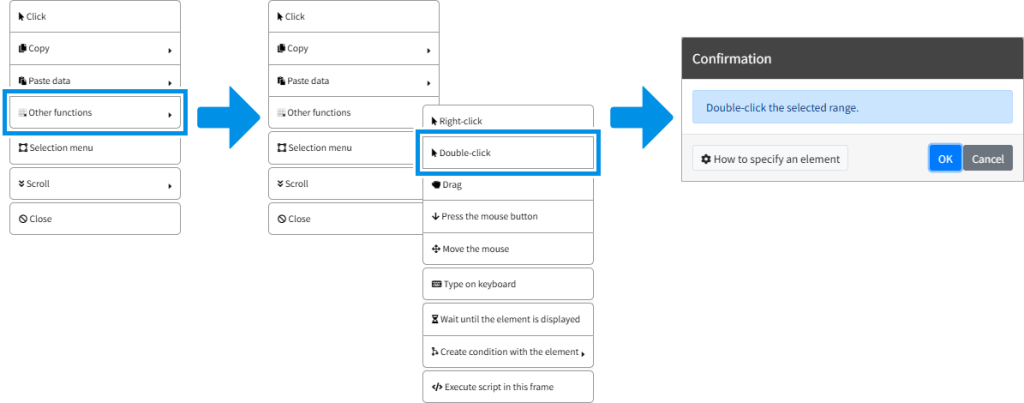
Double-click
Double-click an element.
1.Click "Other functions" from the operation menu.
2.Click "Double-click."
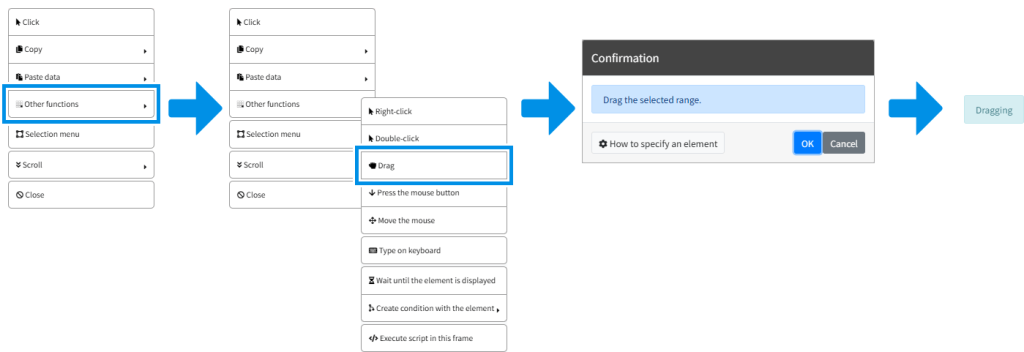
Drag / Drop
Drag / Drop on the element.
1.Click “Other functions” from the operation menu for the element you want to drag.
2.Click on “Drag.” It will enter a dragging state and continue until dropped.
*When a page transition occurs, the drop status is released.
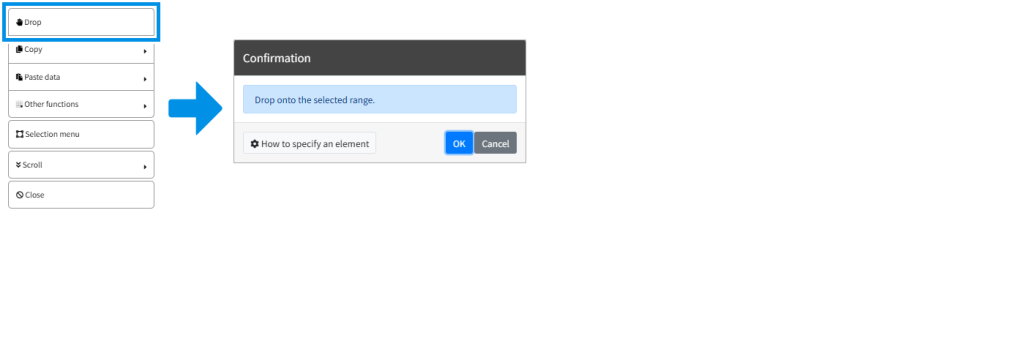
3.Click “Drop” from the operation menu for the element you want to drop.
The mouse cursor moves and the element is dropped.
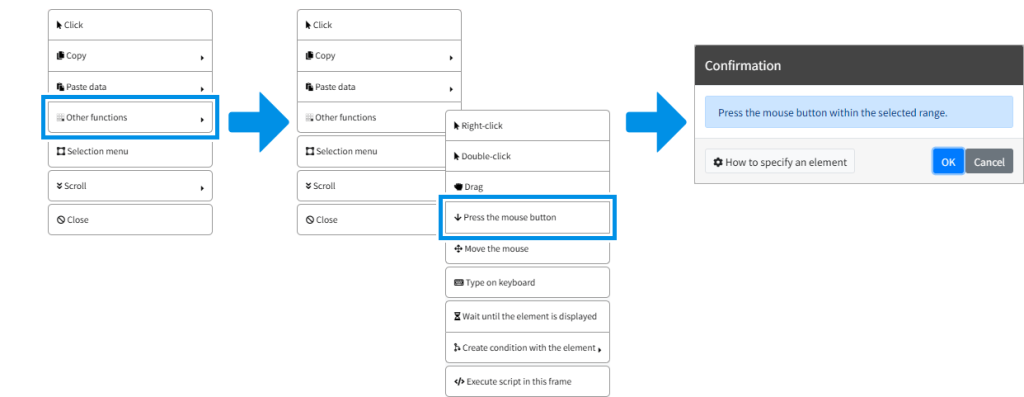
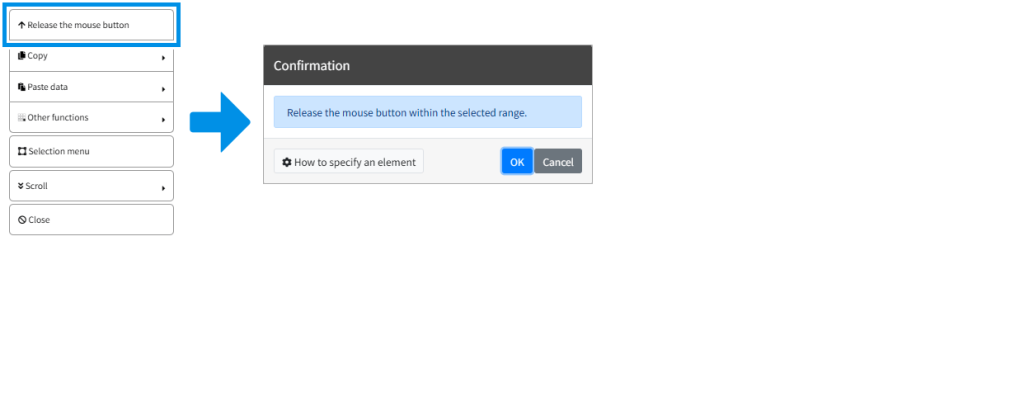
Press the mouse button / Release the mouse button
Press/release the mouse button on the element.
1.Click “Other Functions” from the operation menu for the element for which you want to press the mouse button.
2.Click on “Press the mouse button”. The mouse is held down and will continue until released.
*If a page transition occurs, the pressed state is released.
3.Click “Release the mouse button” from the operation menu at the location where you want to release the mouse button.
The mouse cursor moves and the mouse button is released.
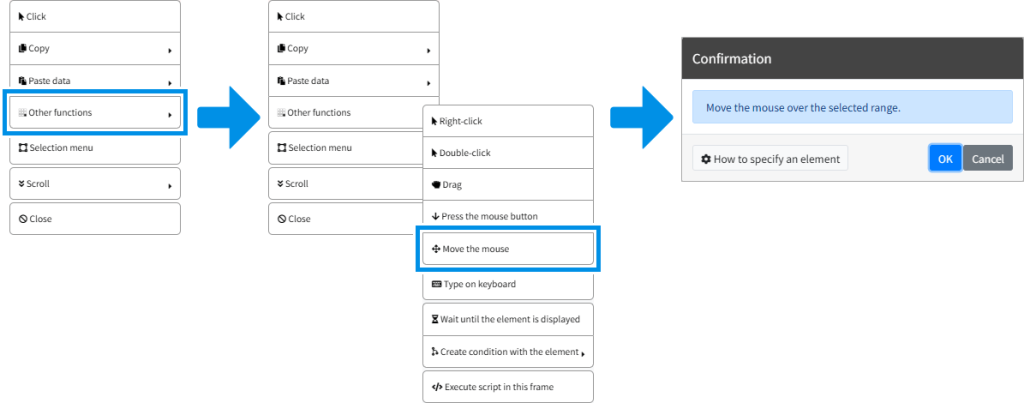
Move the mouse
Moves the mouse cursor over an element.
Used for mouse-over, for example.
1.Click “Other Functions” from the operation menu.
2.Click “Move the mouse.”
*After moving the mouse, 'Drag' and 'Press the mouse button' will be maintained.
Type on keyboard
Enter any key on the keyboard.
It is used when inputting shortcut keys, for example.
1.Click “Other Functions” from the operation menu.
2.Click “Type on keyboard.
3.Click “Focus here and type the key" and press the key from the keyboard.
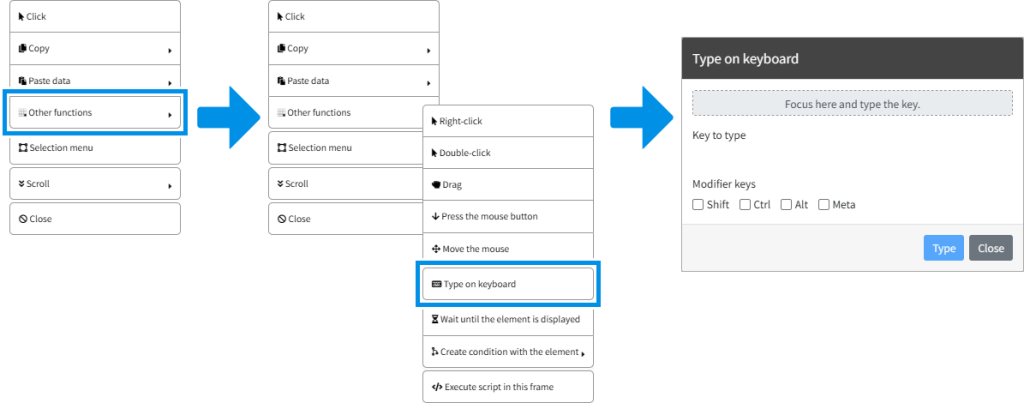
About Modifier keys
Modifier keys can be entered simultaneously.
*"Ctrl" refers to the Ctrl key in Windows and the control key in macOS.
*"Alt" refers to the Alt key in Windows and the option key in macOS.
*"Meta" refers to the windows key in Windows and the command key in macOS.
Wait until the element is displayed
Wait until the element is displayed.
This is used when there are images displayed after the page loads or buttons that are displayed later by JavaScript, and waiting until they are displayed is necessary.
- Click "Other functions" from the operation menu.
- Click "Wait until the element is displayed."
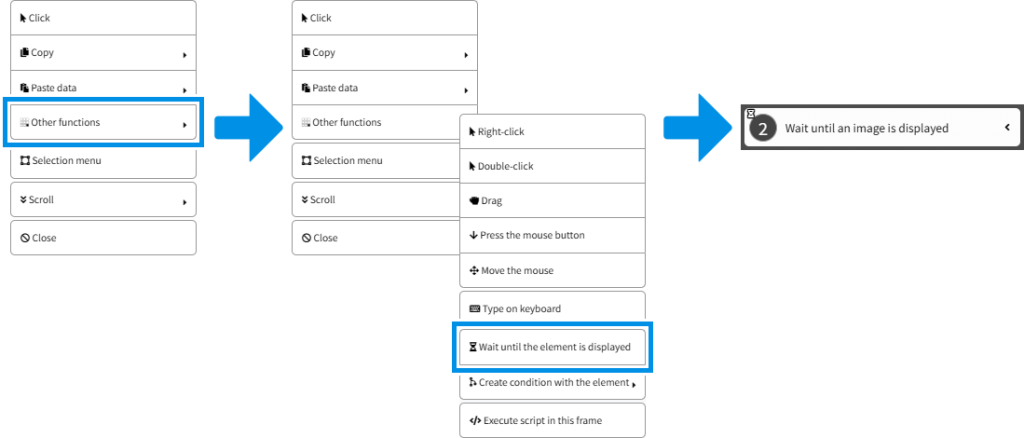
* The waiting time until the selected element is displayed can be adjusted with the "Timeout" setting. For more information about task timeouts, click here.
Create a condition with the element
Create a condition expression using the target element as a template.
Verify element existence
Verify the existence of the selected element.
- Click the element to verify its existence.
- Click "Other functions."
- Click "Create a condition with the element."
- Click "Verify element existence."
- Click "OK." A conditional branch for the existence of the element will be inserted into the tasks in the side menu.

Execute script in this frame
Execute Script on the frame where the selected element exists.
For more information, click here.
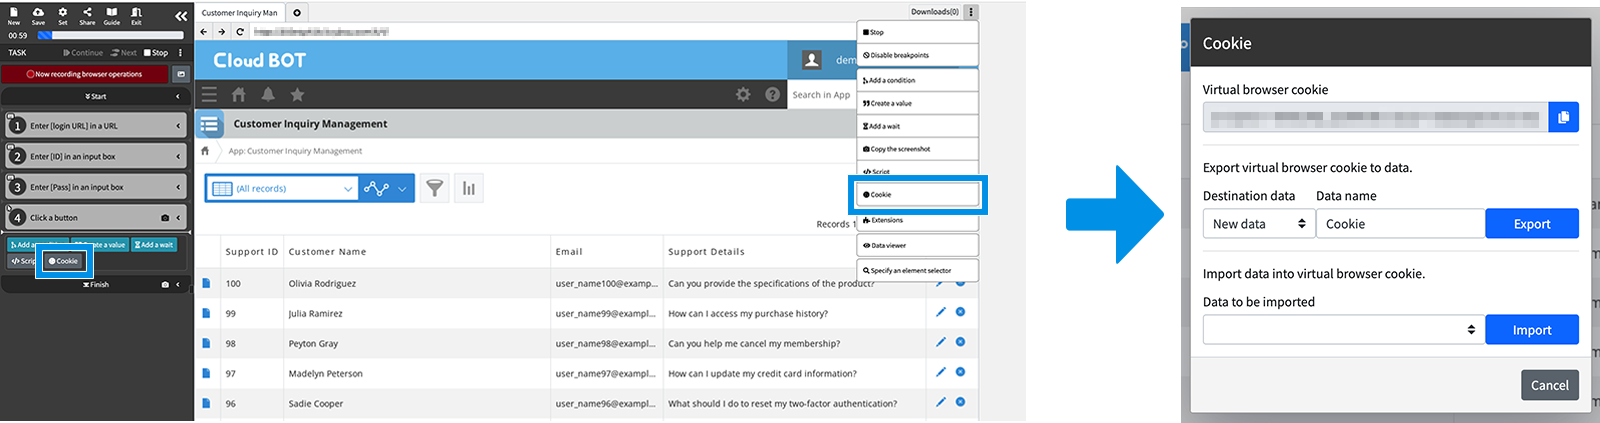
Export/Import cookie
Cookie from the virtual browser can be exported and imported. Exporting and importing can be recorded as tasks.
Additionally, cookie information can be checked and copied to the clipboard.
- Click the "Cookie" button in the side menu or click "Cookie" in the top-right corner of the screen to open the cookie modal window.
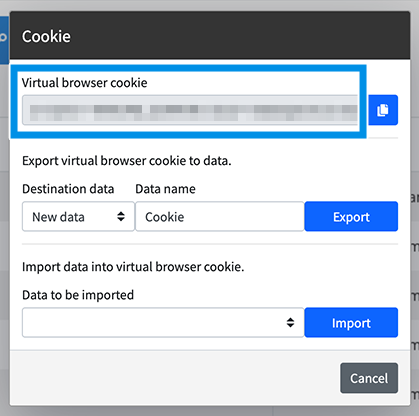
About cookie information
Checking cookie information
Cookie information of the virtual browser can be checked.
* Cookie is displayed as data in JSON format.
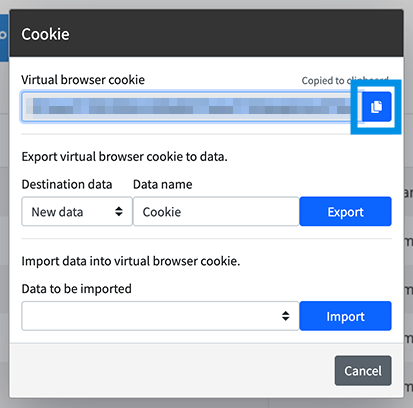
Copying cookie
Cookie from the virtual browser can be copied to the clipboard.
- Click the copy icon to copy the cookie values.
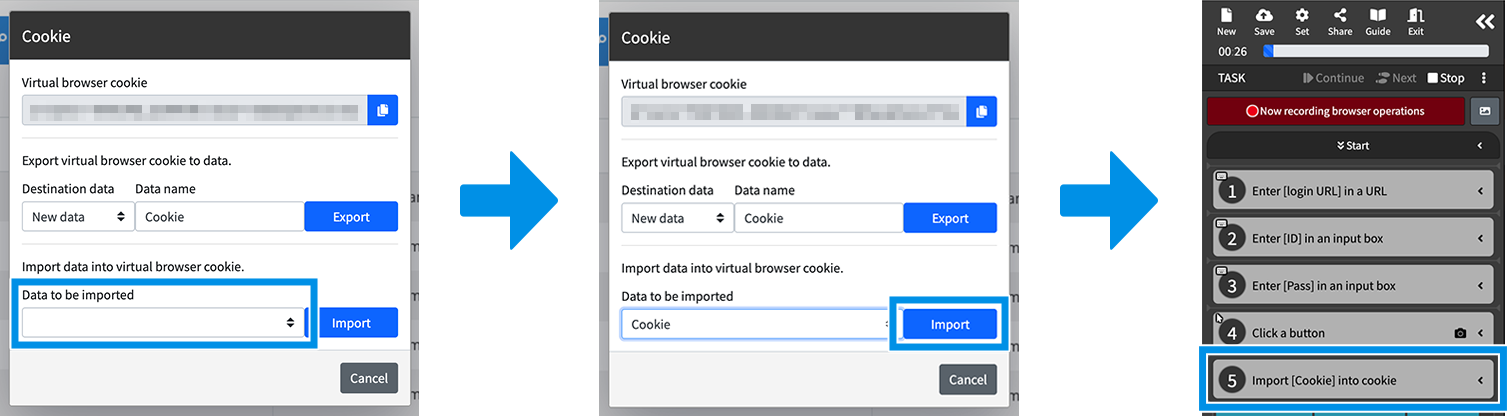
Exporting cookie
Export the currently displayed virtual browser cookie and store it as data.
- Select "Destination data".
* Choose either "New data" or the name of the destination data. - Click the "Export" button. The task of exporting the cookie will be added.

Importing cookie
Import JSON data stored in the data as a cookie.
* If the imported cookie is not valid JSON data, an error will occur.
- Select the data name from "Data to be imported".
- Click the "Import" button. The task of importing the cookie will be added.