Take a screenshot

Home > User guide > BOT > How to use the BOT editor > Take a screenshot
Take a picture of the selected range and copy it to the data value
Select an element in the page. Click the mouse again during selection to display the operation menu. Select "Copy" from the operation menu. Continue to select "Copy Screenshot".
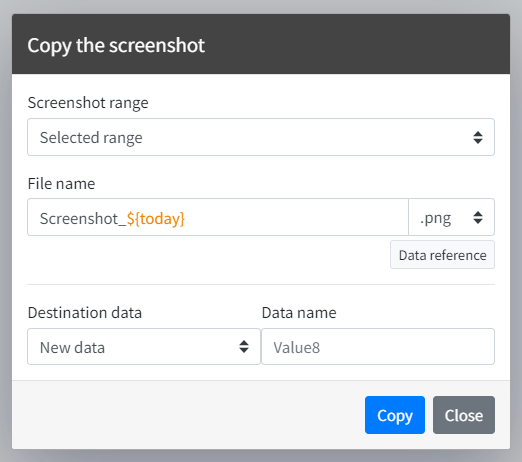
Select "Selected Range" for the range of the screenshot, enter a file name and data name, and click "Copy".
File Format for Data Copy
Screenshots can be copied in png or jpg format.
Only when selecting jpg, you can select the image quality.
When using the macOS version of Cloud BOT Gateway, jpg quality tends to be sharper than in other environments.
Specifying file names when copying data
References to data in the BOT
The value stored as data in BOT can be referenced by using $ {data name}.
You can browse the data and insert it into the Script from the Data reference button.
Take a picture of the displayed range and copy it to the data value.
Select "Copy Screenshot" from the menu in the upper right corner of the BOT editor screen. Select "the displayed range" for the screenshot range, enter a file name and data name, and click "Copy".
The image is taken for the area displayed in the virtual browser at the completion of the execution of the task immediately before.
*For information on specifying file formats and file names when copying data, please click here.
Take a picture of the entire page and copy it to the data value
Select "Copy Screenshot" from the menu in the upper right corner of the BOT editor screen. Select "Entire page" as the range for the screenshot, enter a file name and data name, and click "Copy.
*For details on specifying the file format and file name when copying data, please click here.