How to use

Home > Connect > kintone > How to use
Japanese may be displayed on some pages.
- 1. Add the Cloud BOT Connector to an app
- 2. Plug-in settings
- 2.1. Connection settings
- 2.2. Run settings
- 2.3. 詳細画面の設定
- 2.4. 一覧画面の設定
- 2.5. BOT input values settings
- 2.6. BOT output value storage destination setting
- 2.7. Input another API Token
- 2.8. Save / Update plug-in settings
- 3. How to run the connected BOT
- 4. Generate the API Token
- 5. Register the webhook
- 6. Supplementary note
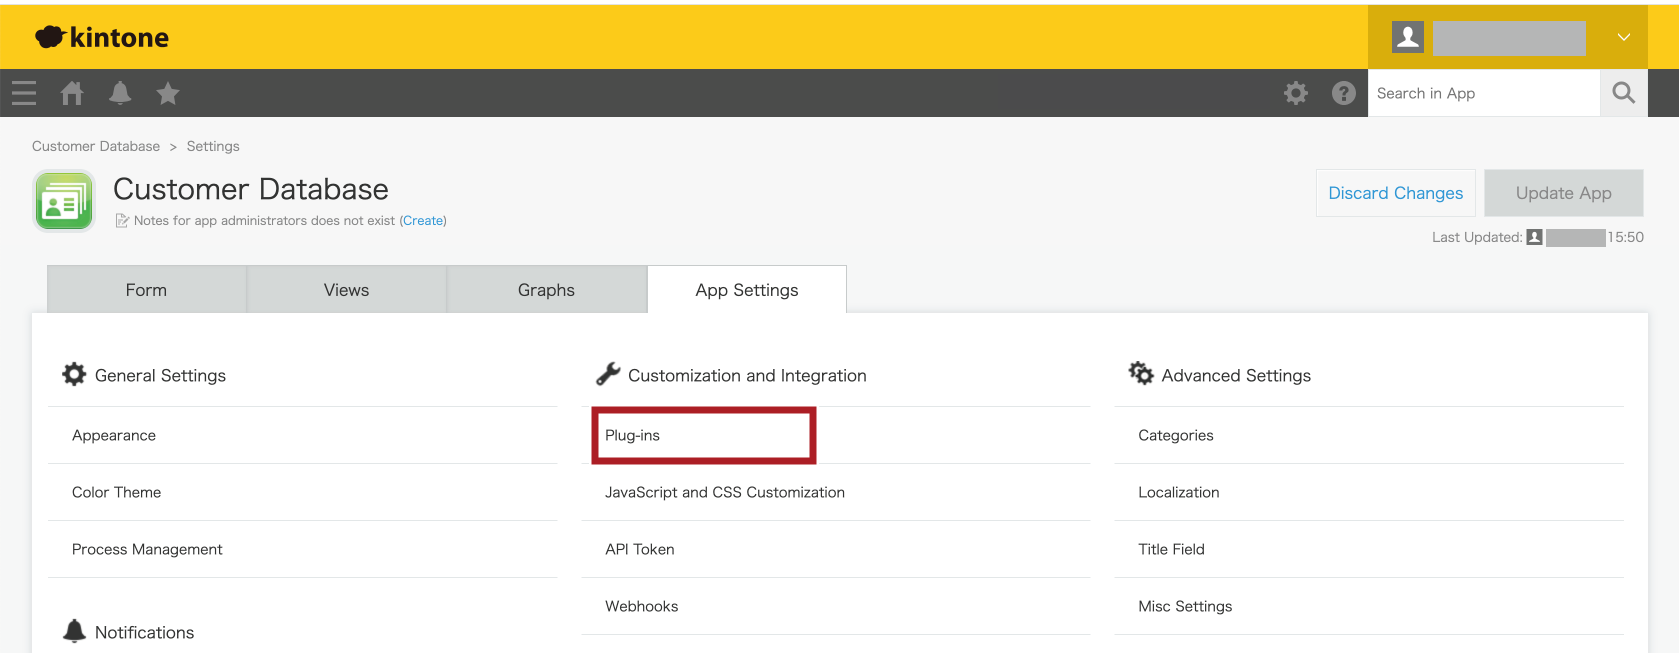
Add the Cloud BOT Connector to an app
1. Select "Plug-ins" from the App Settings screen.
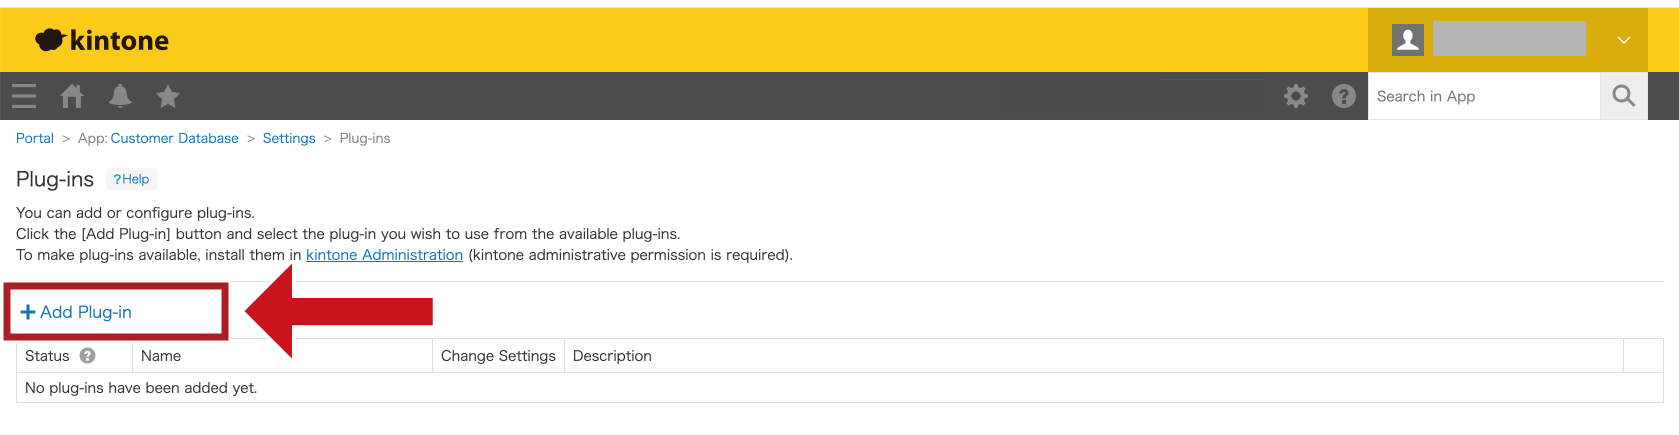
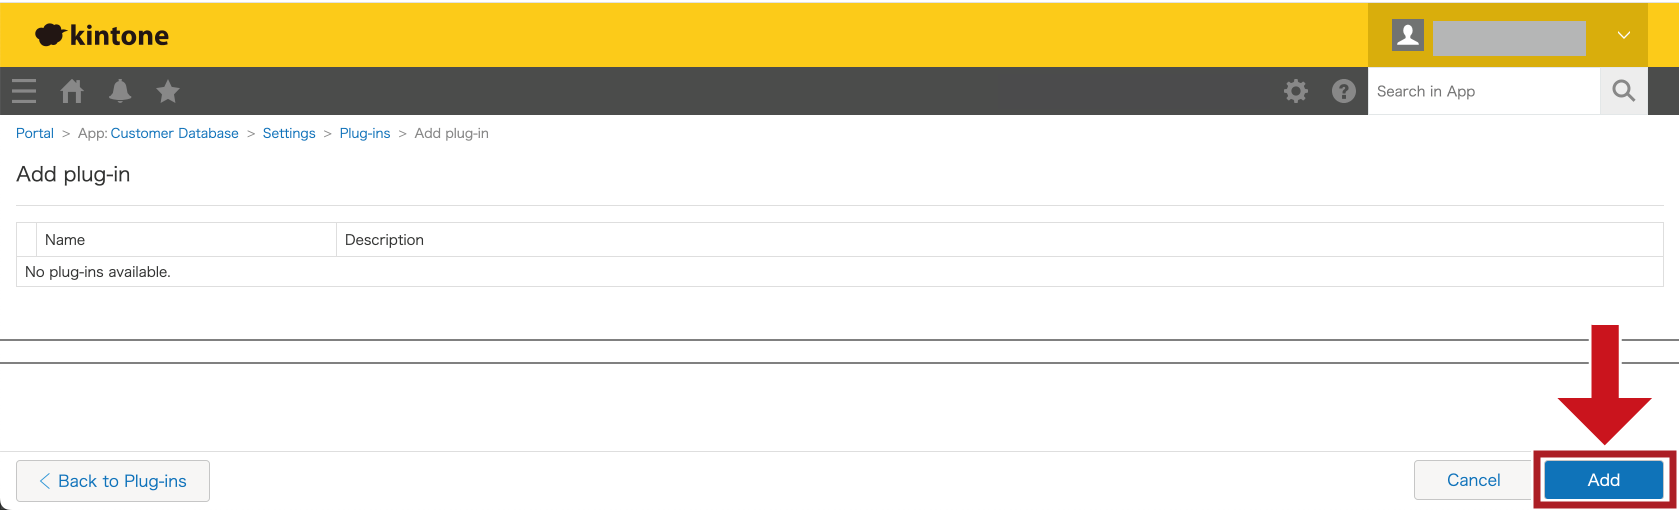
2. Click "Add Plug-in", select the check box next to the Cloud BOT Connector, then click the "Add" button.
Plug-in settings
Connection settings
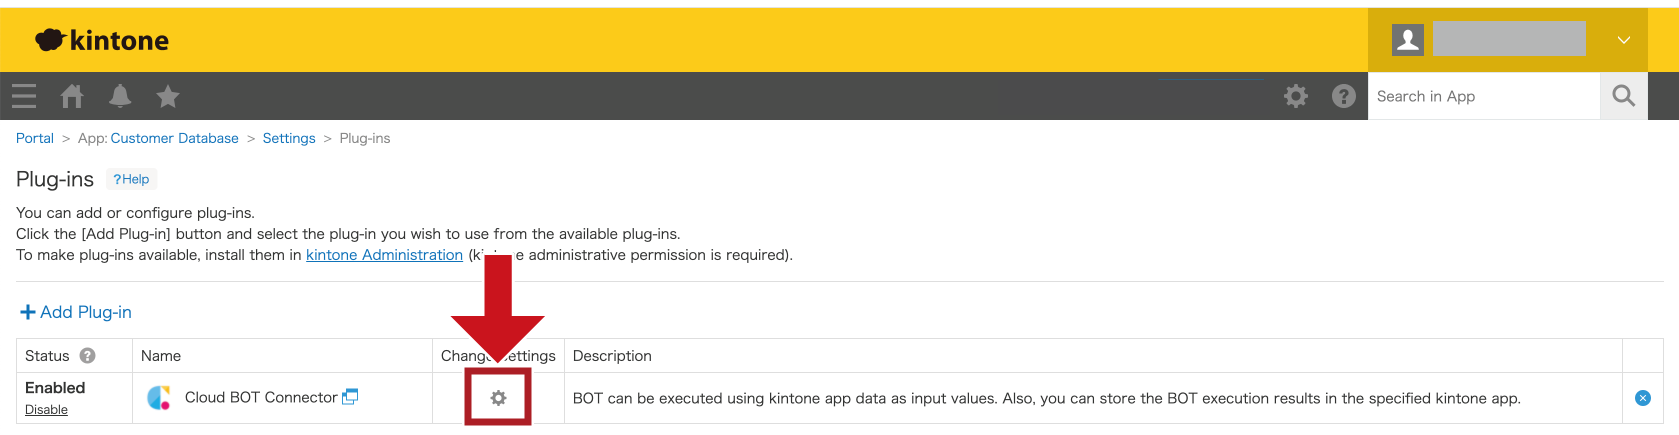
In order to use the Cloud BOT Connector, Cloud BOT account connection must be configured.
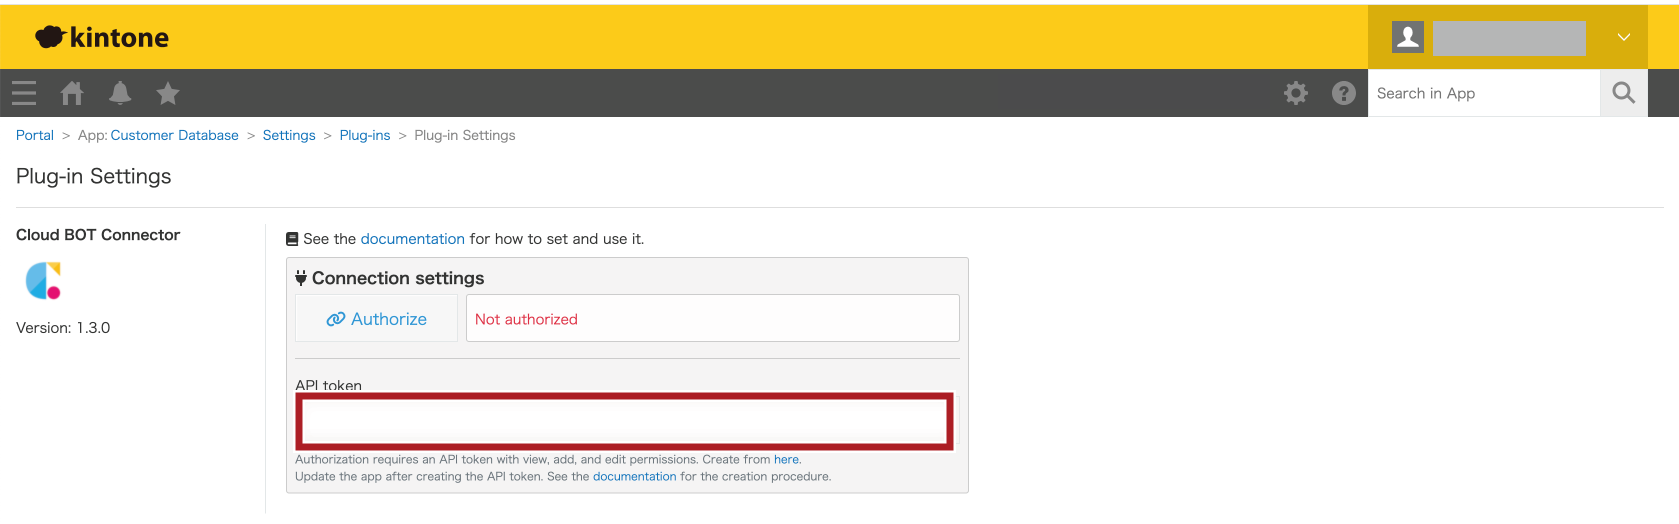
1. Click the cog mark (settings) for the Cloud BOT Connector.
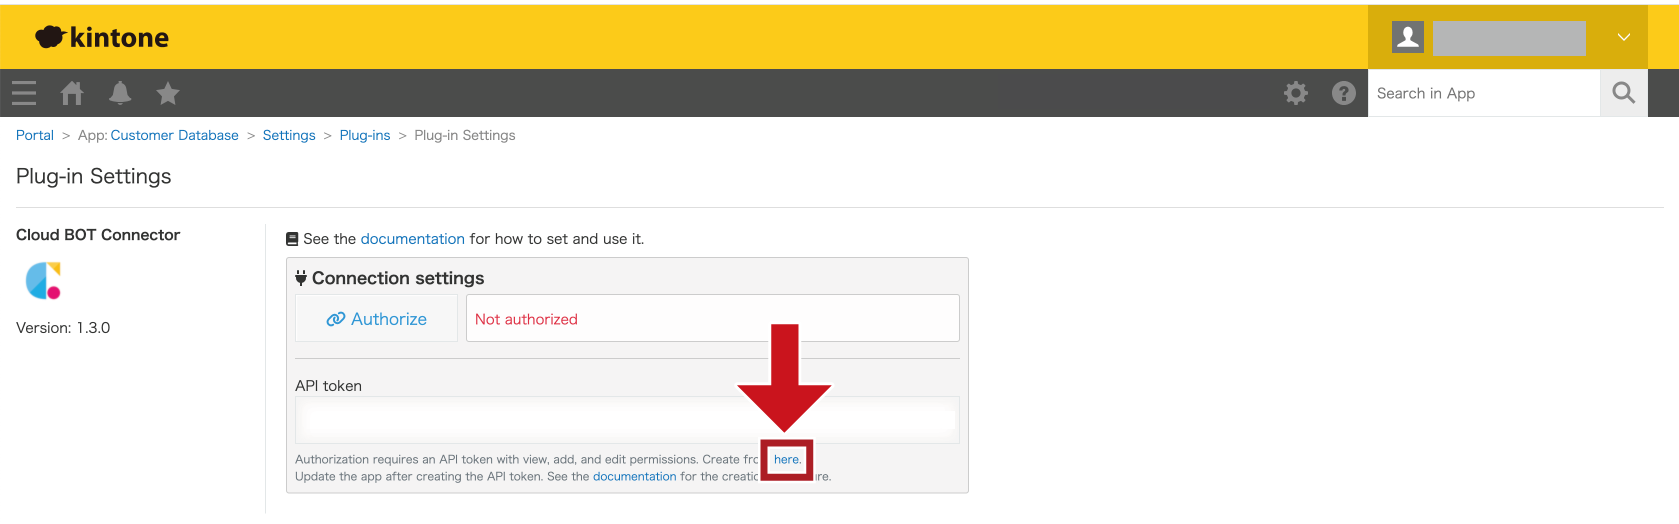
2. Generate and paste the API Token to the "API Token" field on the setting.
>> Click here about how to generate the API Token.
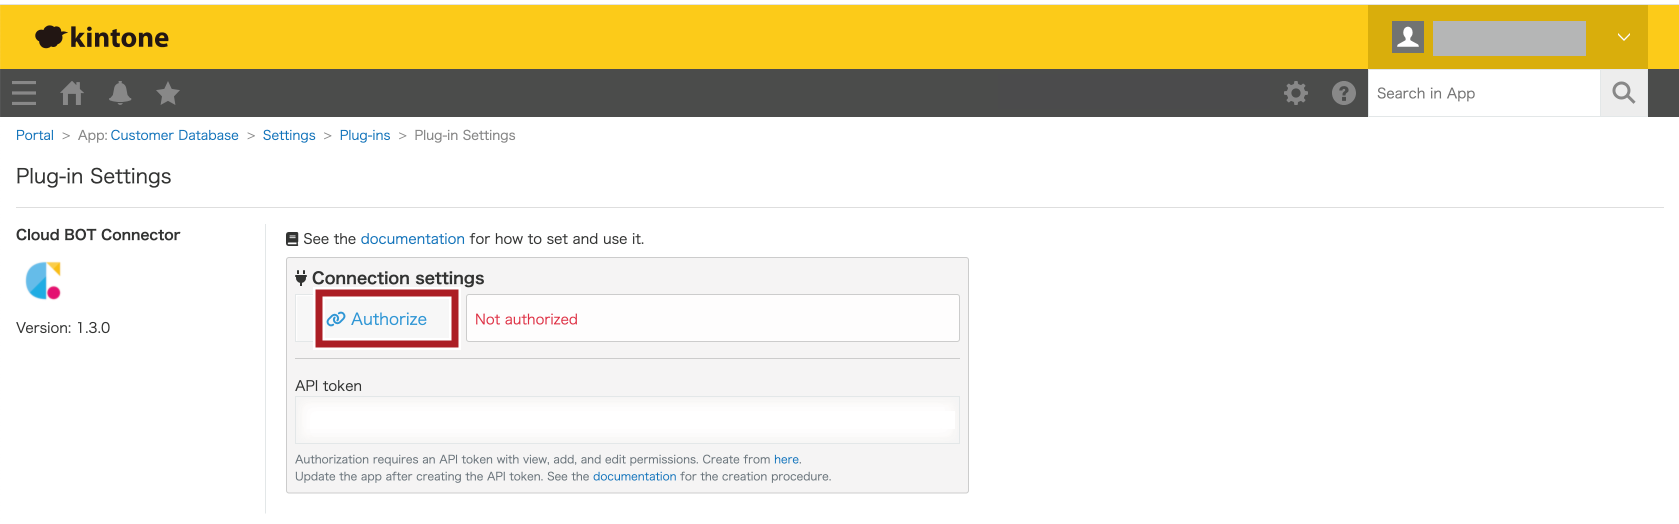
3. Click the "Authorize" button.
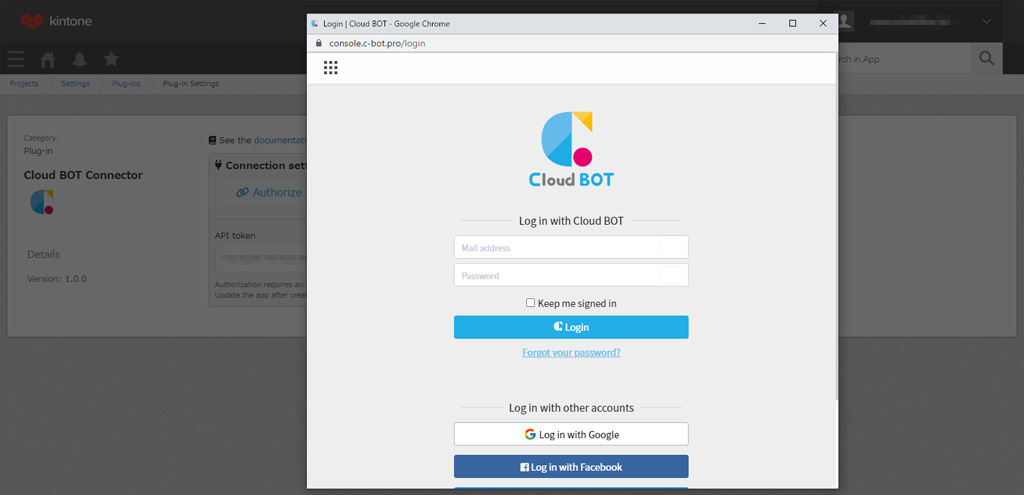
4. Log in to Cloud BOT with an account to connect.
Logging into Cloud BOT automatically connects the account.
When the status changes from "Not authorized" to "Authorized", the process is complete.
Run settings
Configure the BOT’s run settings.
* Set the run settings for multiple BOTs by clicking "+ Add bot settings" to add the settings.
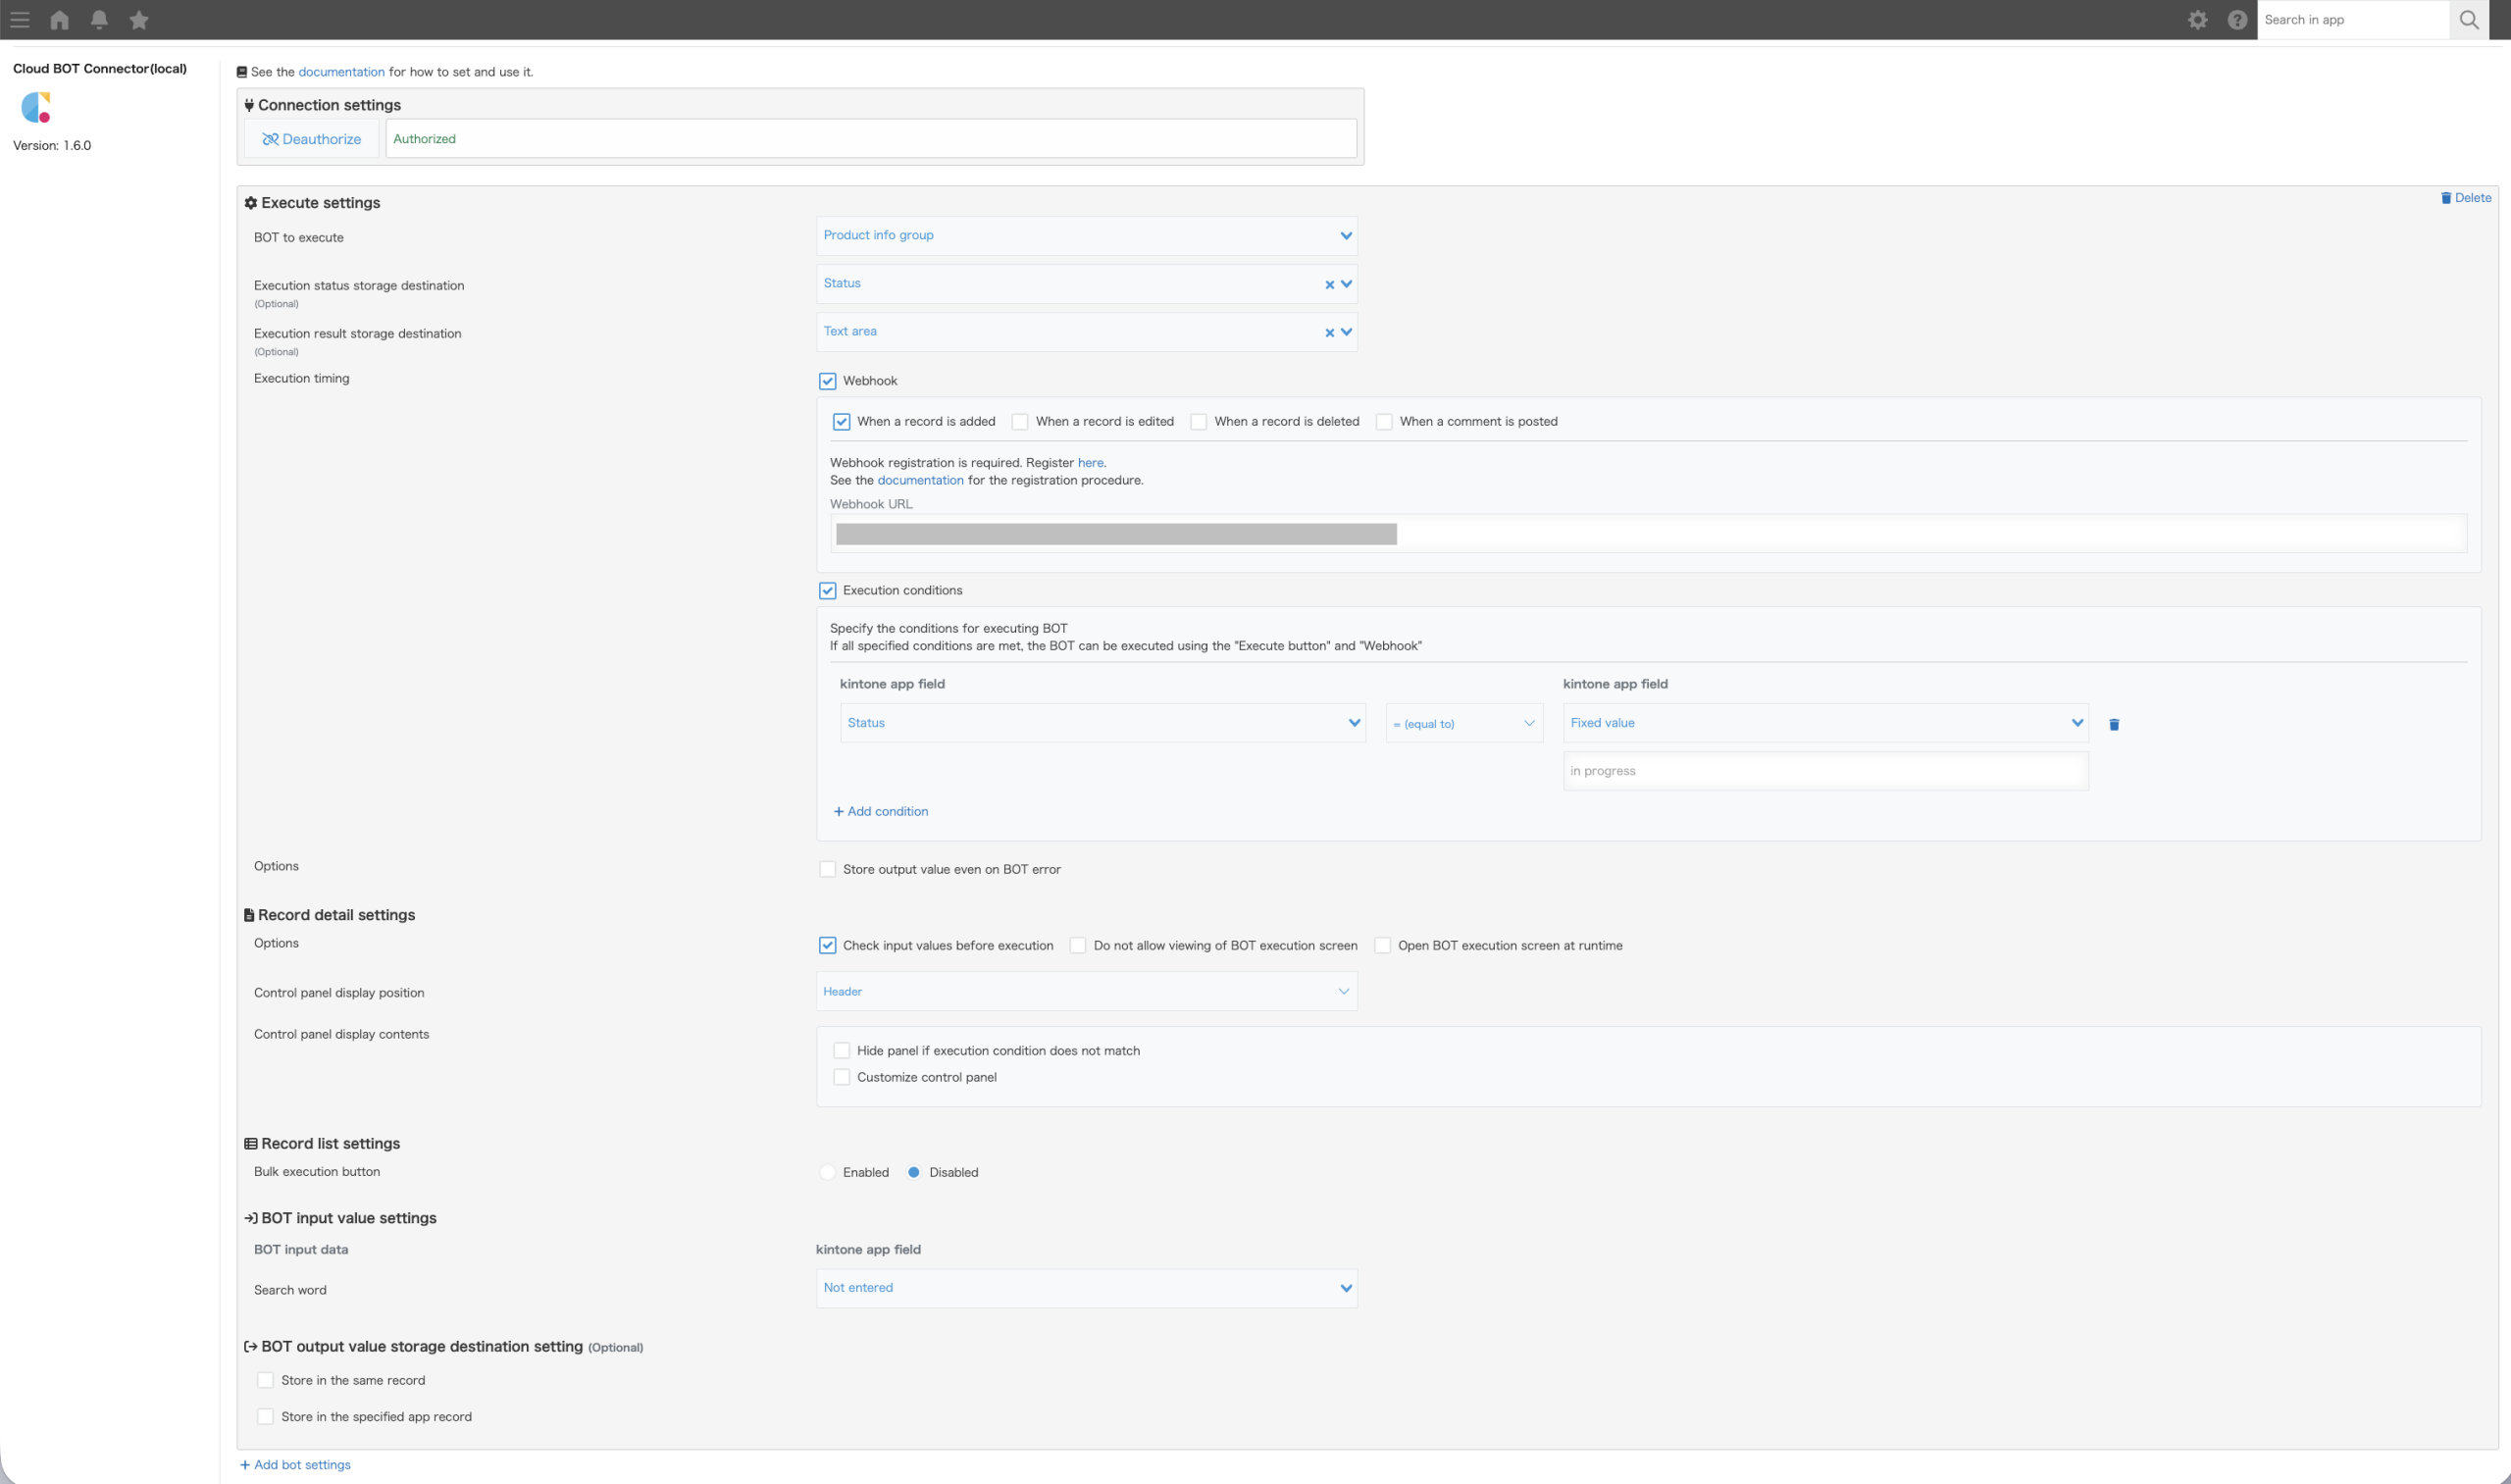
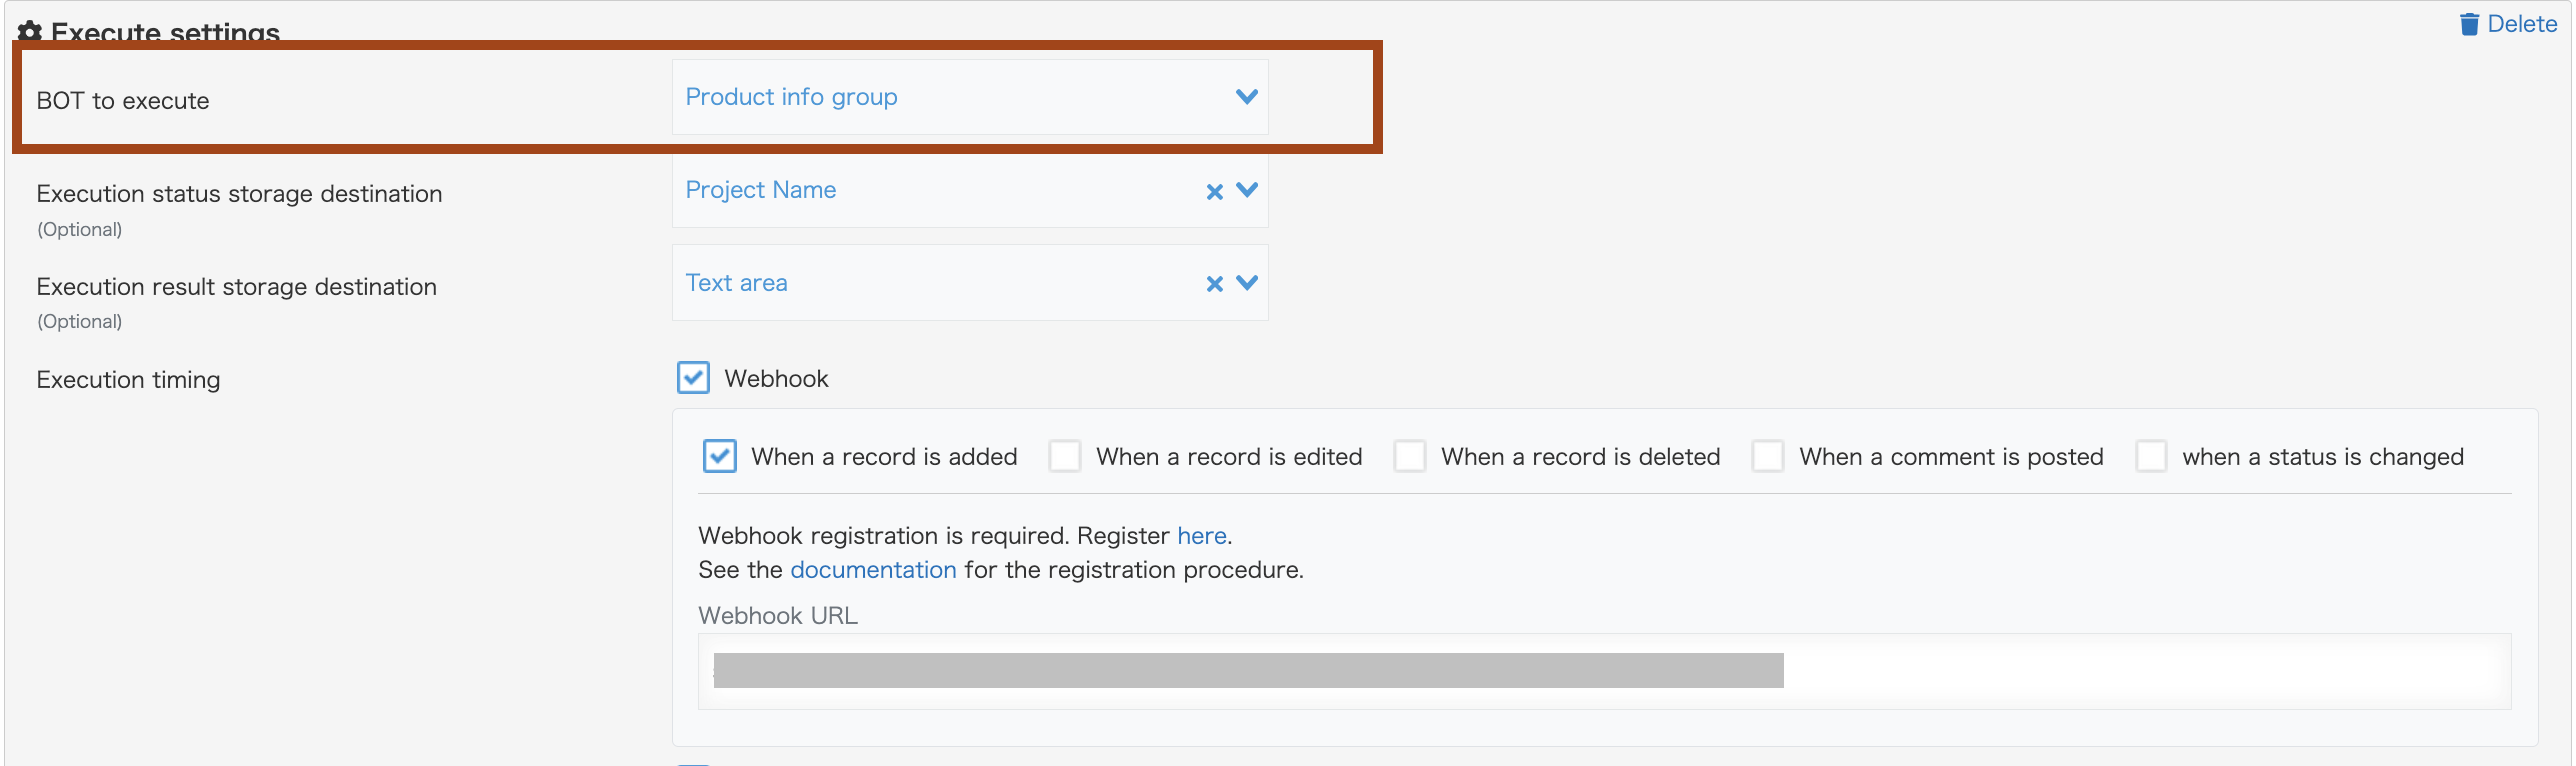
BOT to execute
Select the BOT to execute.
*It is necessary to publish the API of the target BOT on the Cloud BOT service.
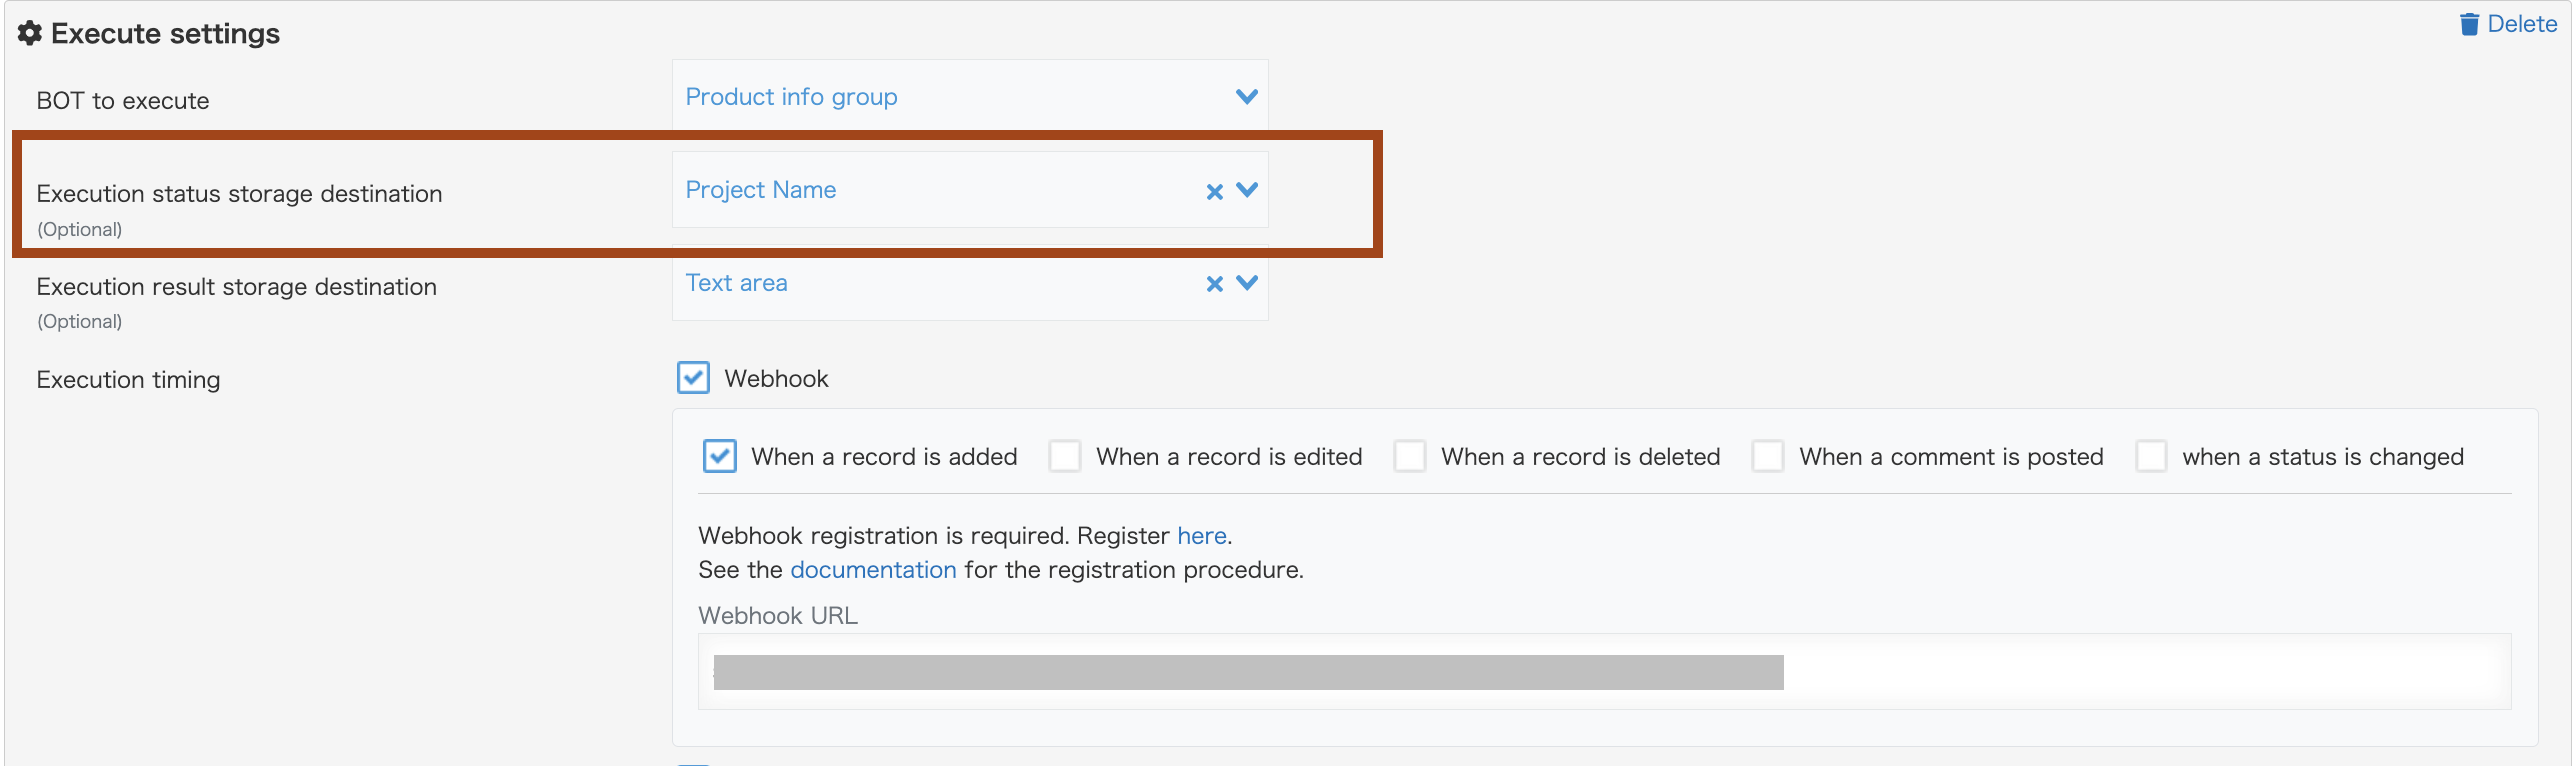
Execution status storage destination
Select the destination to store the BOT’s execution status. The execution status is visible on the record screen.
Select only a Text field.
>>For information about status, click here.
* Not selecting this item means the BOT’s execution status will not be visible (but the BOT can still be run).
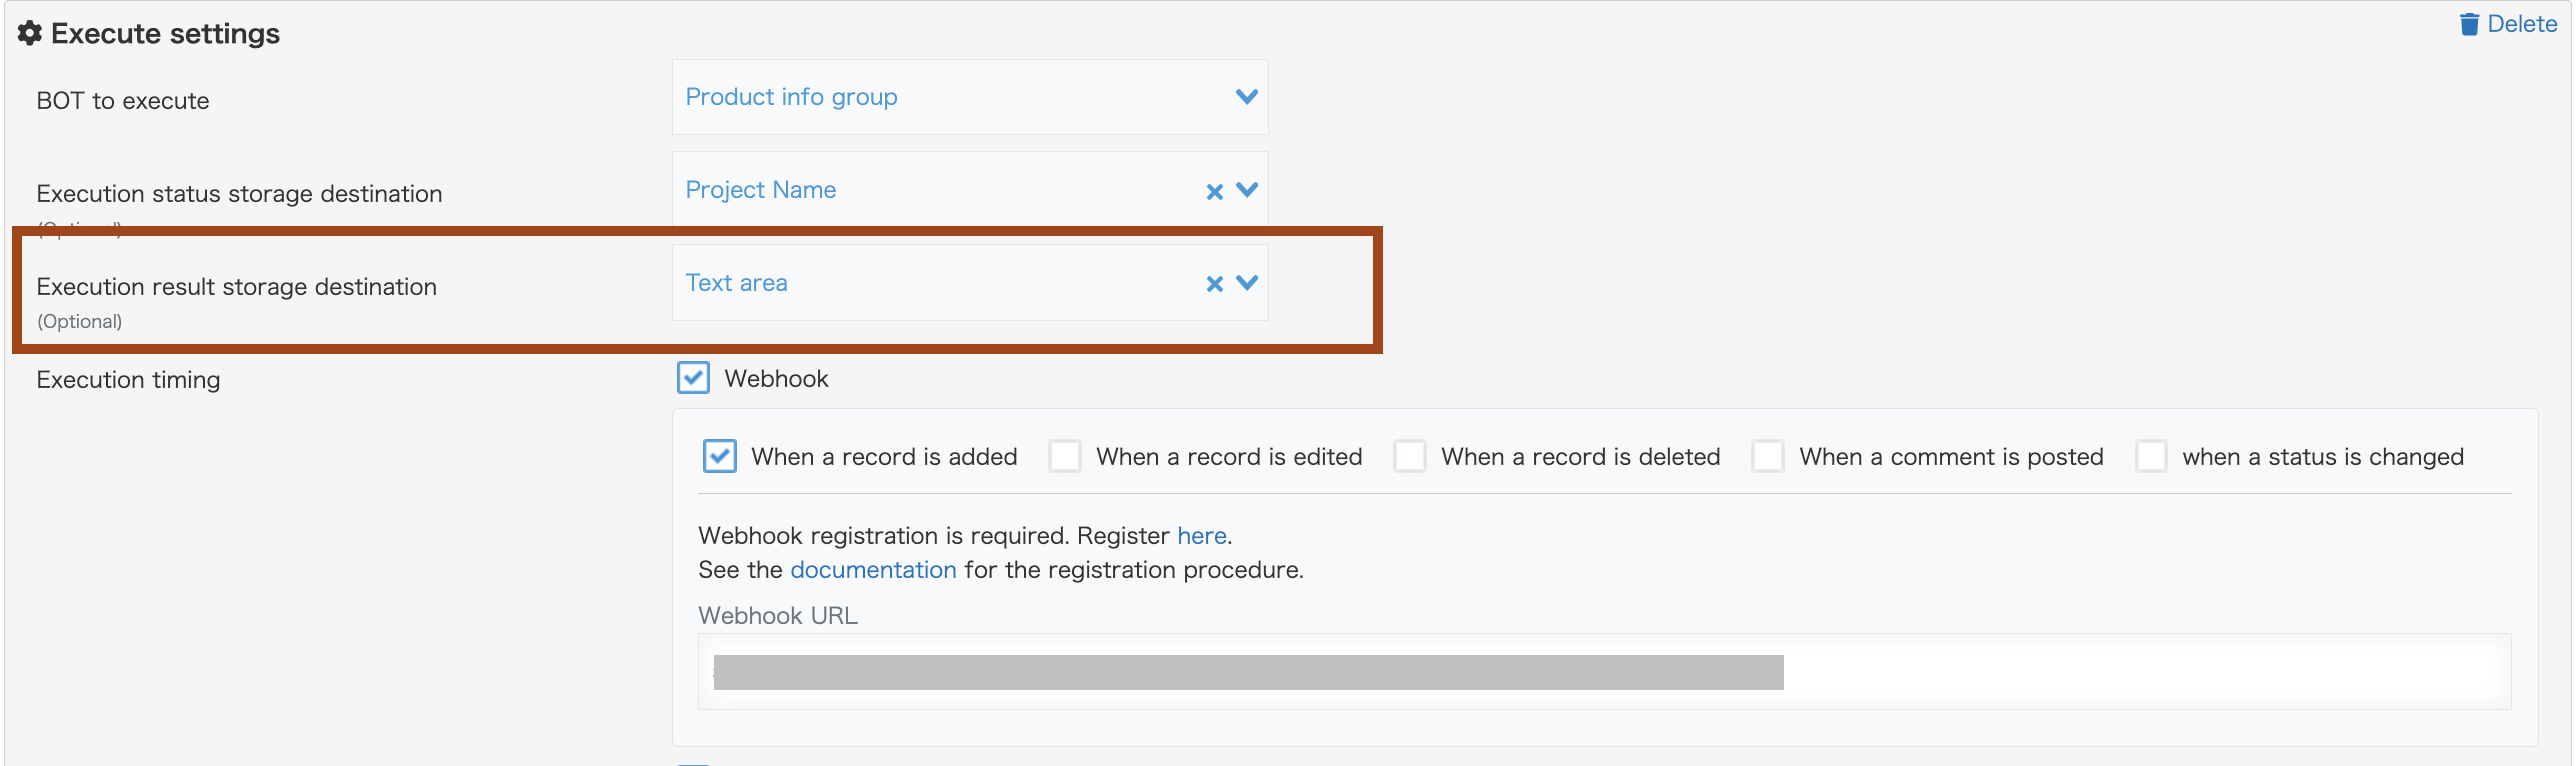
Destination for storing execution results
Outputs the results of the BOT execution and the log of data stored in the records of the kintone application to the specified fields.
The only field that can be selected is the Text field.
>>For more information about the output format of the execution results, click here.
* If not selected, no log is output.
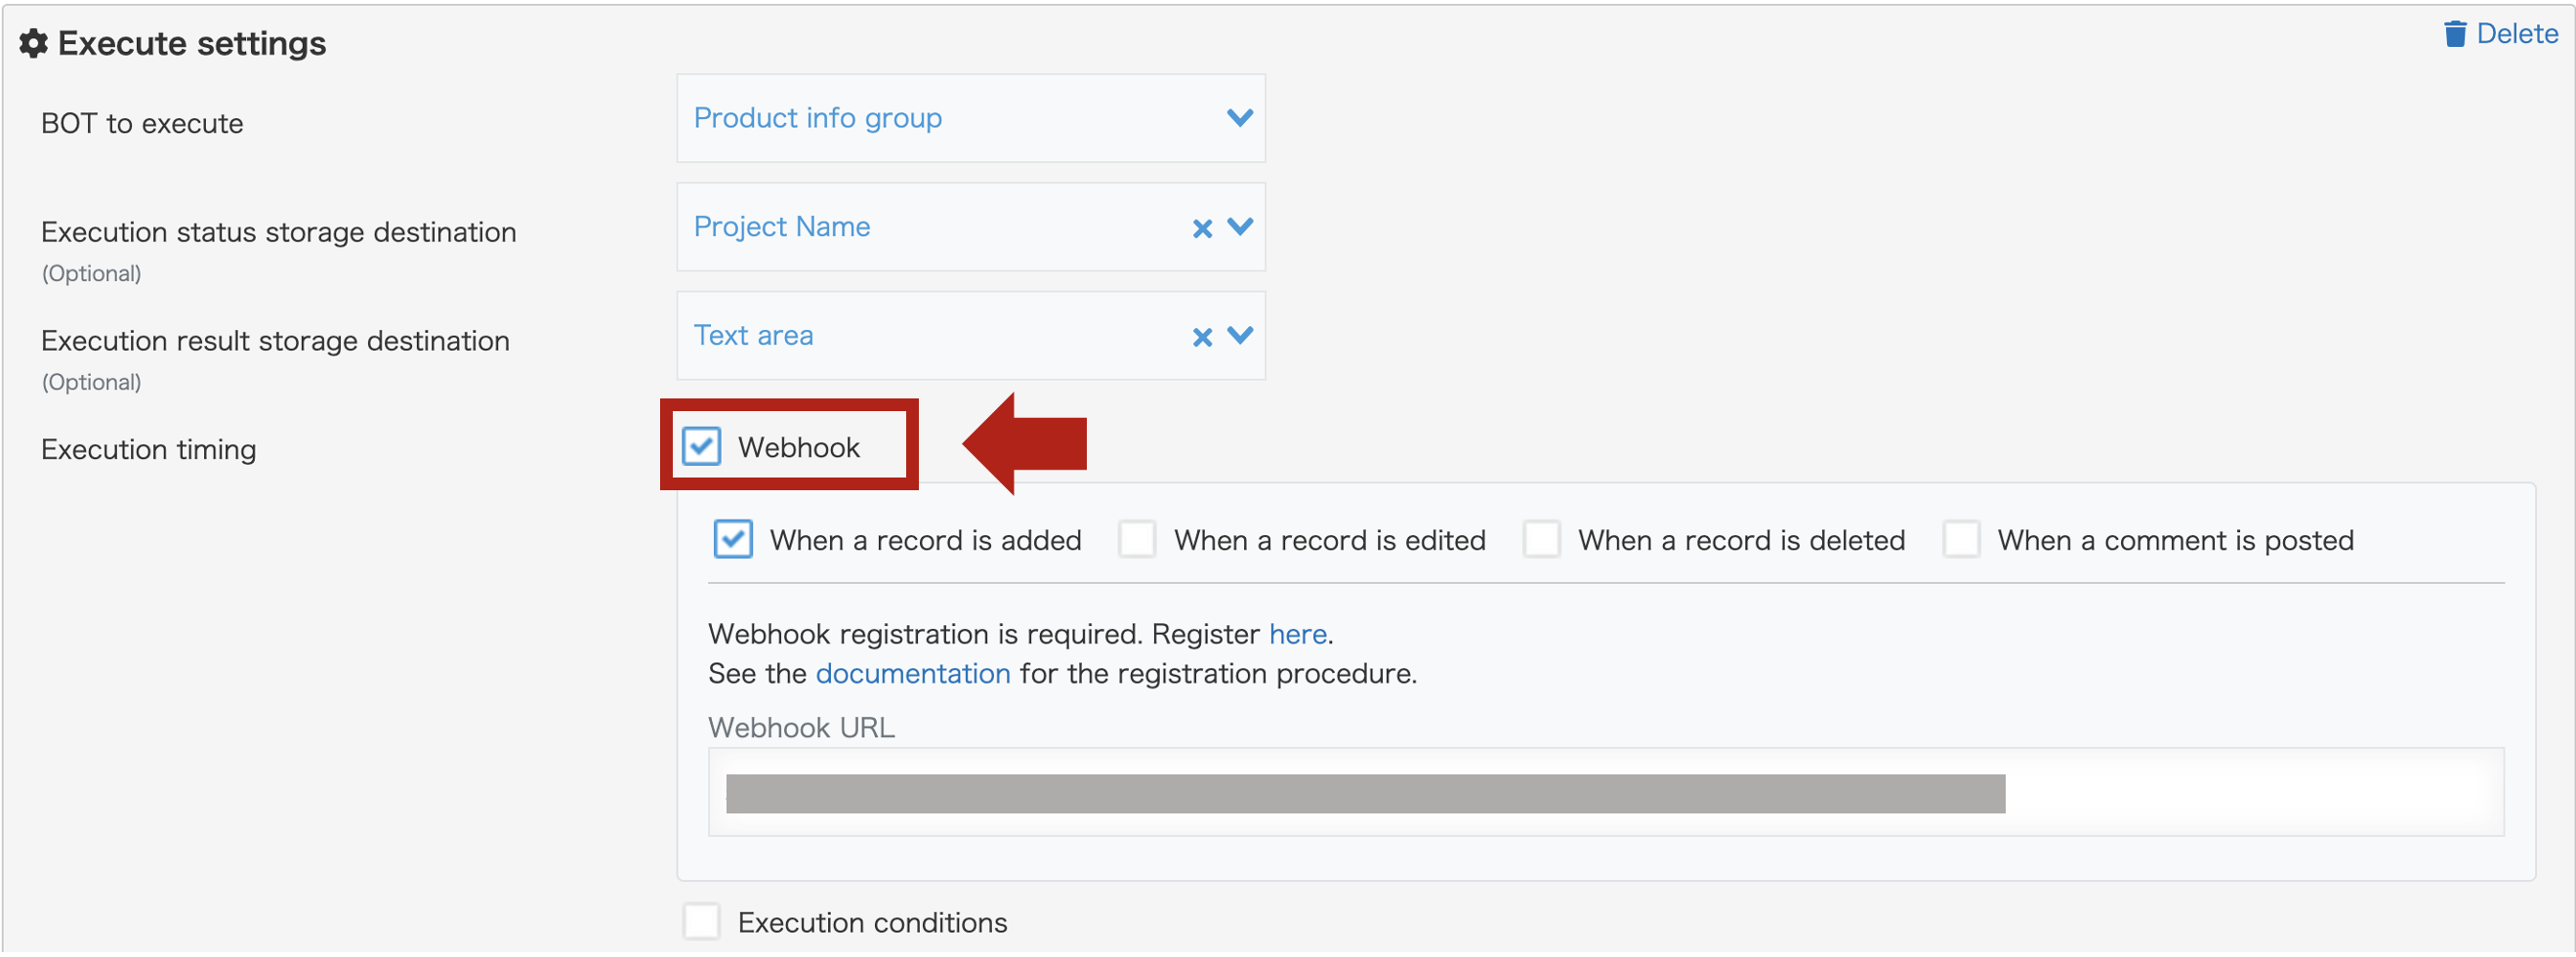
Execution timing
Select the timing to run the BOT.
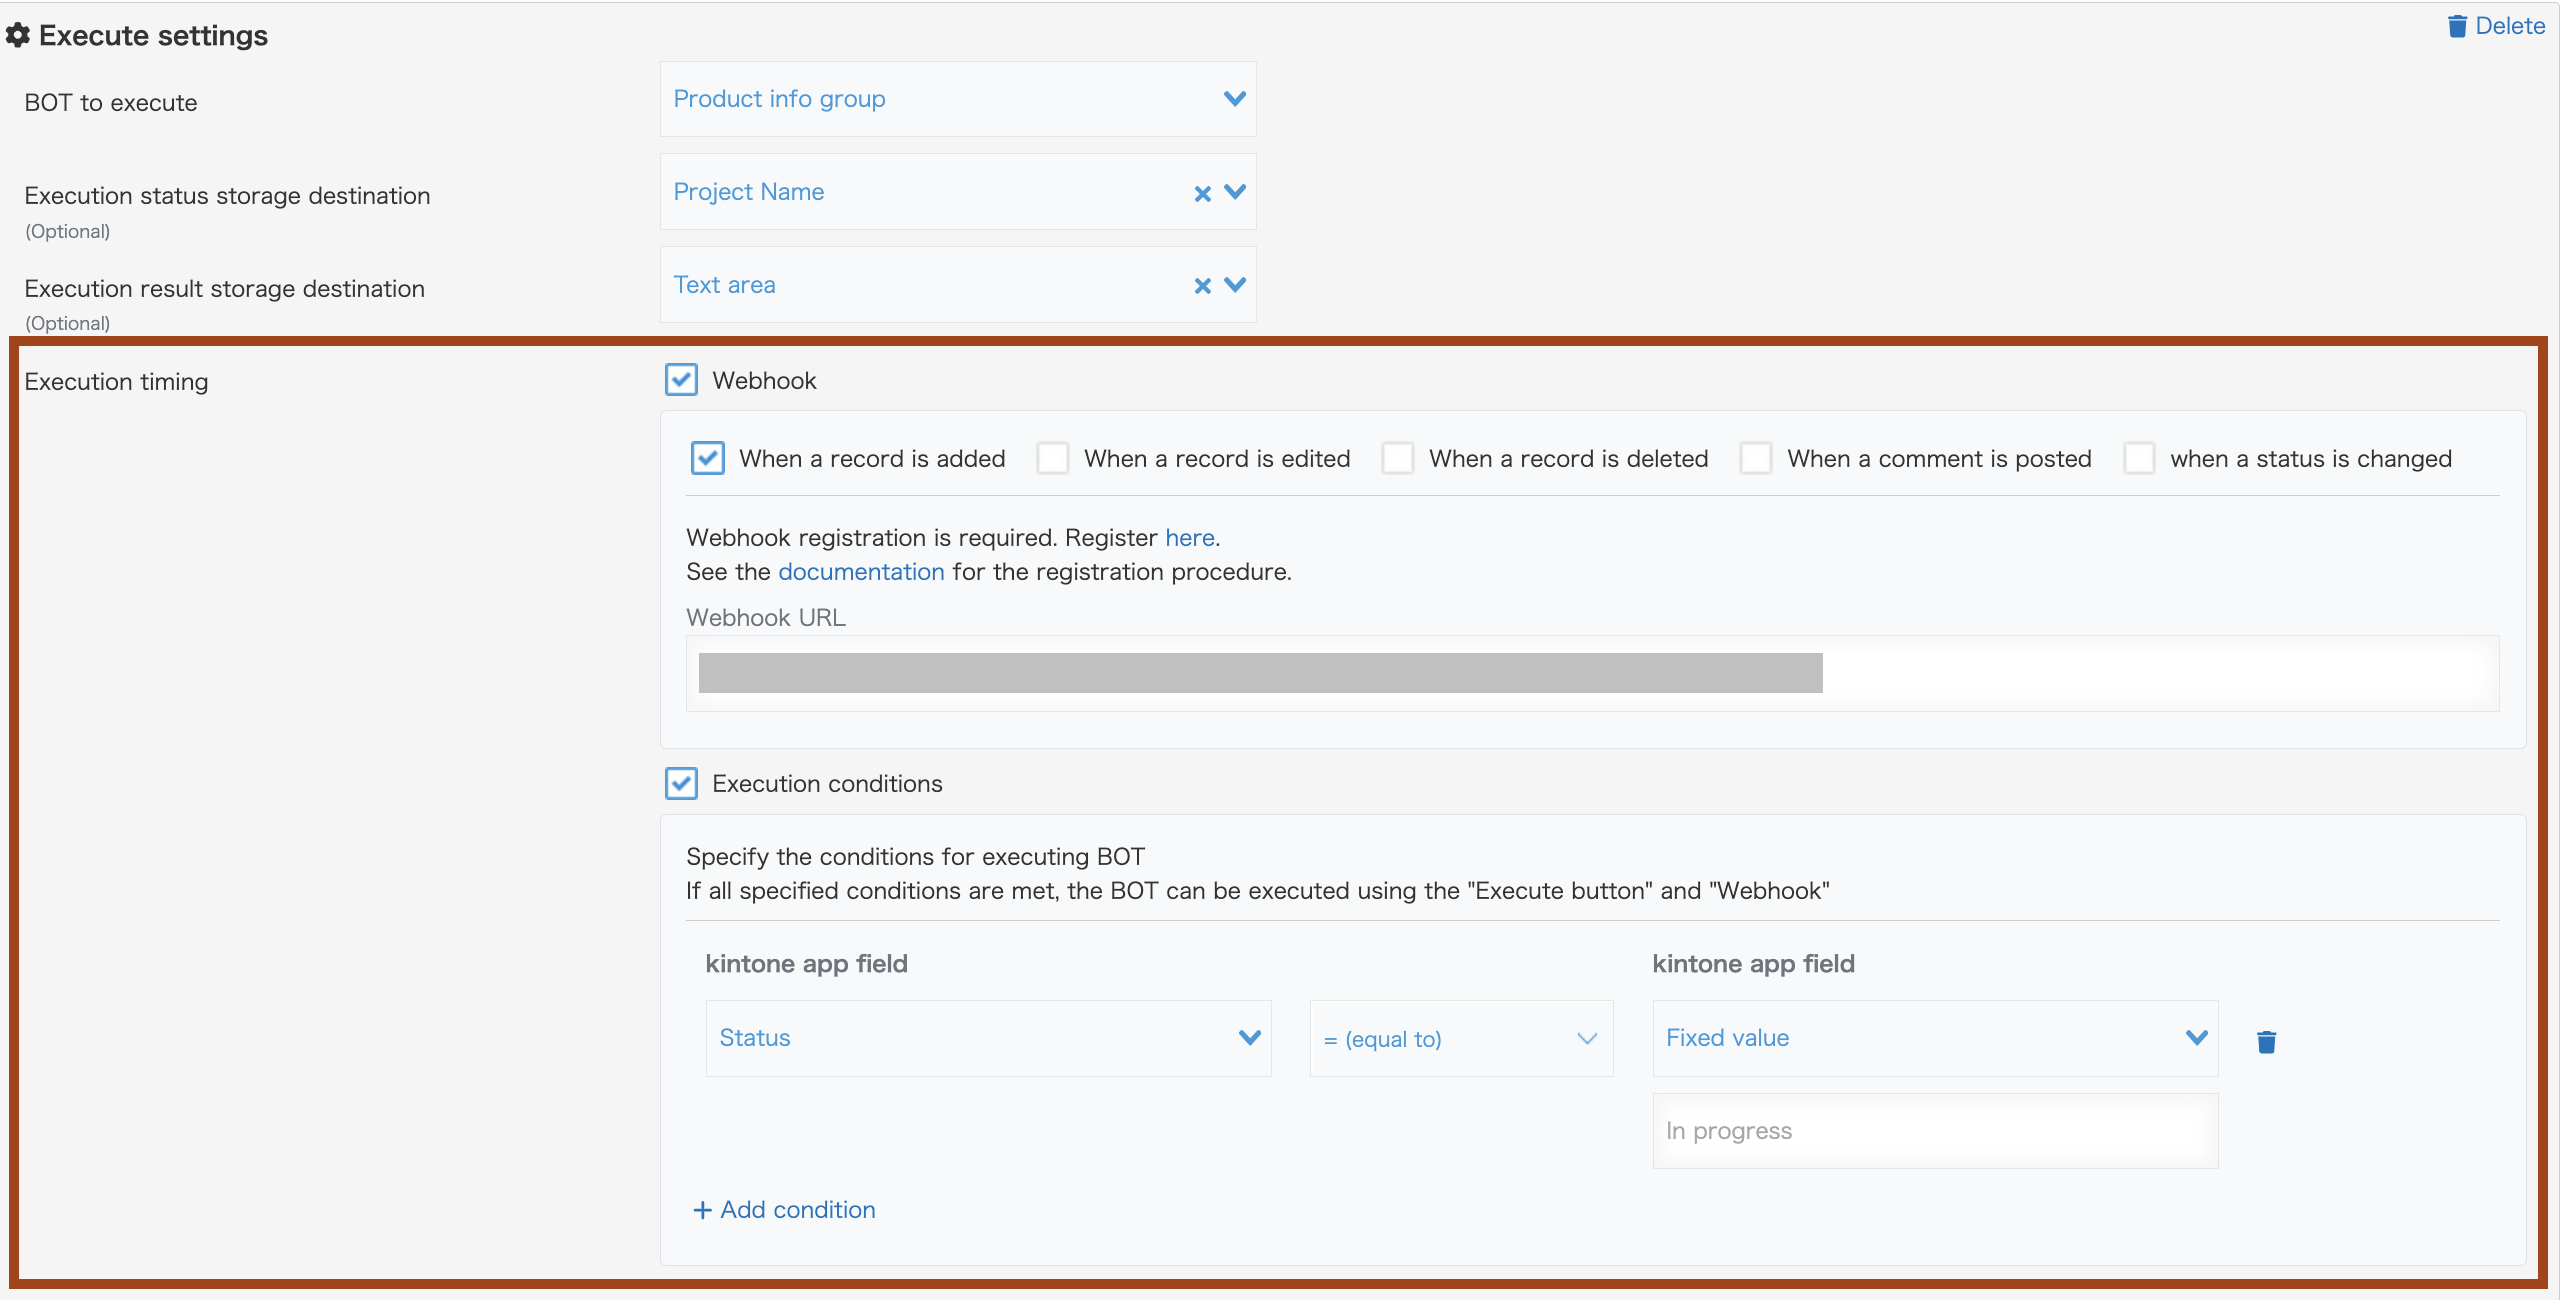
- Webhook
Execute BOT under certain conditions.
Following conditions are available:
- When a record is added
- When a record is edited
- When a record is deleted
- When a comment is posted
- When a status is updated*
* Enable "process management" in the app settings.
Webhook registration is required to set these conditions.
>> For information on registering a webhook, click here.
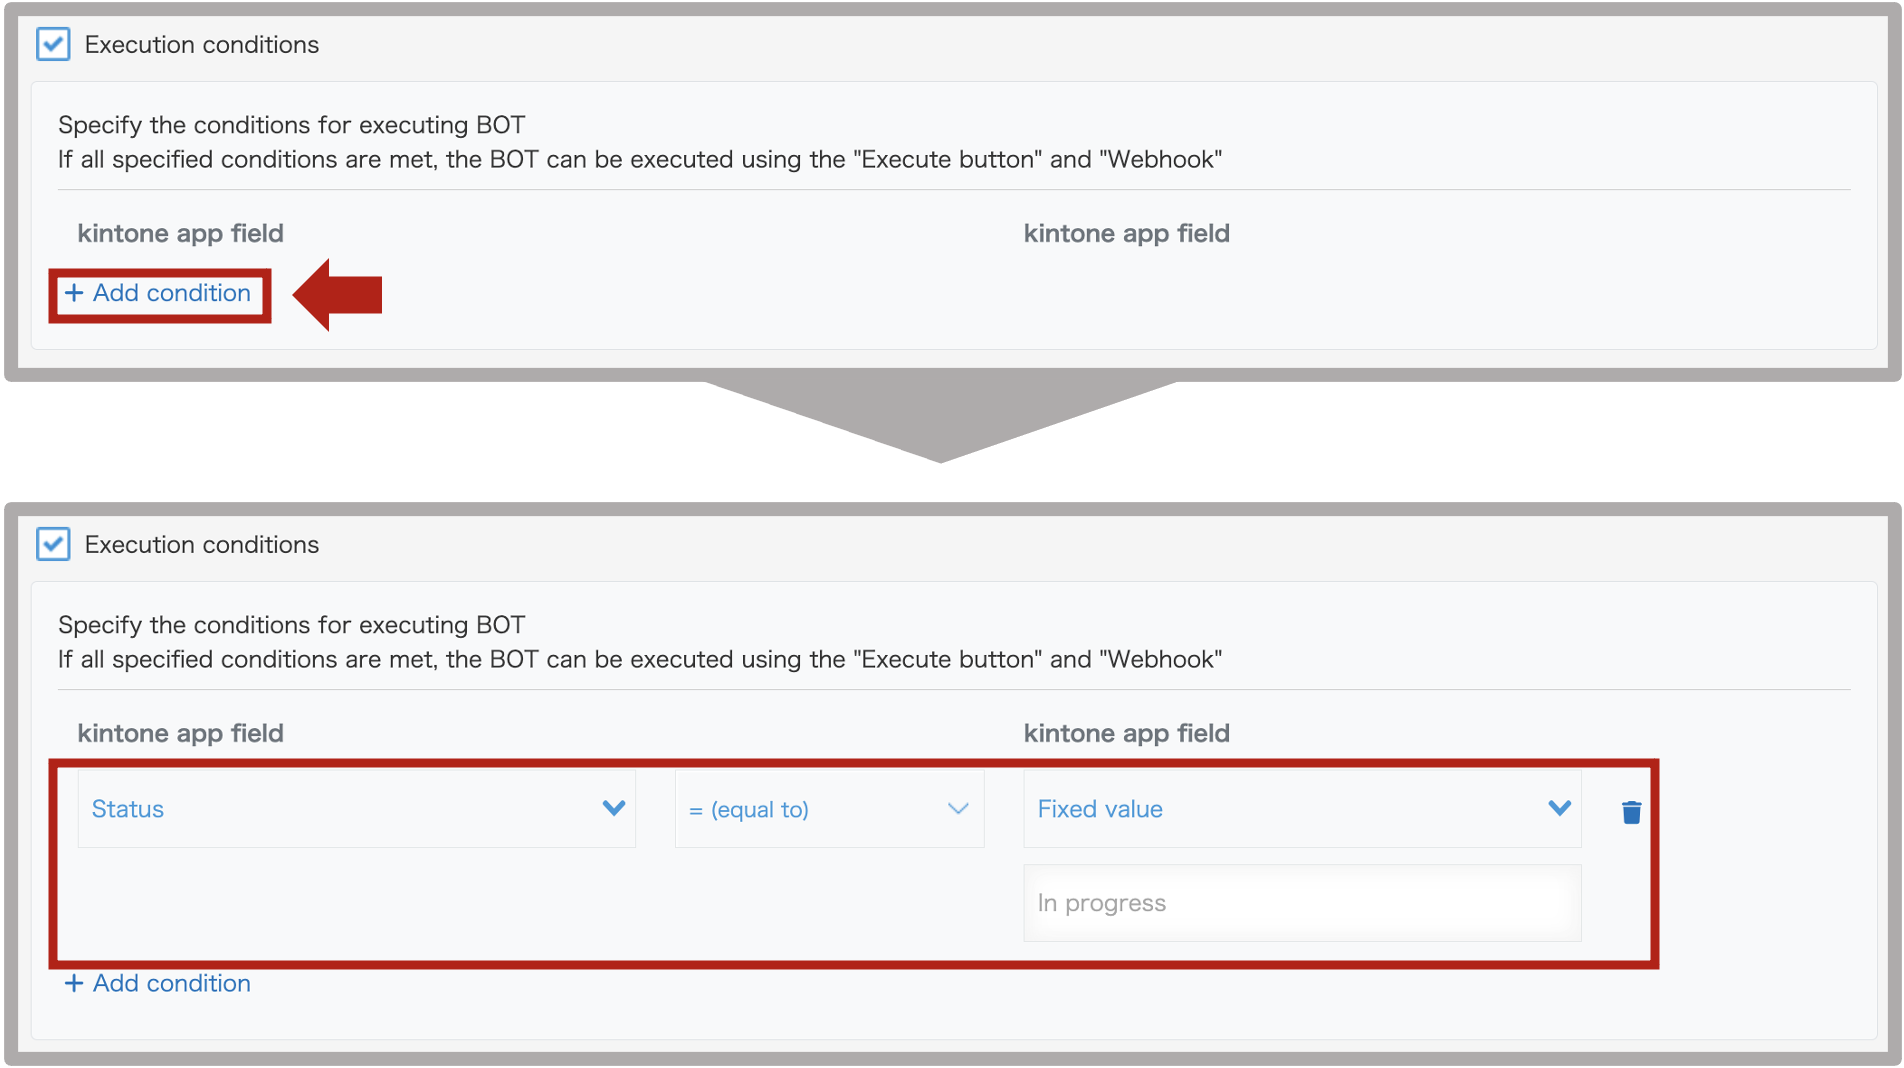
・実行条件
BOTを実行する条件を指定します。
条件を追加する
「条件を追加する」をクリックすることで条件が追加されます。
kintoneアプリのフィールド
比較対象のフィールドを指定します。
フォーム
kintoneアプリのフィールドを指定できます。
kintoneアプリのフィールドを指定できます。
テーブル内のフィールドを指定した場合、条件に満たす行があれば条件一致します。
プロパティ
kintoneアプリのプロパティを指定できます。
- ステータス
- レコードID
- レコード番号
- ログイン者(ログイン名:表示名)
- ログイン者(ログイン名)
- ログイン者(表示名)
- 更新者(ログイン名:表示名)
- 更新者(ログイン名)
- 更新者(表示名)
- 更新日時
- 作業者(ログイン名:表示名)
- 作業者(ログイン名)
- 作業者(表示名)
- 作成者(ログイン名:表示名)
- 作成者(ログイン名)
- 作成者(表示名)
- 作成日時
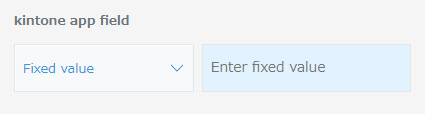
その他
右側のkintoneアプリのフィールドで指定できます
その他の値を指定できます。
- 固定値
※固定値は値を直接入力します。
※固定値の場合、値を左側で指定したフィールドタイプの形式にしてください。
| kintoneのフィールドタイプ | 固定値 |
| 日付 | 値を以下の形式にしてください。 2020 2020-12 2020-12-12 |
| 日時 | 値を以下の形式にしてください 2020-01-01T01:00:00 2020-01-01T01:00:00Z 2020-01-01T10:00:00+09:00 |
| 時刻 | 値を以下の形式にしてください。 12:00 |
演算子
左右のkintoneアプリのフィールドの値を比較する演算子を指定できます。
左側のフィールドによって、使用できる演算子が変わります。
- = (等しい)
- ≠ (等しくない)
- ≦ (以下)
- < (より小さい)
- ≧ (以上)
- > (より大きい)
- 次の値を含む
- 次の値を含まない
Option
Set the following options.

・BOTエラー時にも出力値を格納する
BOTエラー時にも、「BOT出力値の格納先設定」で設定した格納先にBOT出力値を格納します。
>> BOT出力値の格納先設定についてはこちら
詳細画面の設定
kintoneアプリのレコード詳細画面に関する設定を行います。

Option
Set the following options.

- Check input values before execution
After clicking the "Execute" button, you will be prompted to confirm the input values before running the BOT.
- Do not allow viewing of BOT execution screen
Prohibit viewing of the execution screen while the BOT is running.
- Open BOT browsing screen at runtime
Clicking the "Execute" button opens the BOT browsing screen. (The page will open in a separate window)
* If the "Do not allow viewing of BOT execution screen" option is enabled, this feature cannot be used.
操作パネルの表示位置
操作パネルを任意の位置に表示します。
操作パネルの表示位置では以下の項目を選択できます。
- ヘッダー
- スペース

・ヘッダー
ヘッダーに操作パネルを表示します。
・スペース
指定した要素IDのスペースに操作パネルを表示します。

操作パネルの表示内容
操作パネルに表示する内容を設定します。

・実行条件に一致しない場合は、パネルを非表示
実行条件に一致しない場合は、パネルを非表示にします。
>> 実行条件についてはこちら
・操作パネルをカスタマイズ
操作パネルの各項目を任意に設定します。
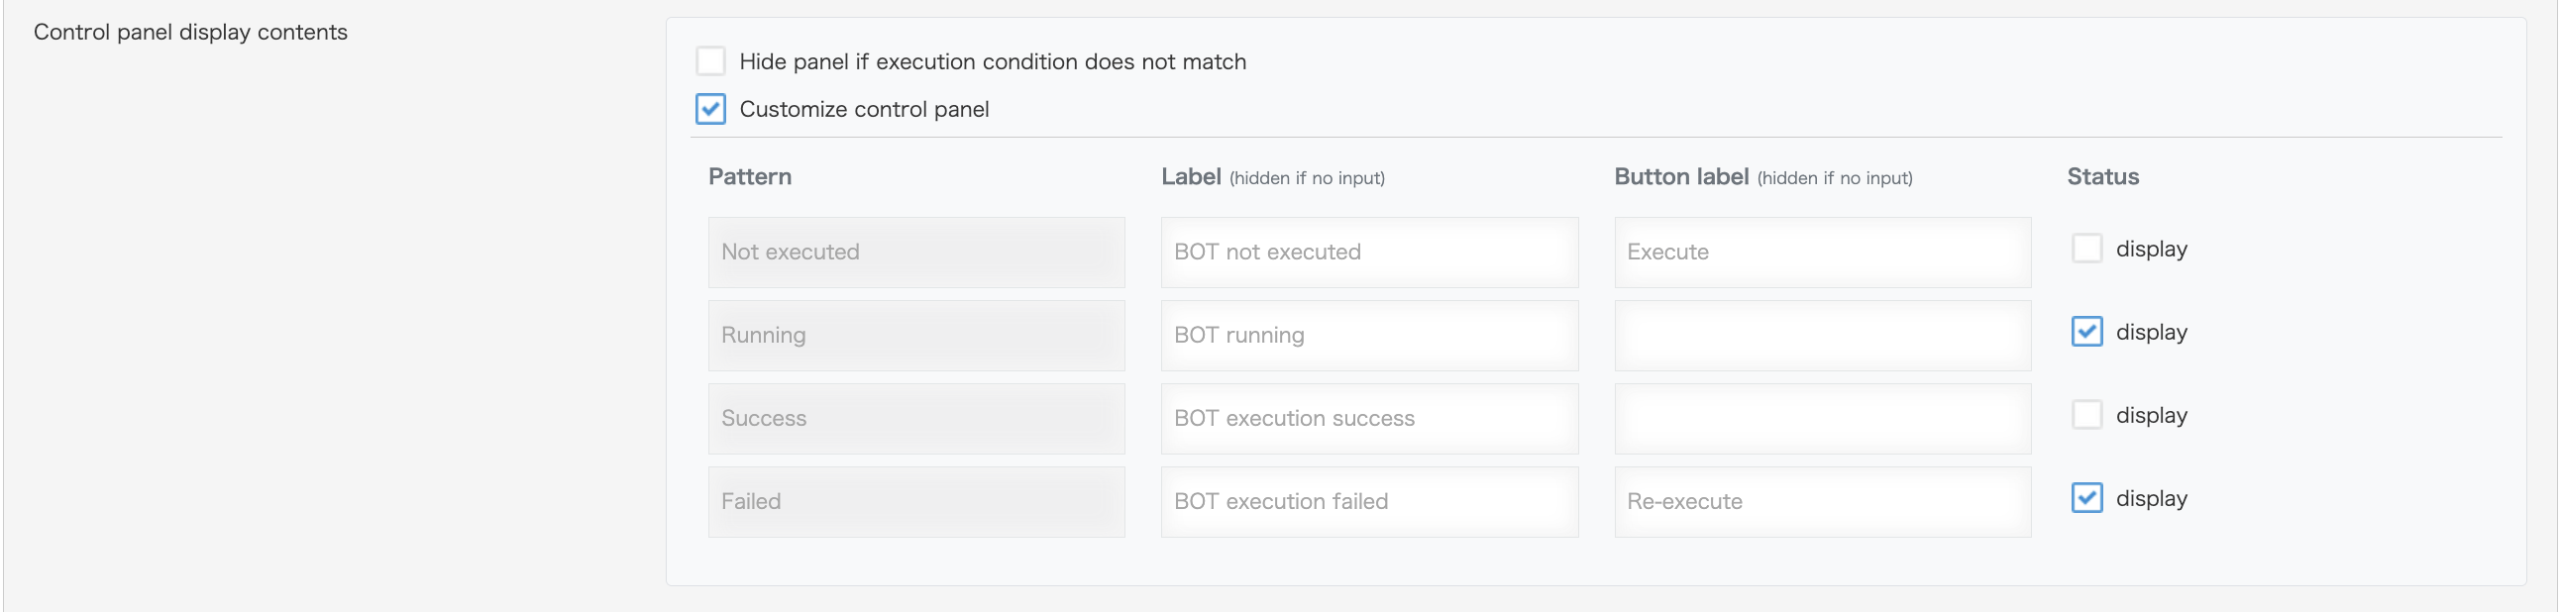
・パターン
パターン別に操作パネルをカスタマイズできます。
パターンに対応する実行ステータスは次のとおりです。
| パターン | ステータス |
| 未実行 | ・未実行 |
| 実行中 | ・準備中 ・実行中 ・書込中 |
| 正常終了 | ・正常終了 |
| 異常終了 | ・実行失敗 ・書込失敗 ・エラー ・内部エラー ・不明 |
※「実行ステータスの格納先」が未指定の場合は、未実行の操作パネルが表示します。
>> 実行ステータスの格納先についてはこちら
>> ステータスに関してはこちら
・ラベル
ラベルに表示するテキストを設定します。
未入力の場合は、ラベルの項目を非表示します。
・ボタン名
ボタンに表示するテキストを設定します。
未入力の場合は、ボタンの項目を非表示にします。
・ステータス
ステータスの表示/非表示を設定します。
一覧画面の設定
kintoneアプリのレコード一覧画面に関する設定を行います。

一括実行ボタン
一括実行ボタンの表示を設定します。
※表形式の一覧画面でのみ表示されます。

一括実行ボタンでは以下の項目を選択できます。
- 有効
- 無効
※「無効」を選択した場合は、「操作パネルの表示内容」と「一括実行上限件数」は表示されません。
操作パネルの表示内容
操作パネルに表示する内容を設定します。

・ボタン名
ボタンに表示するテキストを設定します。
未入力の場合は、BOT名 +「を実行する」の形式で表示されます。
一括実行上限件数
一括実行するレコードの上限件数を設定します。
※最大500件まで設定できます。
>> 一括実行時の上限件数についてはこちら

BOT input values settings
Specify the input values assigned to the BOT.

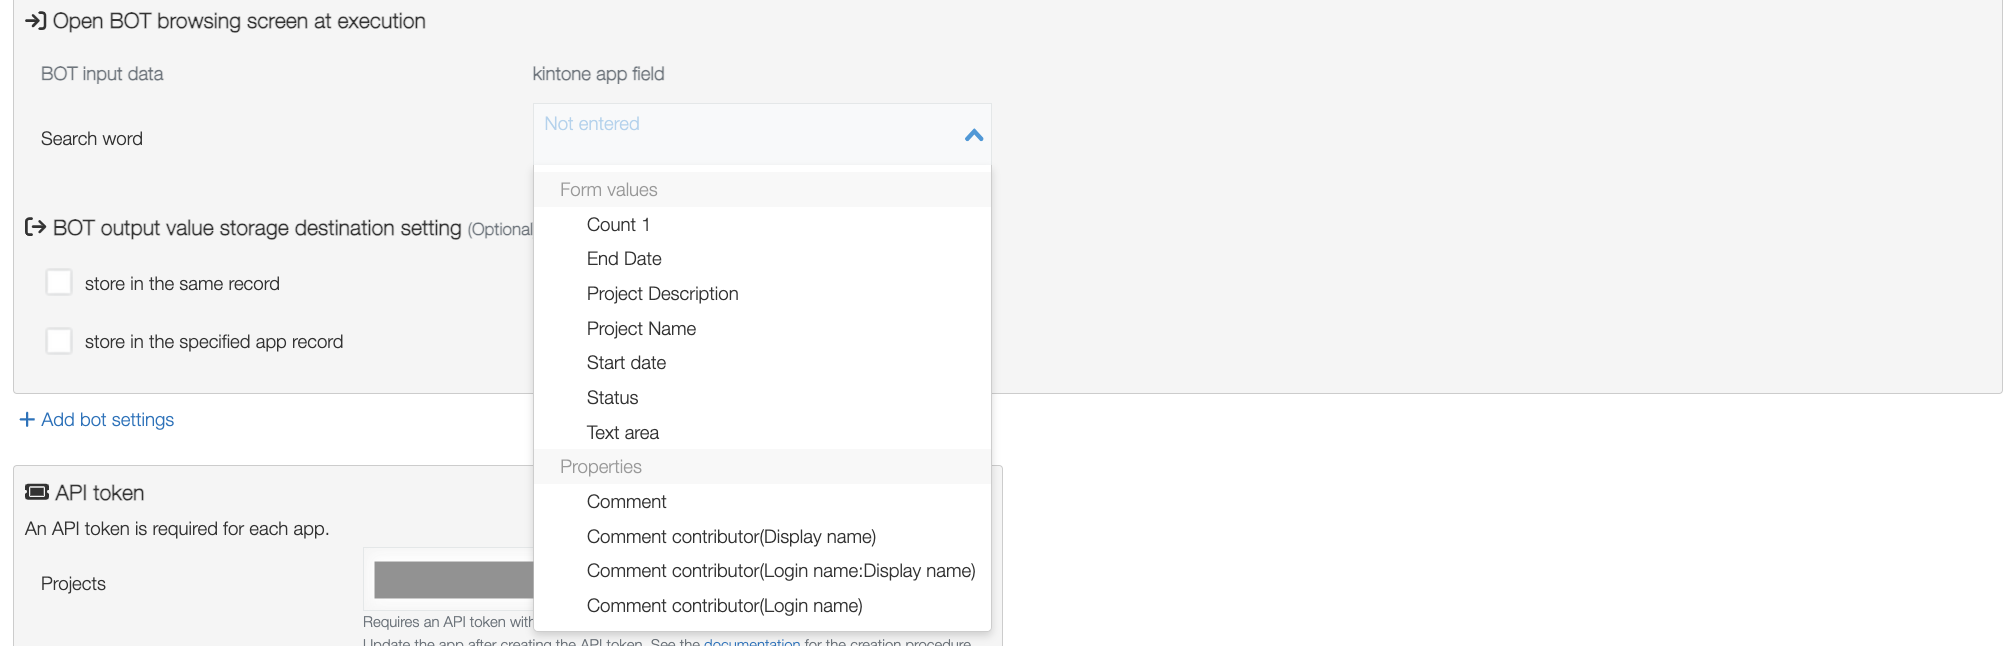
Form values
Specifies the fields of kintone app.
>> For Cloud BOT's data types to kintone's field types mapping, click here.
Properties
Specifies the properties of kintone app.
- Comment
- Comment contributor(Login name:Display name)
- Comment contributor(Login name)
- Comment contributor(Display name)
- Comment number
- Status
- Record id
- Record number
- ログイン者(ログイン名:表示名)
- ログイン者(ログイン名)
- ログイン者(表示名)
- Revision
- 作業者(ログイン名:表示名)
- 作業者(ログイン名)
- 作業者(表示名)
- Updated by(Login name:Display name)
- Updated by(Login name)
- Updated by(Display name)
- Updated datetime
- Assignee(Login name:Display name)
- Assignee(Login name)
- Assignee(Display name)
- Created datetime
- Execution timing
Others
Specify other values.
- Not entered
- Fixed value
* Input a value directly for “Fixed value”.
BOT output value storage destination setting
Set this when you want to store the BOT output value in a record of a kintone app.
Select the field of the destination kintone app and the BOT output value to be stored.
Store in the same record
Store the output value in the same record.
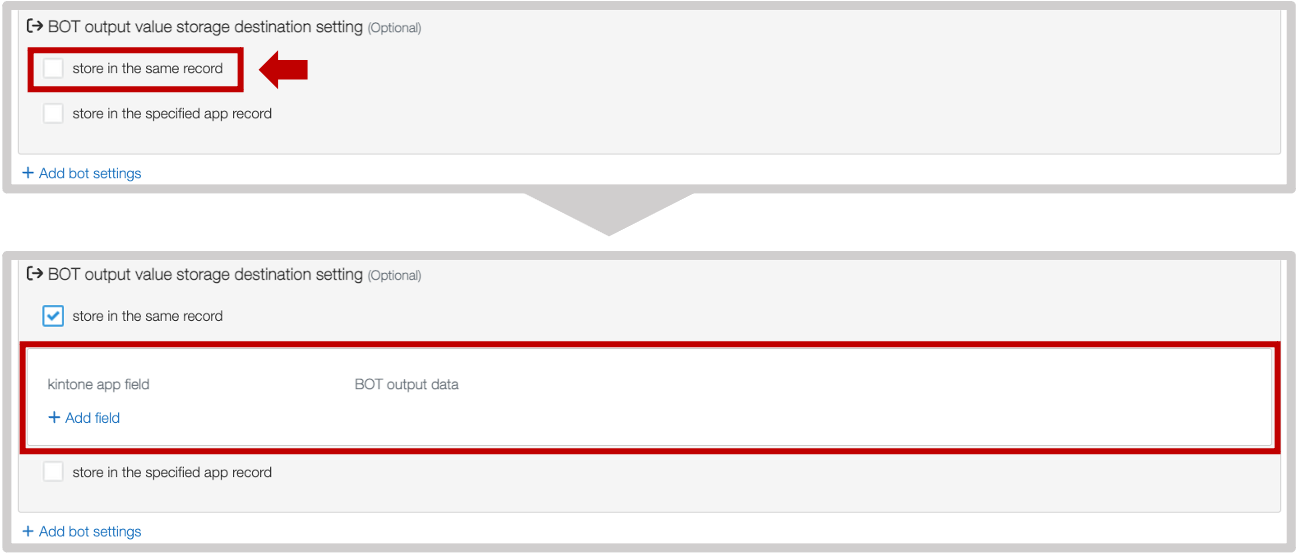
Destination field and value to be stored
An arbitrary number of destination fields can be set. Click "+Add field" to add a setting.

kintone app field
Specify the destination field in the kintone app field.
BOT output data
Specify the value to be stored in the BOT output data.
- Output data
Specify the BOT's output data.
>> For the Cloud BOT’s data types to kintone’s field types mapping, click here.
* If "Group data row" is chosen under "Number of record add," only group data may be chosen as BOT output data.
- Others
Other values can be specified.
- Fixed value
- Status
- BOT name
- Job ID
* Fixed values specify values directly.
Table update mode
Select the update mode for the "Table" field to specify whether to overwrite all rows or append them as new rows.
This option is displayed when a "Table" field is specified in the kintone app field.
The update mode for the table allows the following options:
- Overwrite
- Append
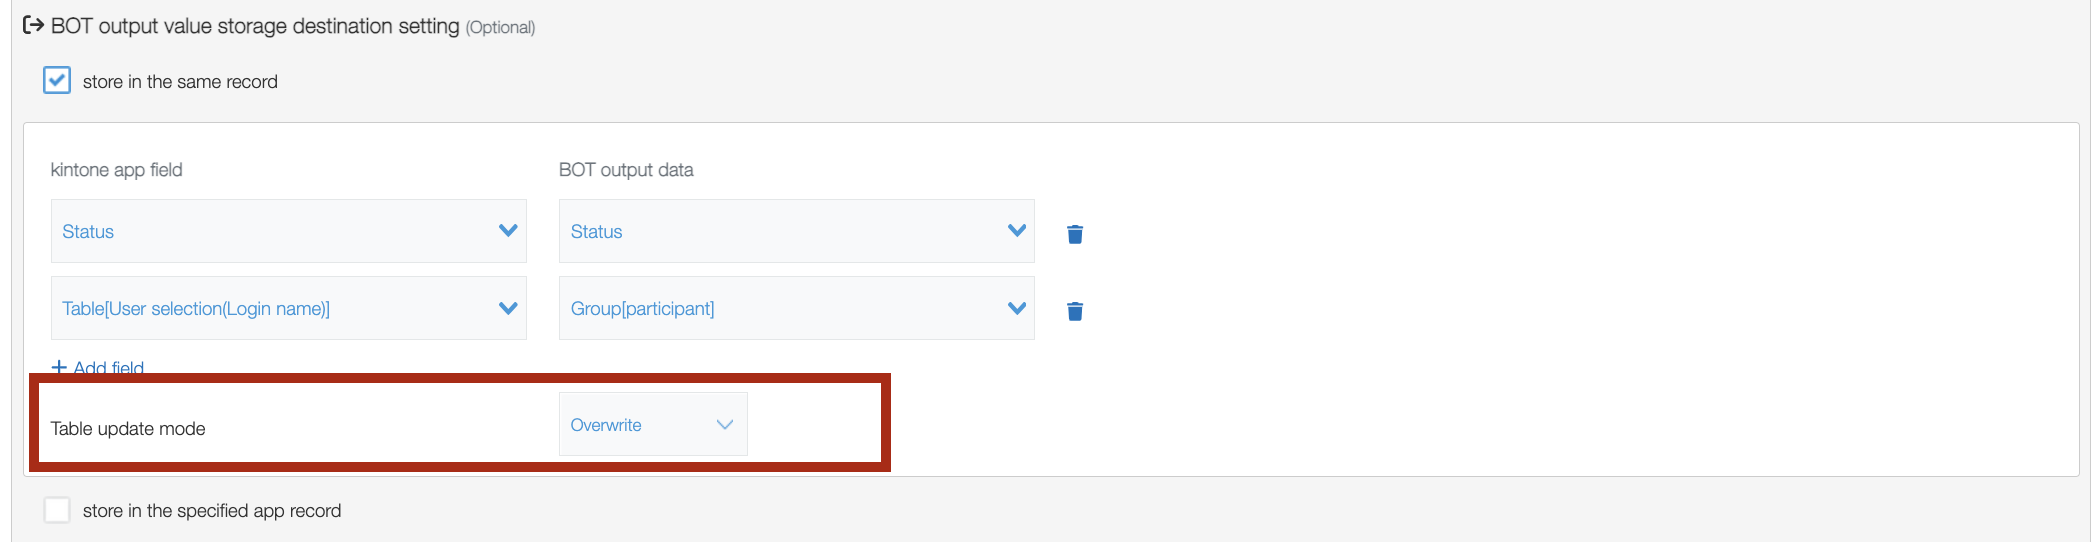
- Overwrite
Deletes all existing rows and overwrites them with new rows.
- Append
Leaves the existing rows as they are and appends new rows.
Store in the specified app record
Store the output value in the record of the specified app.
Settings can be added by clicking "Add storage destination."
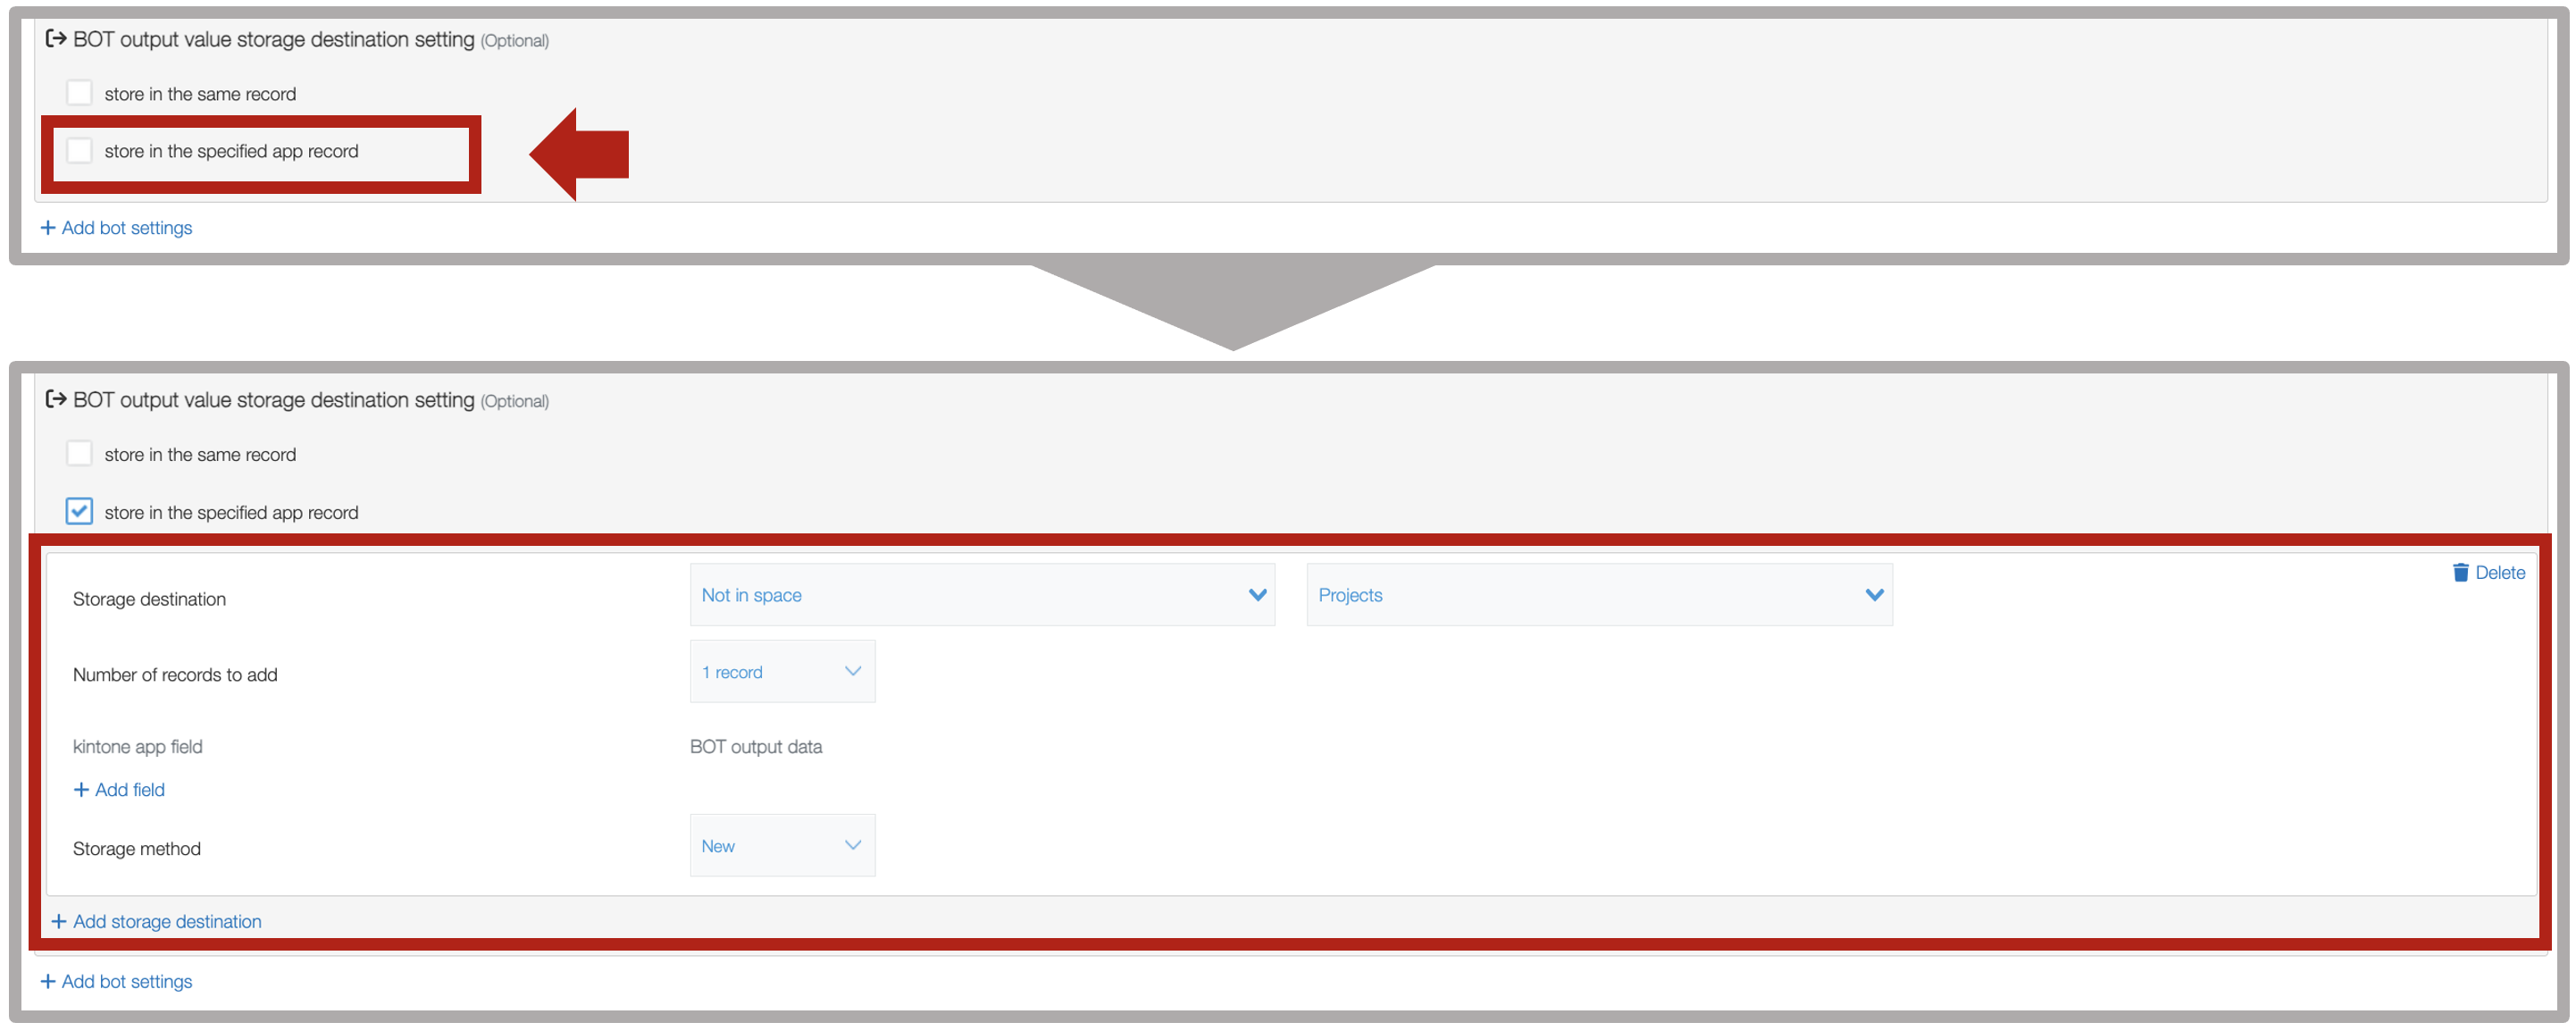
Storage destination
Filter by space and select an app.

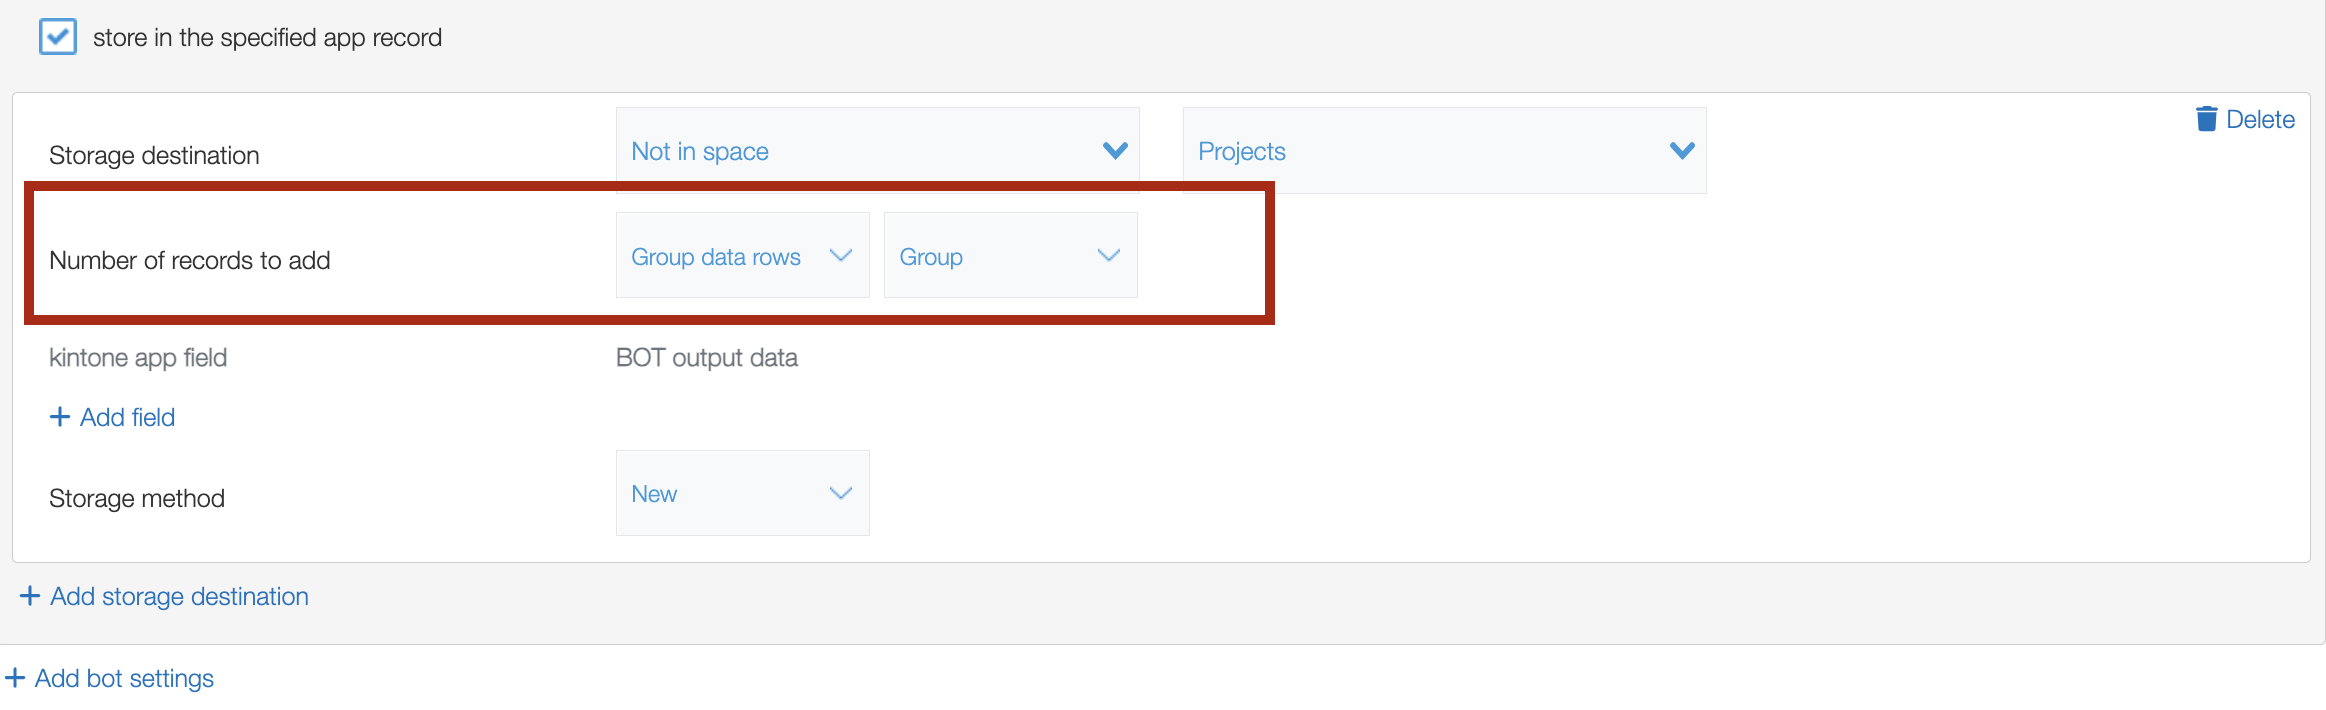
Number records to add
- 1 record
Creates one new record.
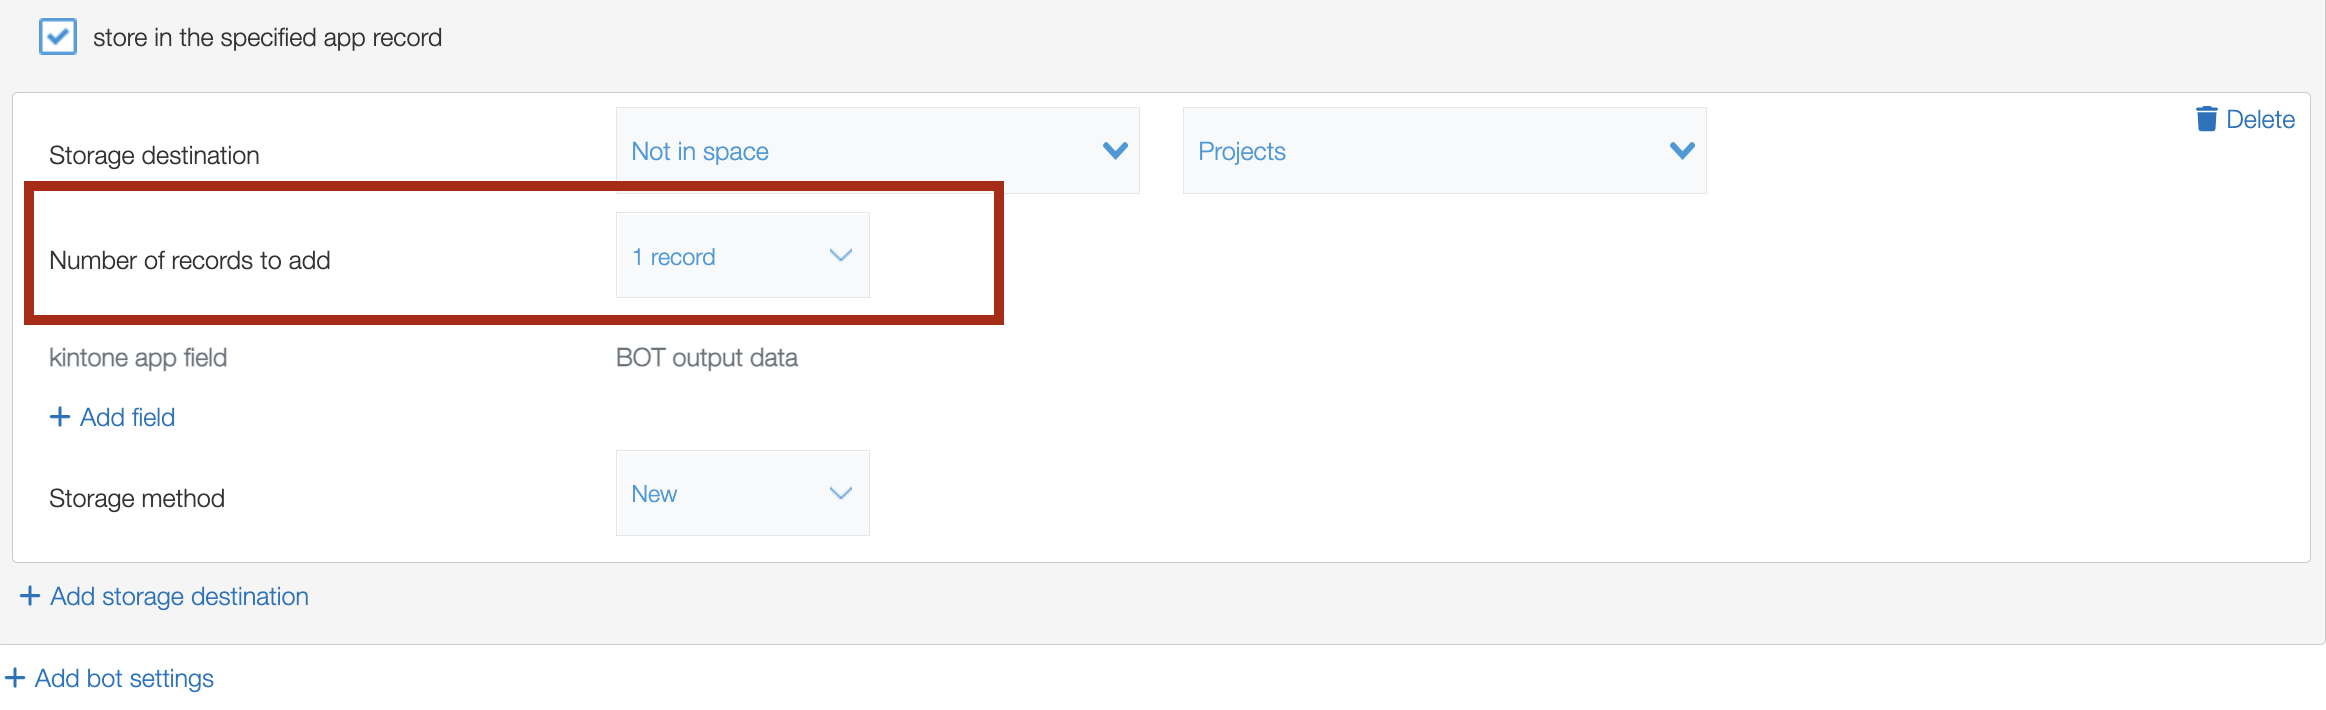
- Group data row
Creates records for the number of rows in group data.
Set the destination field and value to store
An arbitrary number of destination fields can be set. Clicking "+ Add field" allows for the inclusion of additional settings.
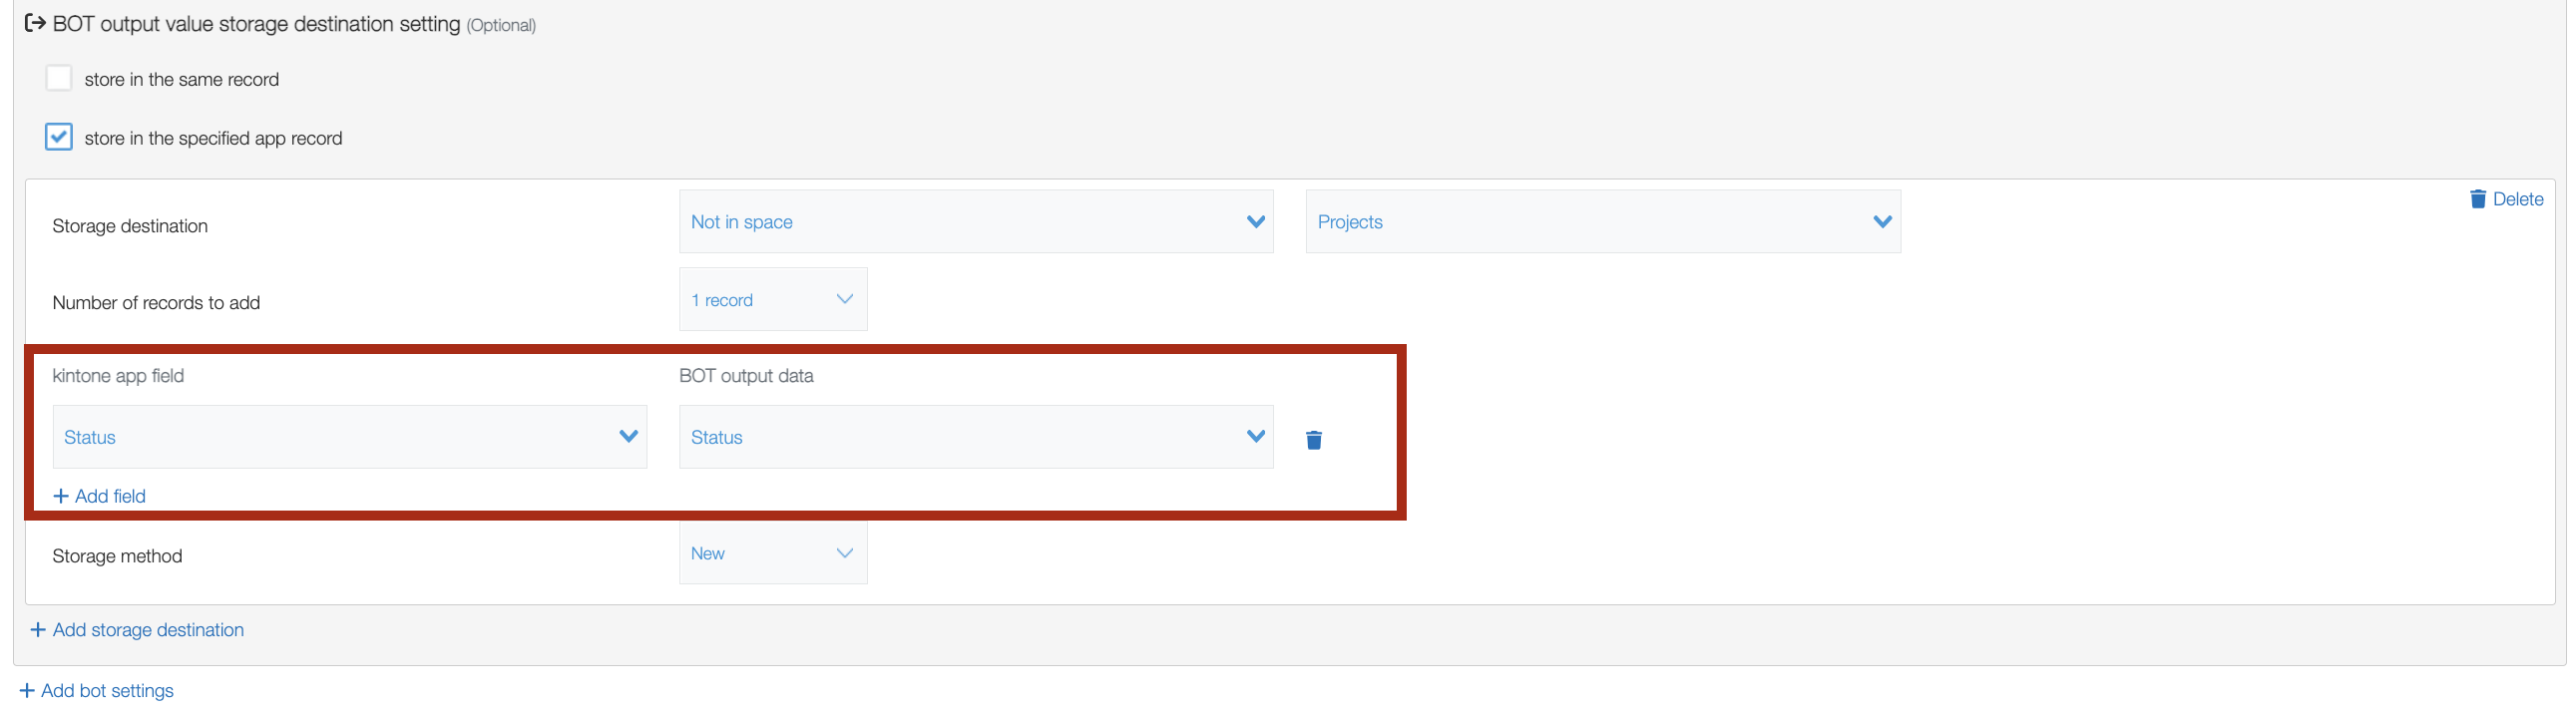
kintone app field
Specify the destination field in the kintone app field.
BOT output data
Specify the value to be stored in the BOT output data.
>> For information on what items can be entered, click here.
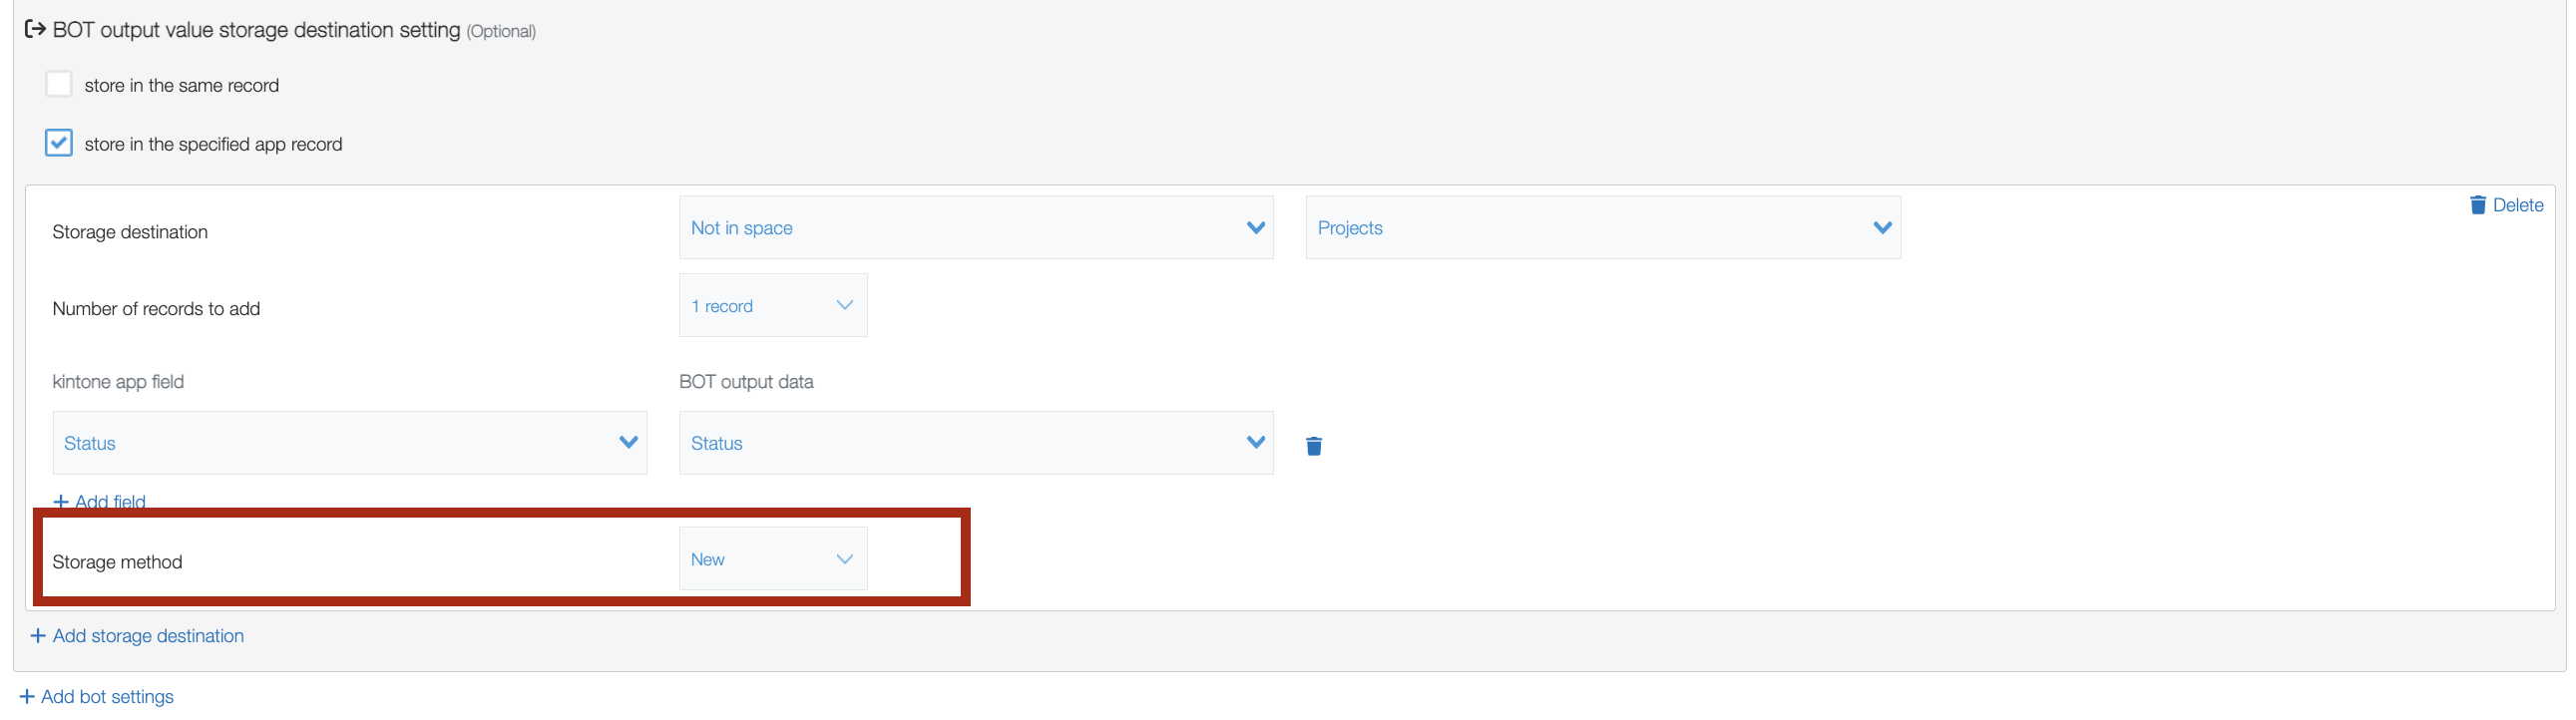
Storage method
The following options can be specified for the storage method:
- New
- Update
- New & Update
| Storage method | Case of "1 record" | Case of "Group data row" |
| New | Creates a new record. | Creates a new record for the group detail rows. |
| Update | Updates existing records that match all update conditions. | Updates existing records that match all update criteria for each detail row in the group. |
| New & Update | Updates existing records that match all update conditions. If the first update condition does not match, a new record is created. | Updates existing records that match all update conditions for each detail row in the group. Creates new records for the summary rows in the group that do not match the first update condition. |
Table update mode
Select the update mode for the "Table" field to specify whether to overwrite all rows or append them as new rows.
This option is displayed when a "Table" field is specified in the kintone app field.
The update mode for the table allows the following options:
- Overwrite
- Append
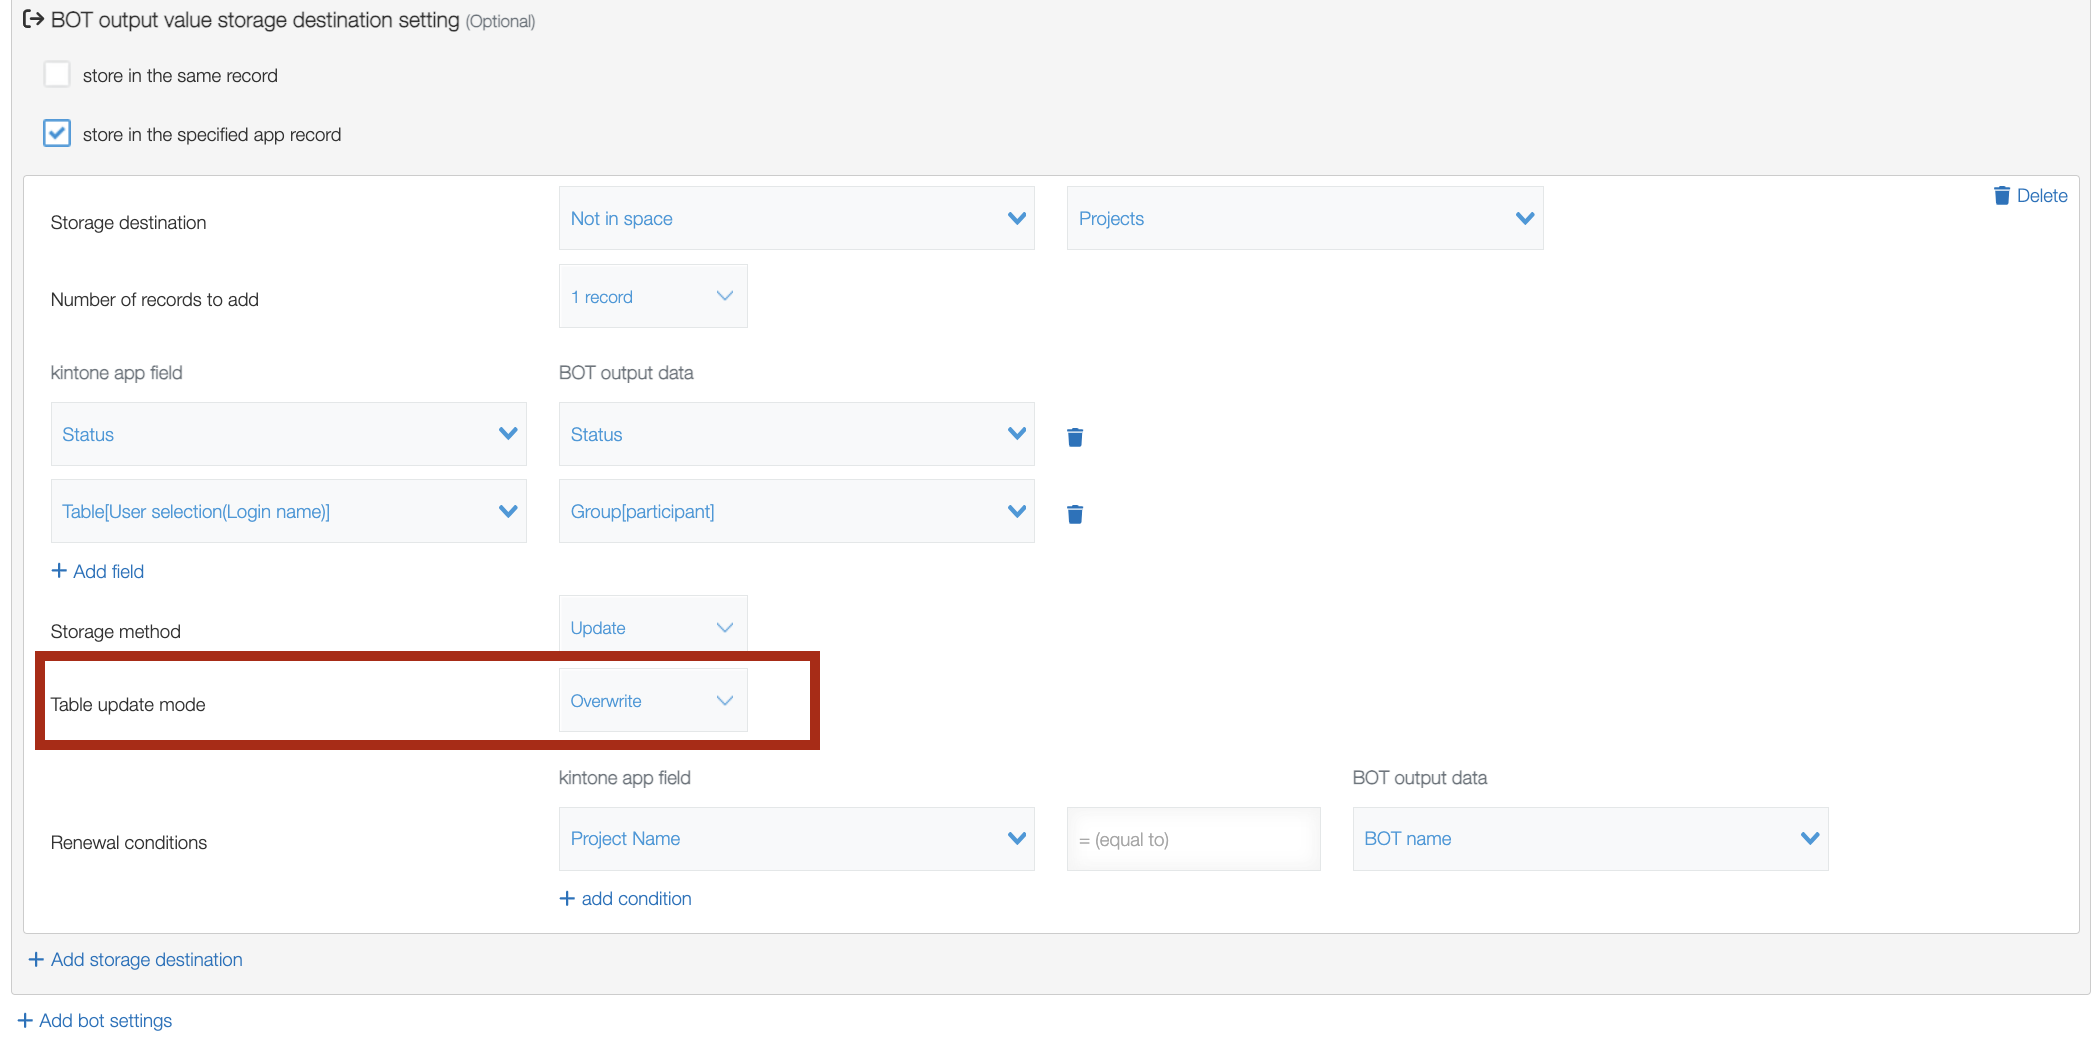
- Overwrite
Deletes all existing rows and overwrites them with new rows.
- Append
Leaves the existing rows as they are and appends new rows.
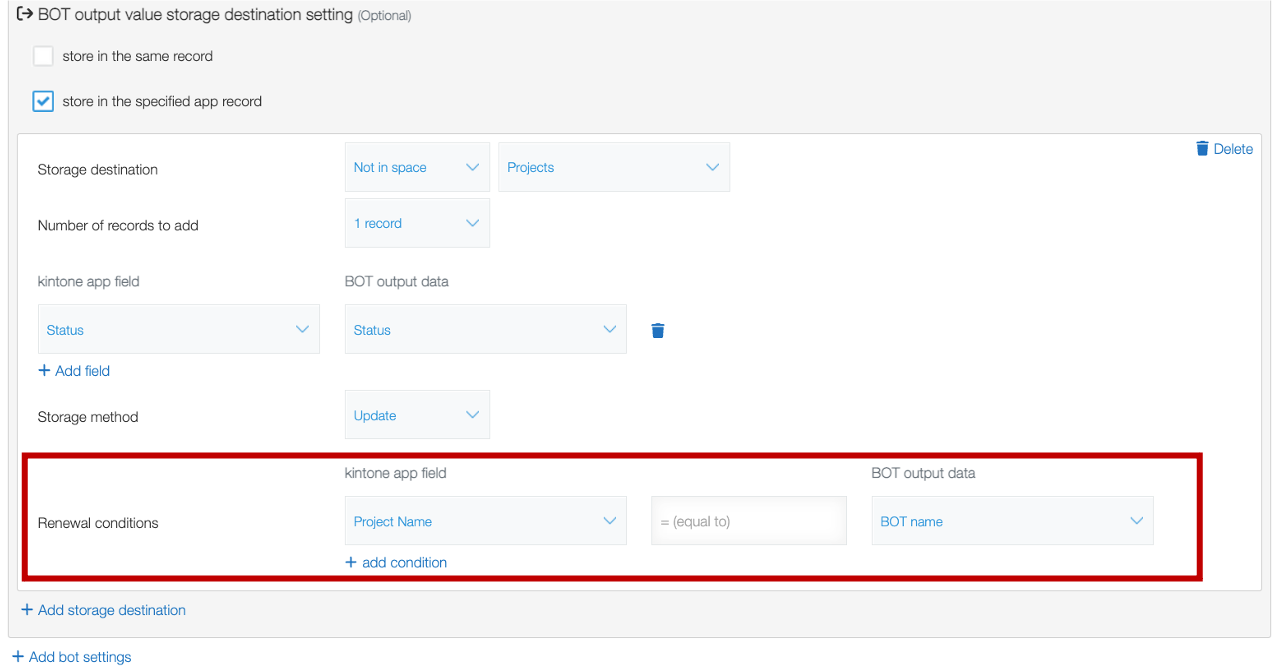
Update condition
It is displayed only when "Update" or "New & Update" is specified as the storage method.
Specify the first update condition.
For the first update condition, specify a field in the kintone application that identifies the record to be updated and the BOT output data to be used as the key.
* All specified update conditions must match in order for the record to be updated.
※「新規&更新」を指定して、第一更新条件以降の条件が不一致の場合は、新しいレコードを作成しません。
kintoneアプリのフィールド
更新するレコードを識別できるフィールドを指定します。
フォーム
kintoneアプリのフィールドを指定できます。
- 文字列(1行)
- 数値
- 日付
- 日時
- リンク
※重複禁止のフィールドが対象です。
プロパティ
kintoneアプリのプロパティを指定できます。
- レコードID
- レコード番号
Operator
- = (equal to)
Specify an operator that compares the value of a field in the kintone application with the value of the BOT output data.
BOT output data
Specify the BOT output data to be used as the key.
>> For the output data that can be specified, click here.
* Only text type output data can be specified for output data.
Notes on storing records
The conditions for storing records differ depending on the fields specified in the fields of the kintone application.
The case of "Update" storage method.
| kintone app field | Existing record | Non-existing record | Blank value |
| Record ID / レコード番号 | Update existing records | Write Failure | Do not store records |
| Other fields | Update existing records | Do not store records | Do not store records |
The case of "New & Update" storage method.
| kintone app field | Existing record | Non-existing record | Blank value |
| Record ID / レコード番号 | Update existing records | Write Failed | Create new records |
| Other fields | Update existing records | Create new records | Create new records |
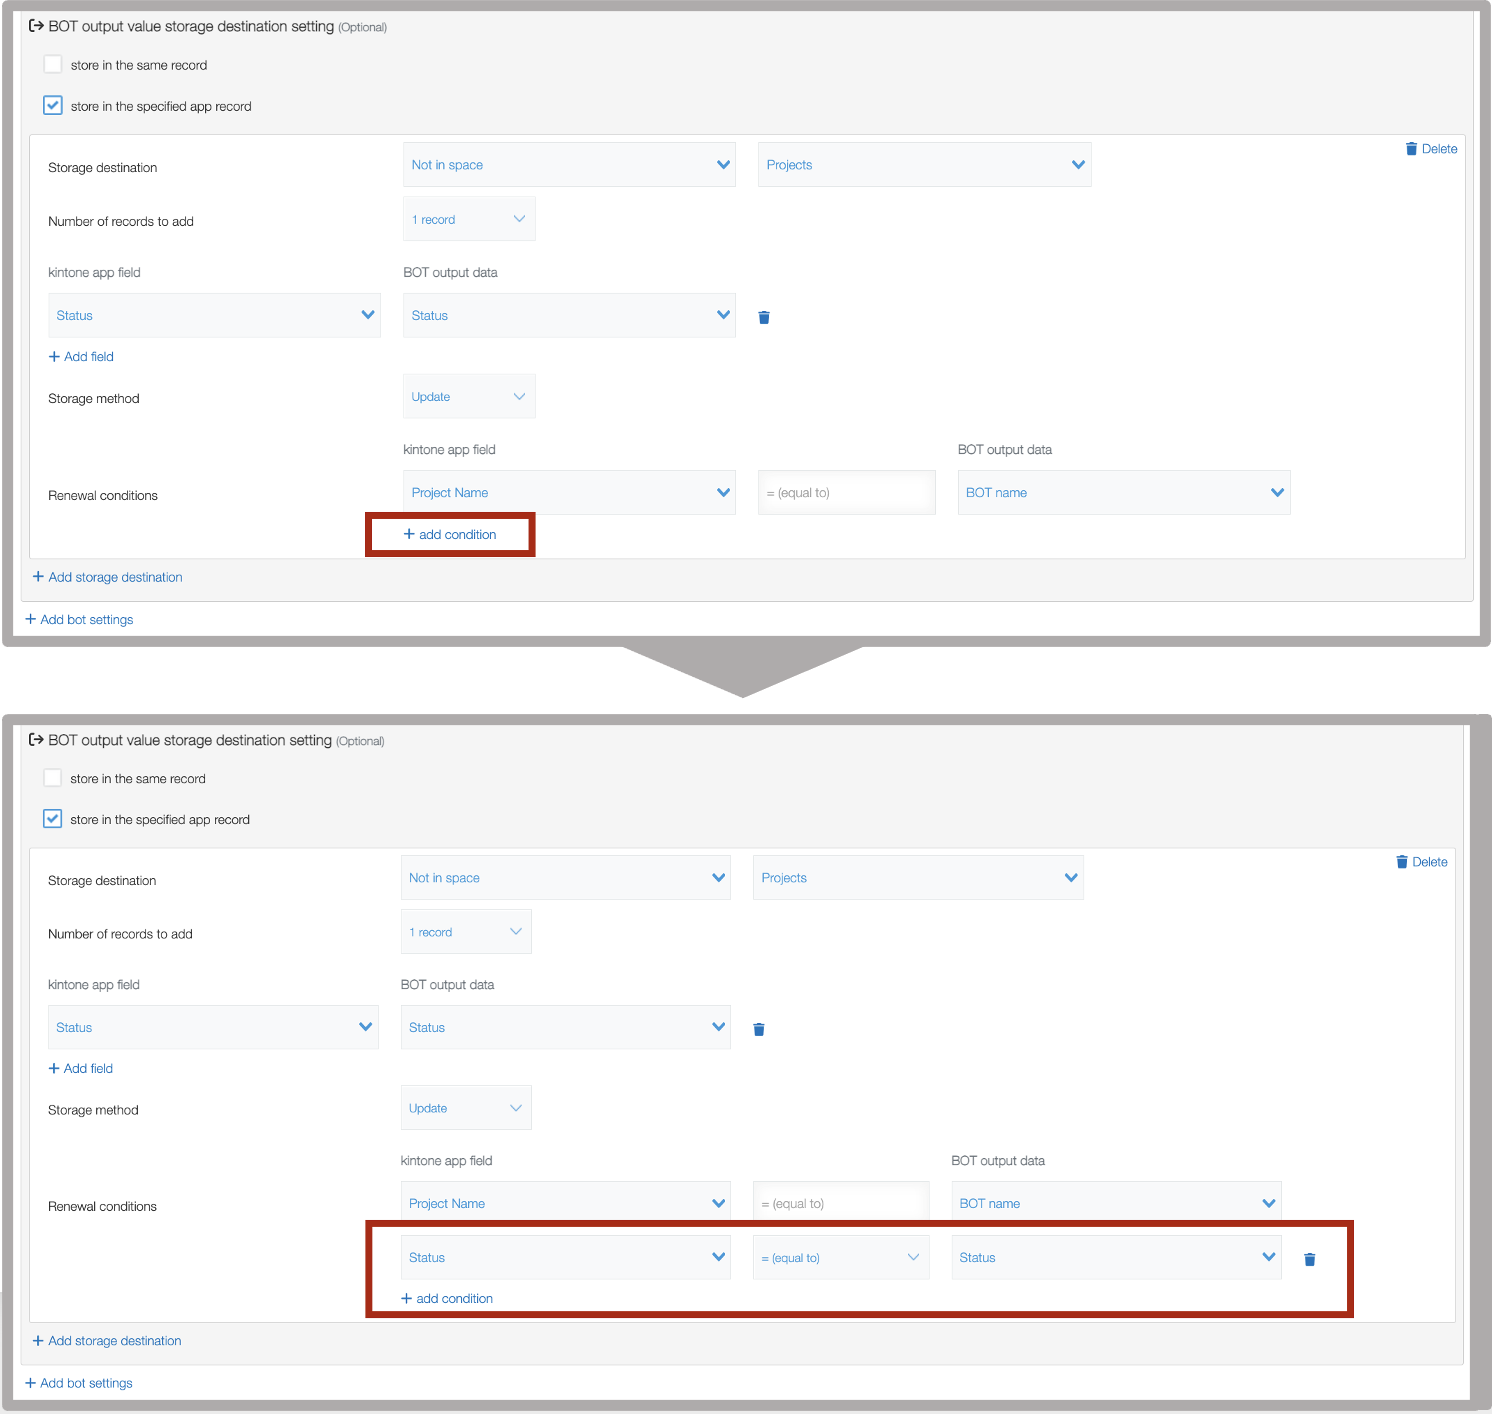
Add condition
Click "Add condition" to add a condition.
kintoneアプリのフィールド
フィルターするフィールドを指定します。
フォーム
kintoneアプリのフィールドを指定できます。
テーブル内のフィールドを指定した場合、条件に満たす行があれば条件一致します。
プロパティ
kintoneアプリのプロパティを指定できます。
- ステーテス
- レコードID
- レコード番号
- ログイン者(ログイン名:表示名)
- ログイン者(ログイン名)
- ログイン者(表示名)
- リビジョン
- 作業者(ログイン名:表示名)
- 作業者(ログイン名)
- 作業者(表示名)
- 更新者(ログイン名:表示名)
- 更新者(ログイン名)
- 更新者(表示名)
- 更新日時
- 作成者(ログイン名:表示名)
- 作成者(ログイン名)
- 作成者(表示名)
- 作成日時
Operator
Specify the operator to filter the values of kintone app fields and the BOT's output data values.
- = (等しい)
- ≠ (等しくない)
- ≦ (以下)
- < (より小さい)
- ≧ (以上)
- > (より大きい)
- 次の値を含む
- 次の値を含まない
BOT output data
Specify the BOT's output data to be filtered.
>> For information on which output data can be specified, click here.
* Only text type output data can be specified for the output data.
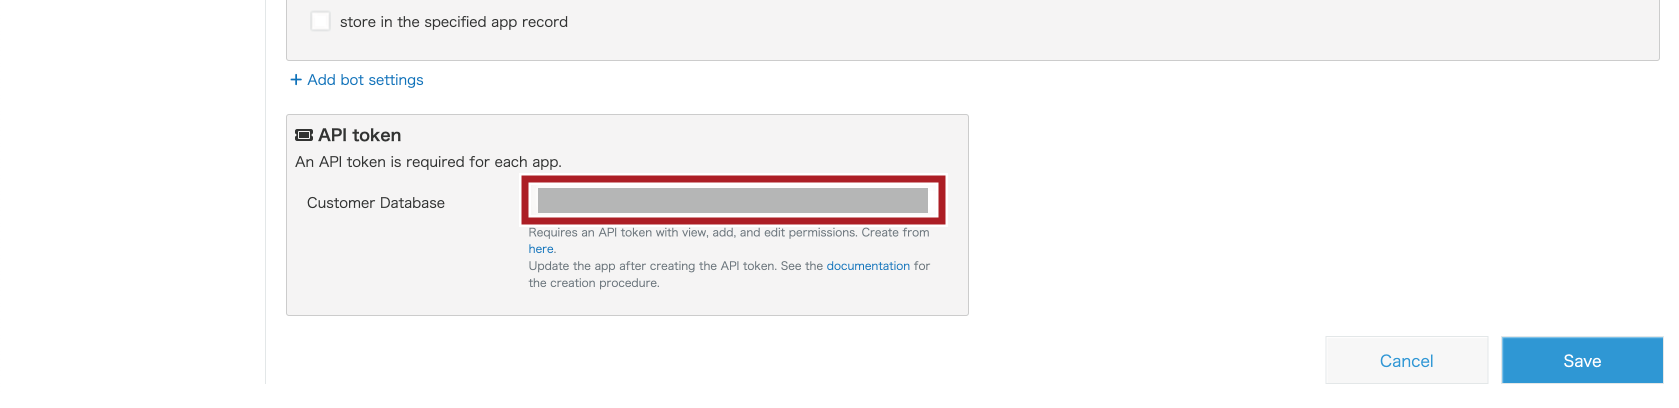
Input another API Token
If a different app is specified as the storage destination, an API Token is required for each app.
When a Lookup field is used in the storage destination field, the API Token of the app associated through the Lookup field's settings is needed.
* The API Token for the app connected via a Lookup field must have "View records" permissions.
Specify an API Token for each app.
>> For details on generating an API Token,
click here.
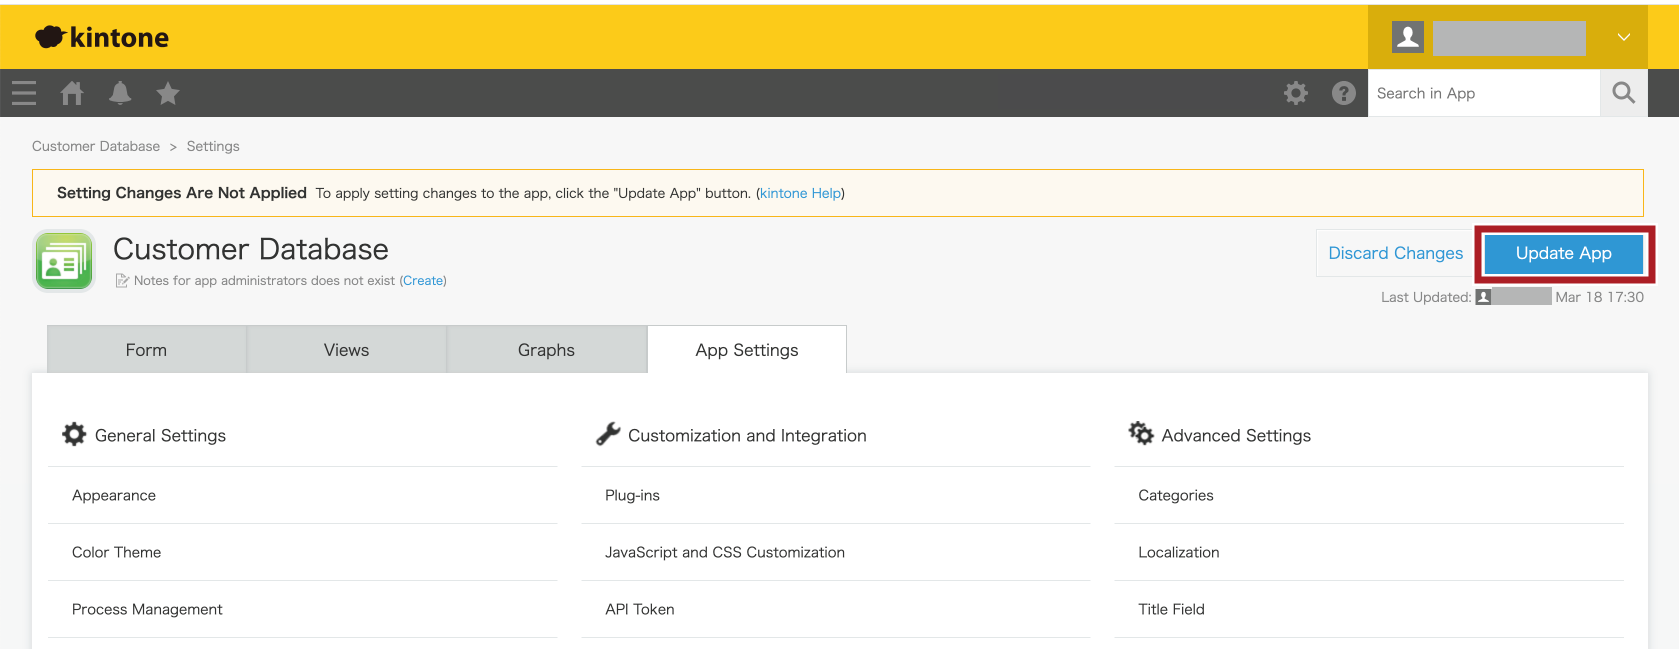
Save / Update plug-in settings
1. After setting, click the "Save" button.
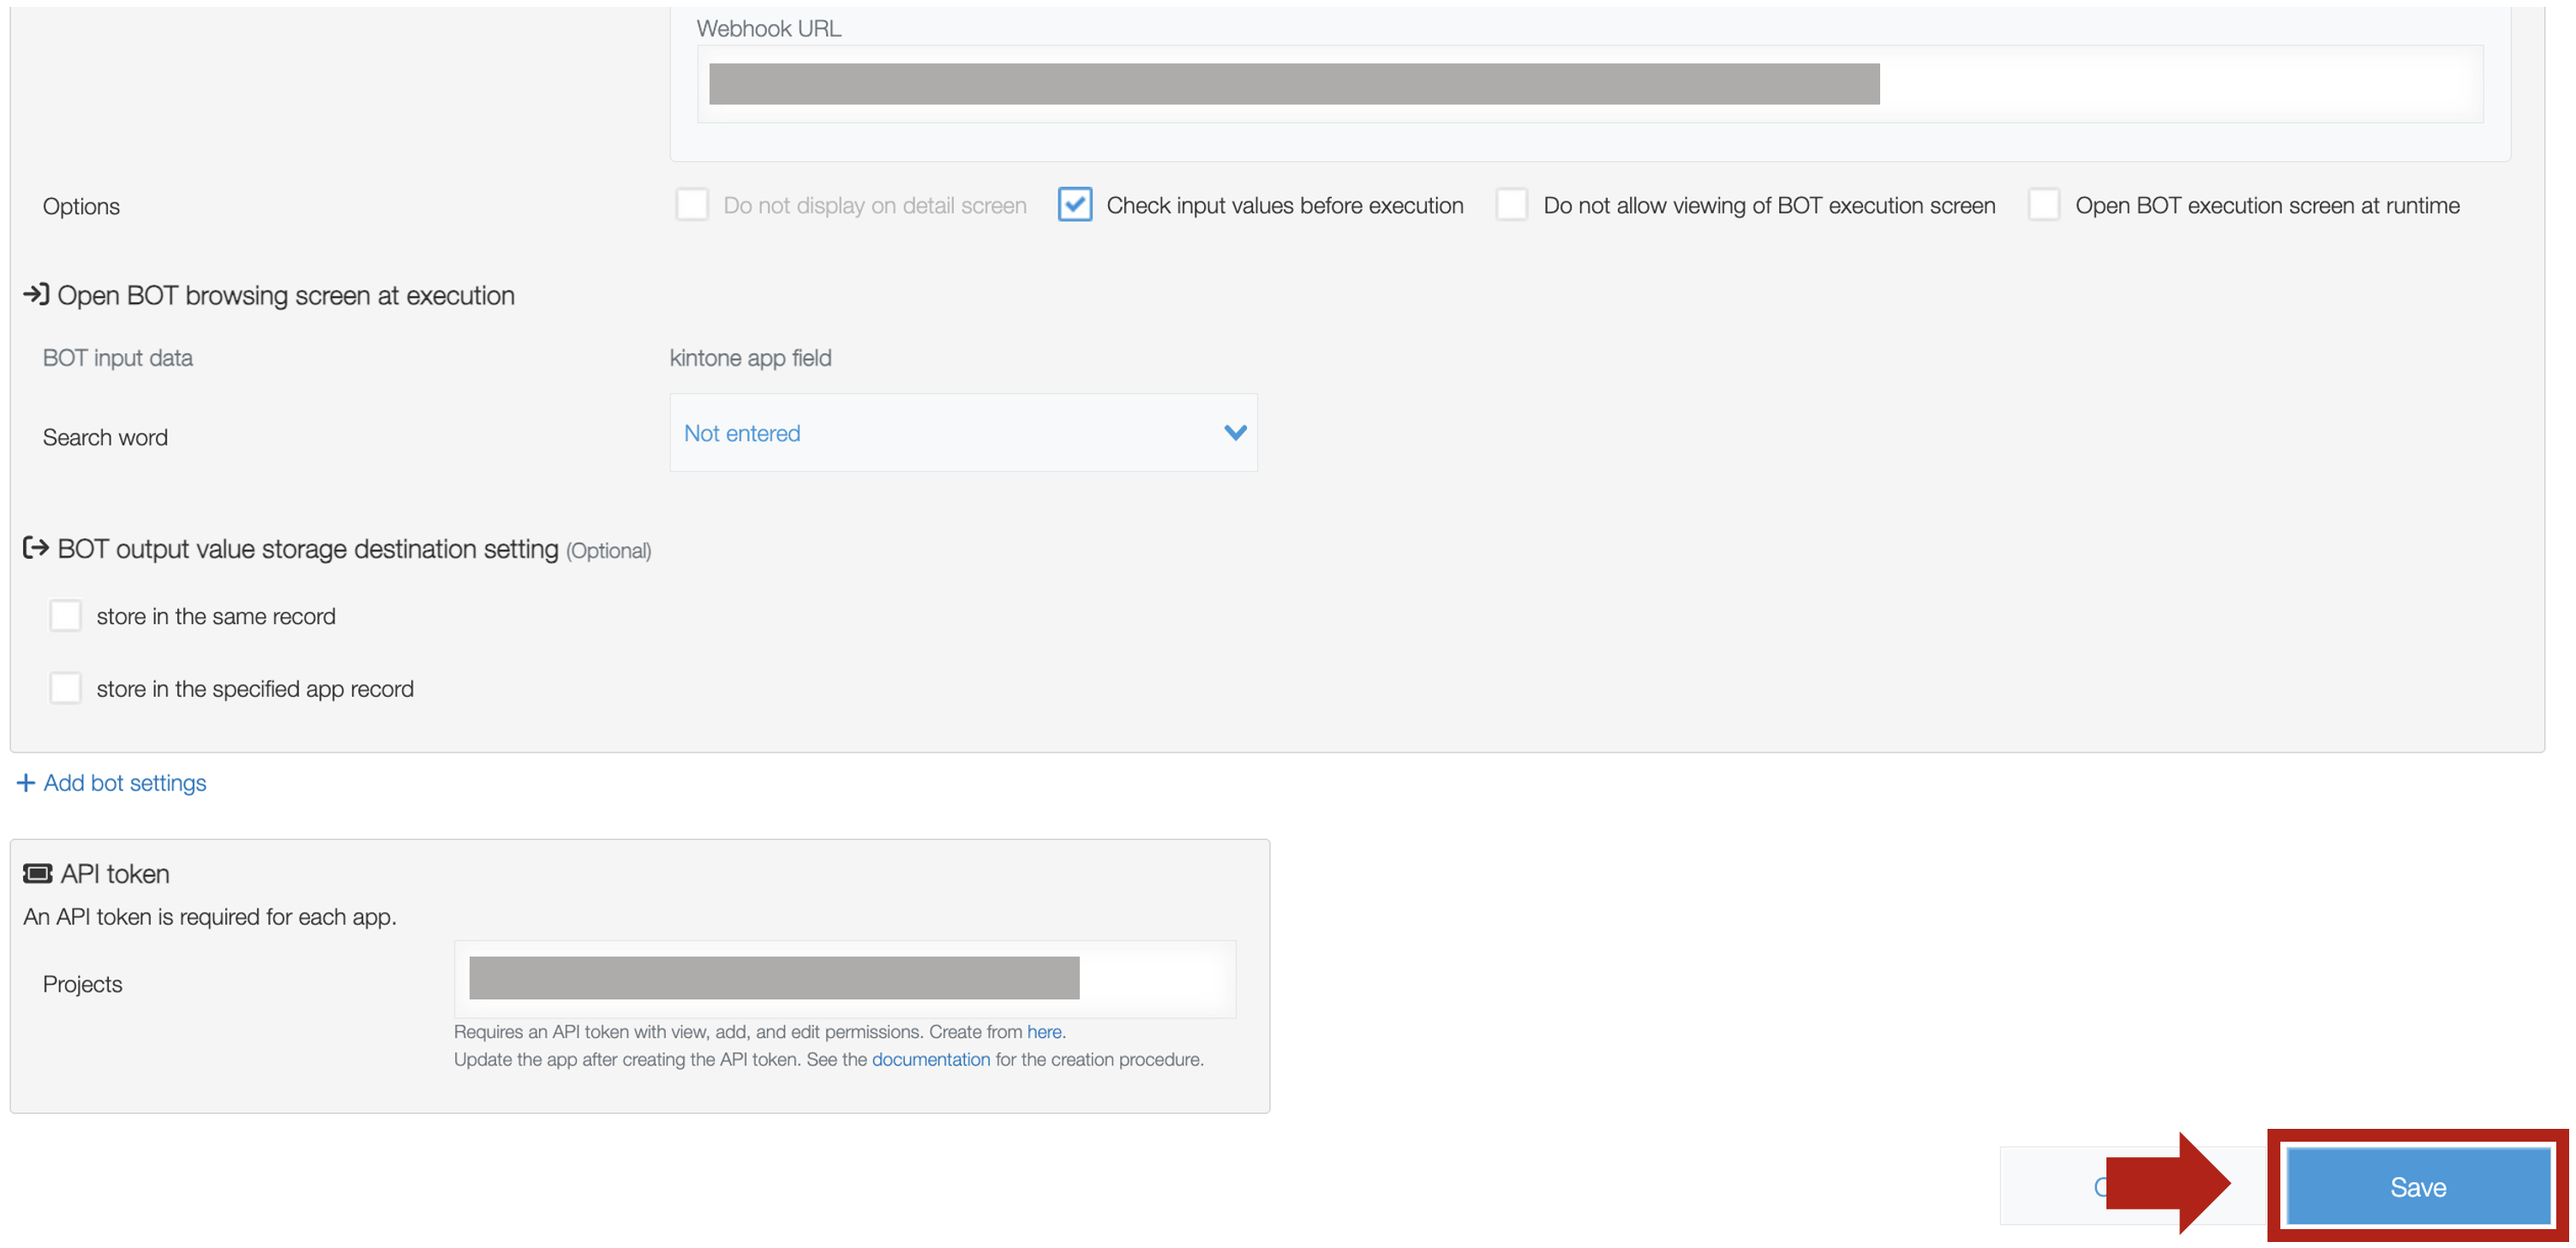
Click the "Update App" button to reflect the settings to the operational environment.
How to run the connected BOT
レコード詳細画面から実行する
レコード詳細画面から、表示中のレコードを対象にBOTを実行できます。
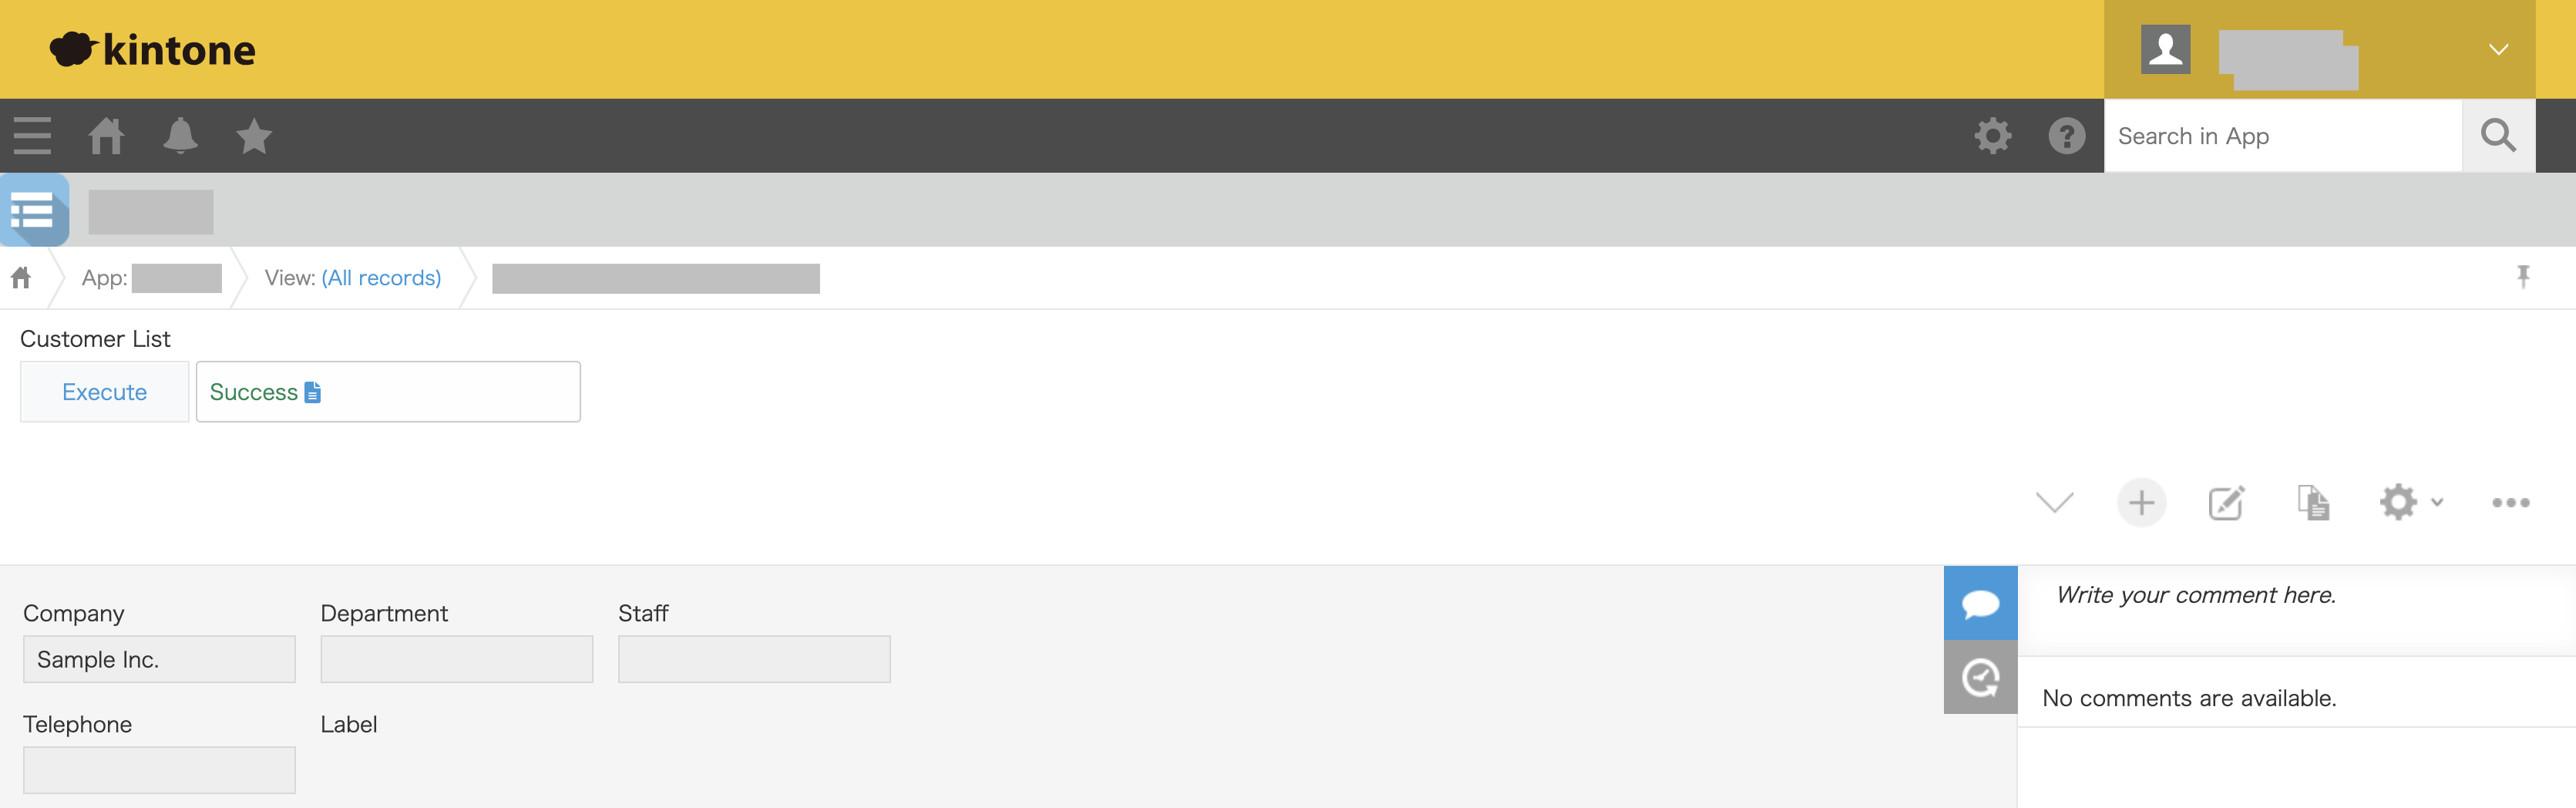
Execute button
Clicking the "Execute" button executes the BOT any time.
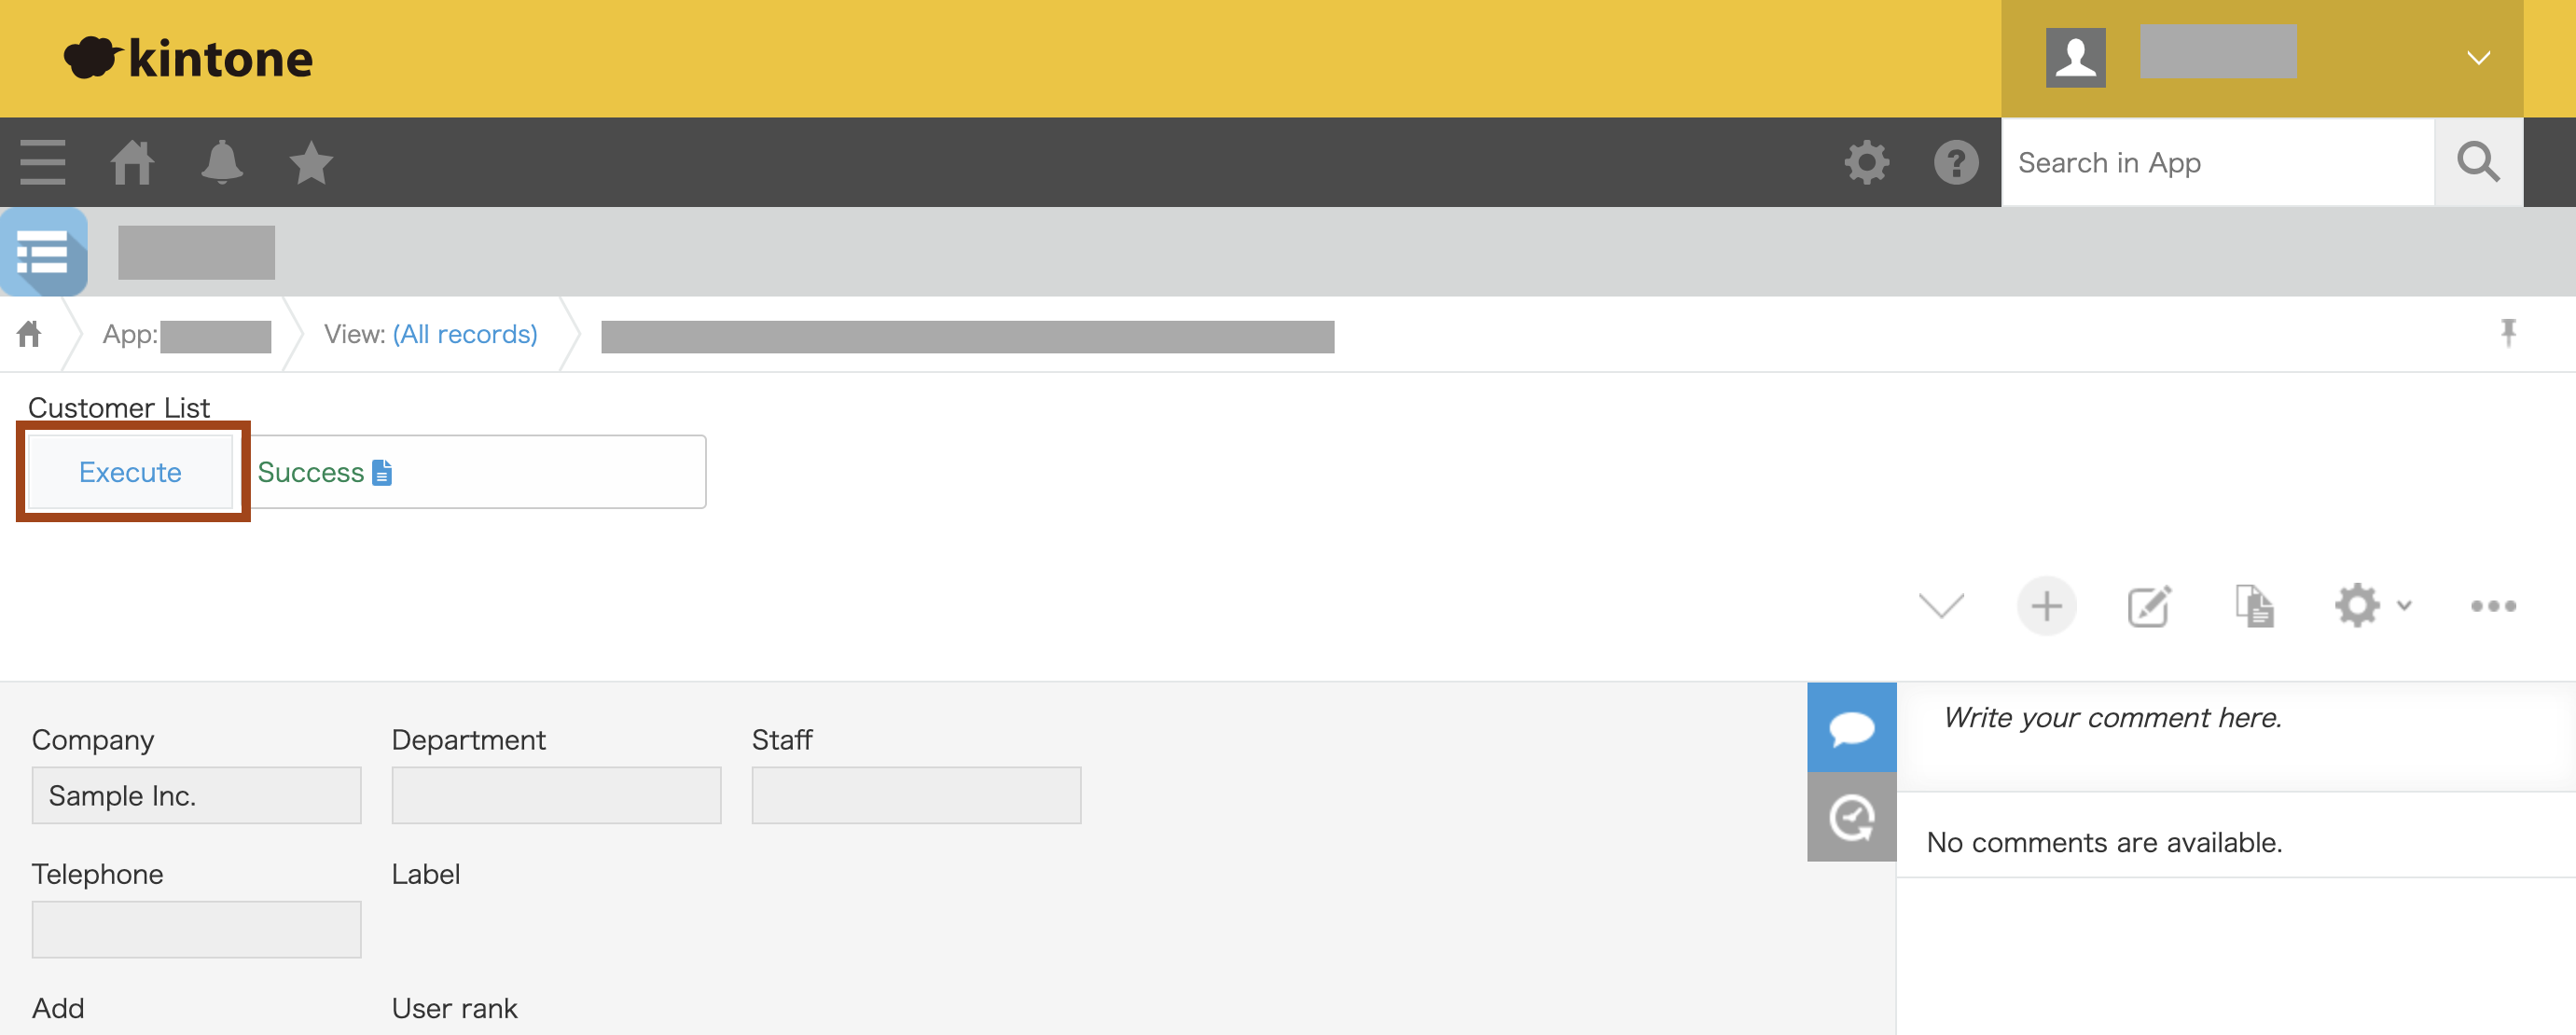
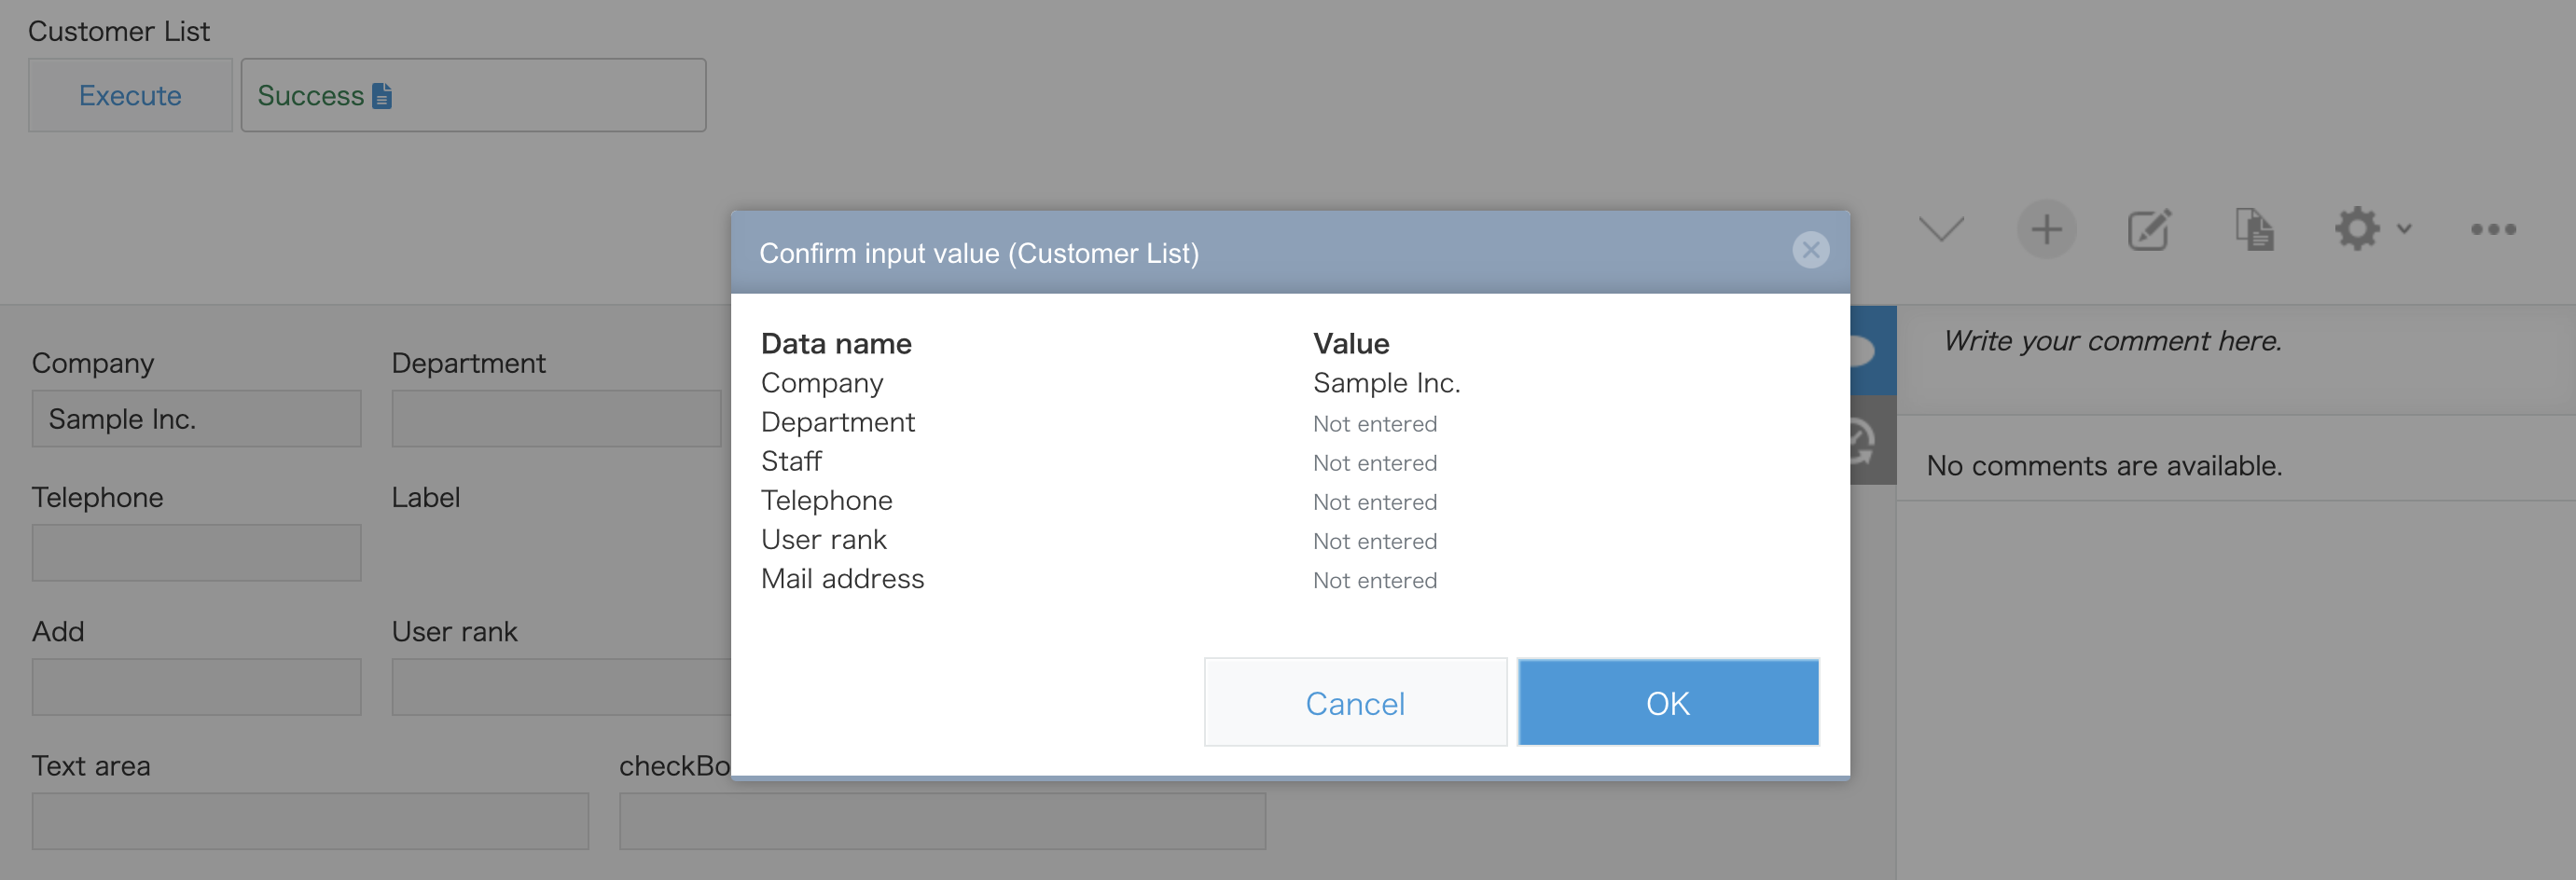
Check input values before execution
By selecting "Check input values before execution" in the options of Execute settings, a confirmation dialog will be displayed before the BOT run.
Open BOT browsing screen at runtime
By selecting "Open BOT browsing screen at runtime" in the run setting option, the preview of the run screen will open in a separate window.
Status
The execution status is displayed. Click the report icon next to the status to open the Cloud BOT execution logs screen in a separate window.
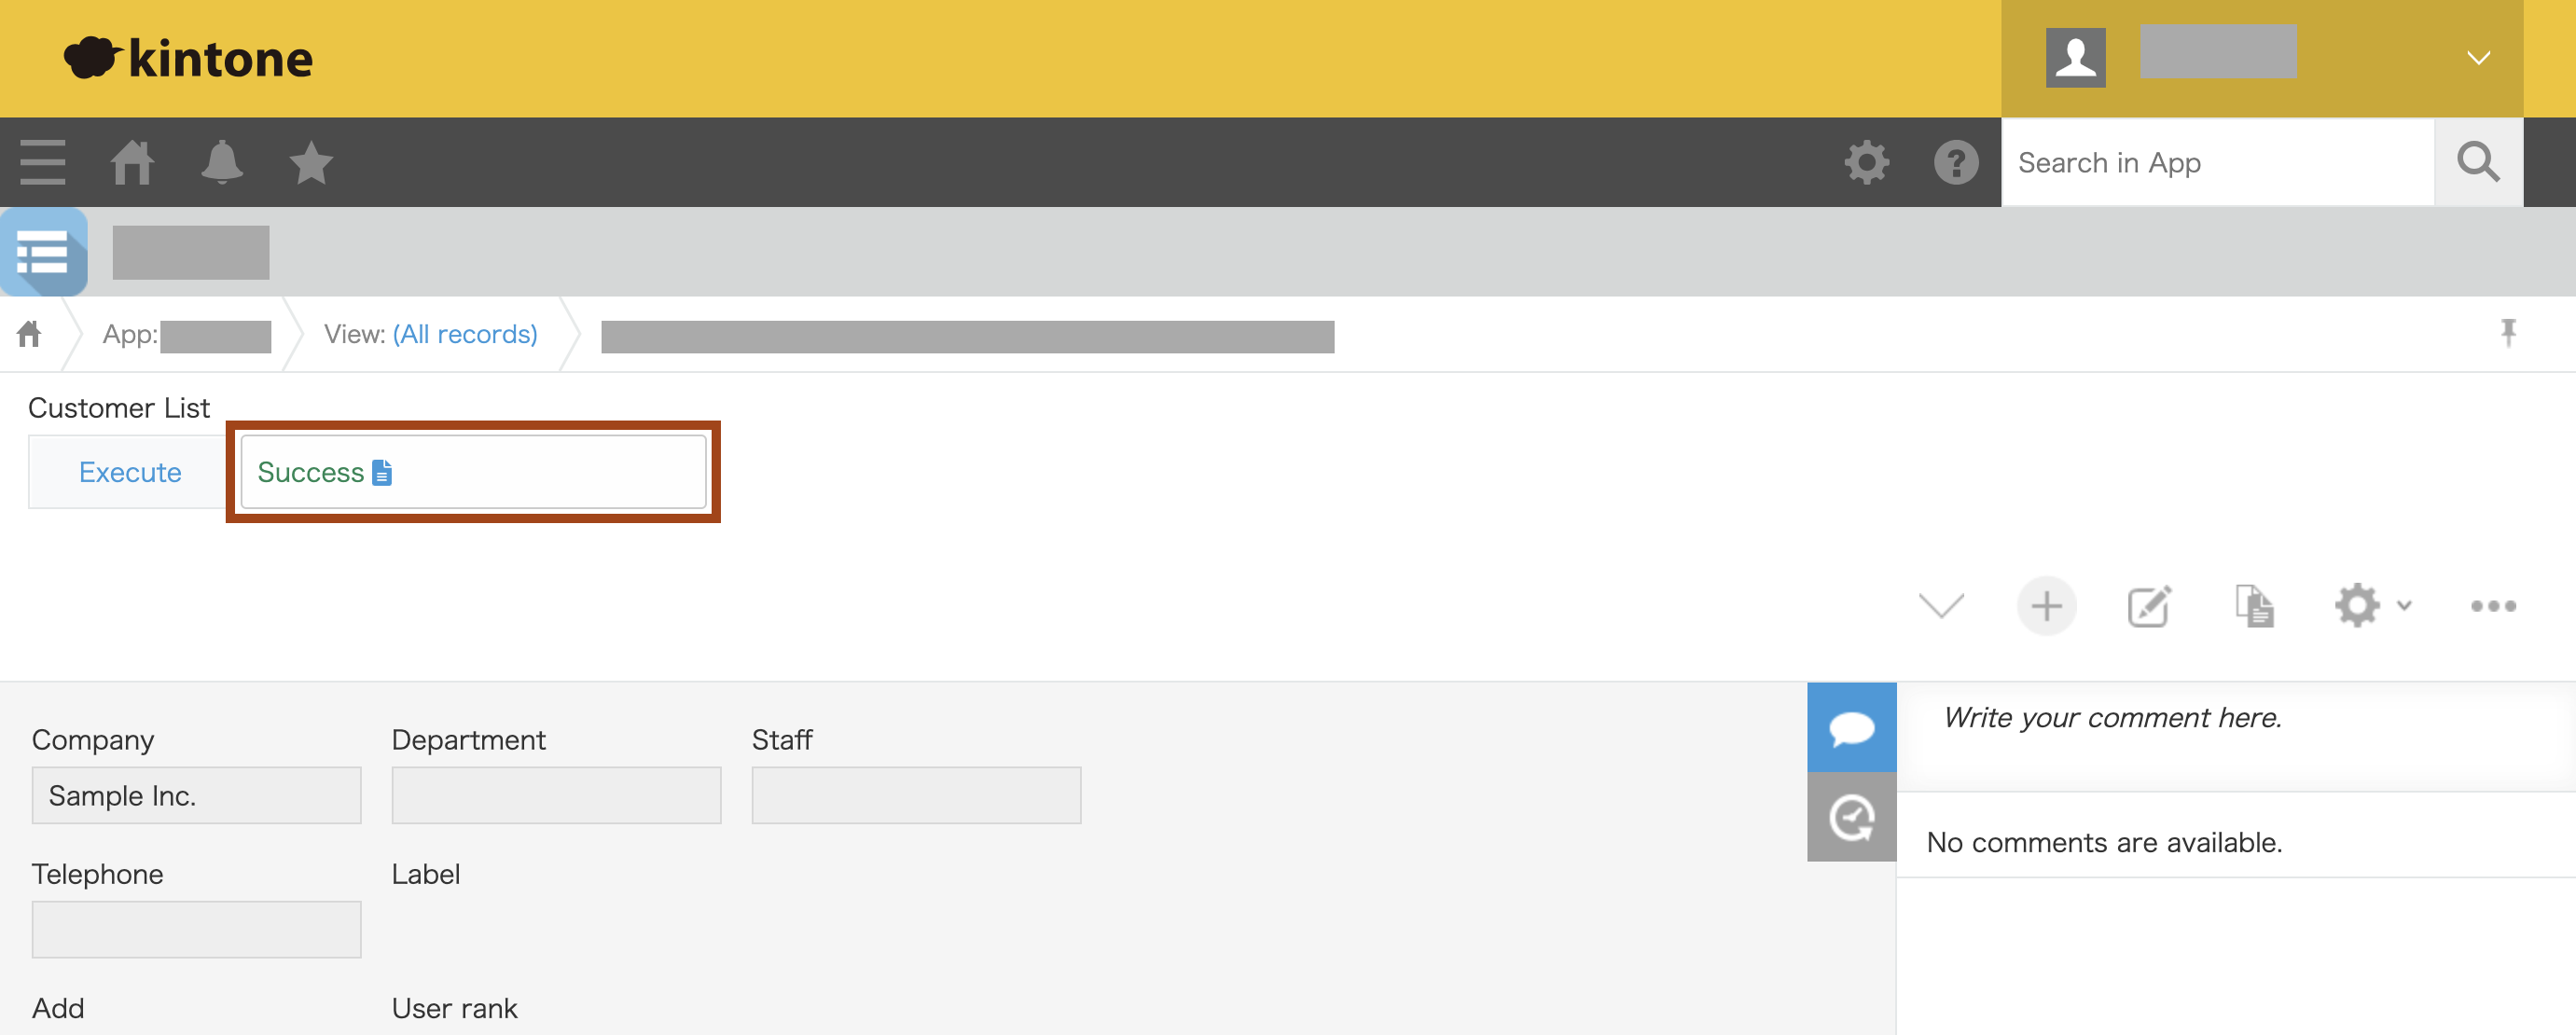
The status changes as follows.
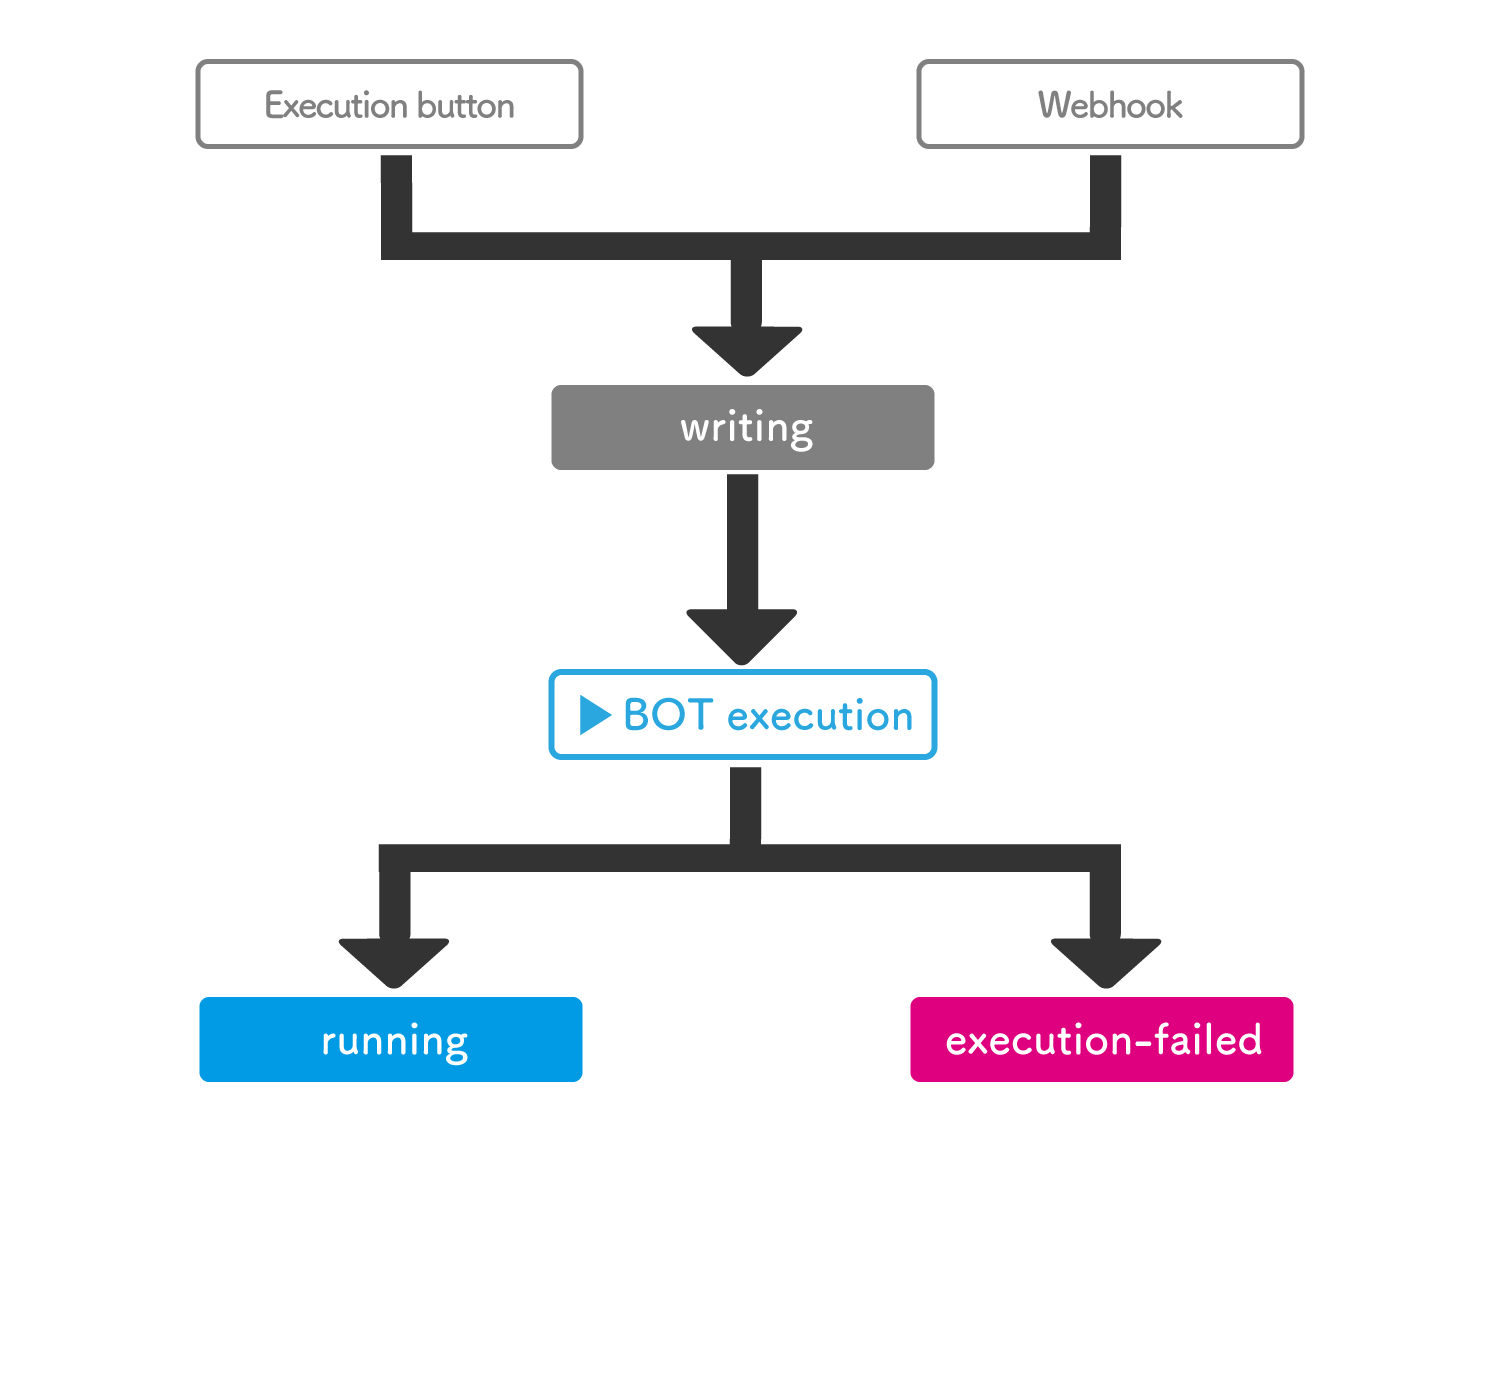
Status when the BOT execution starts
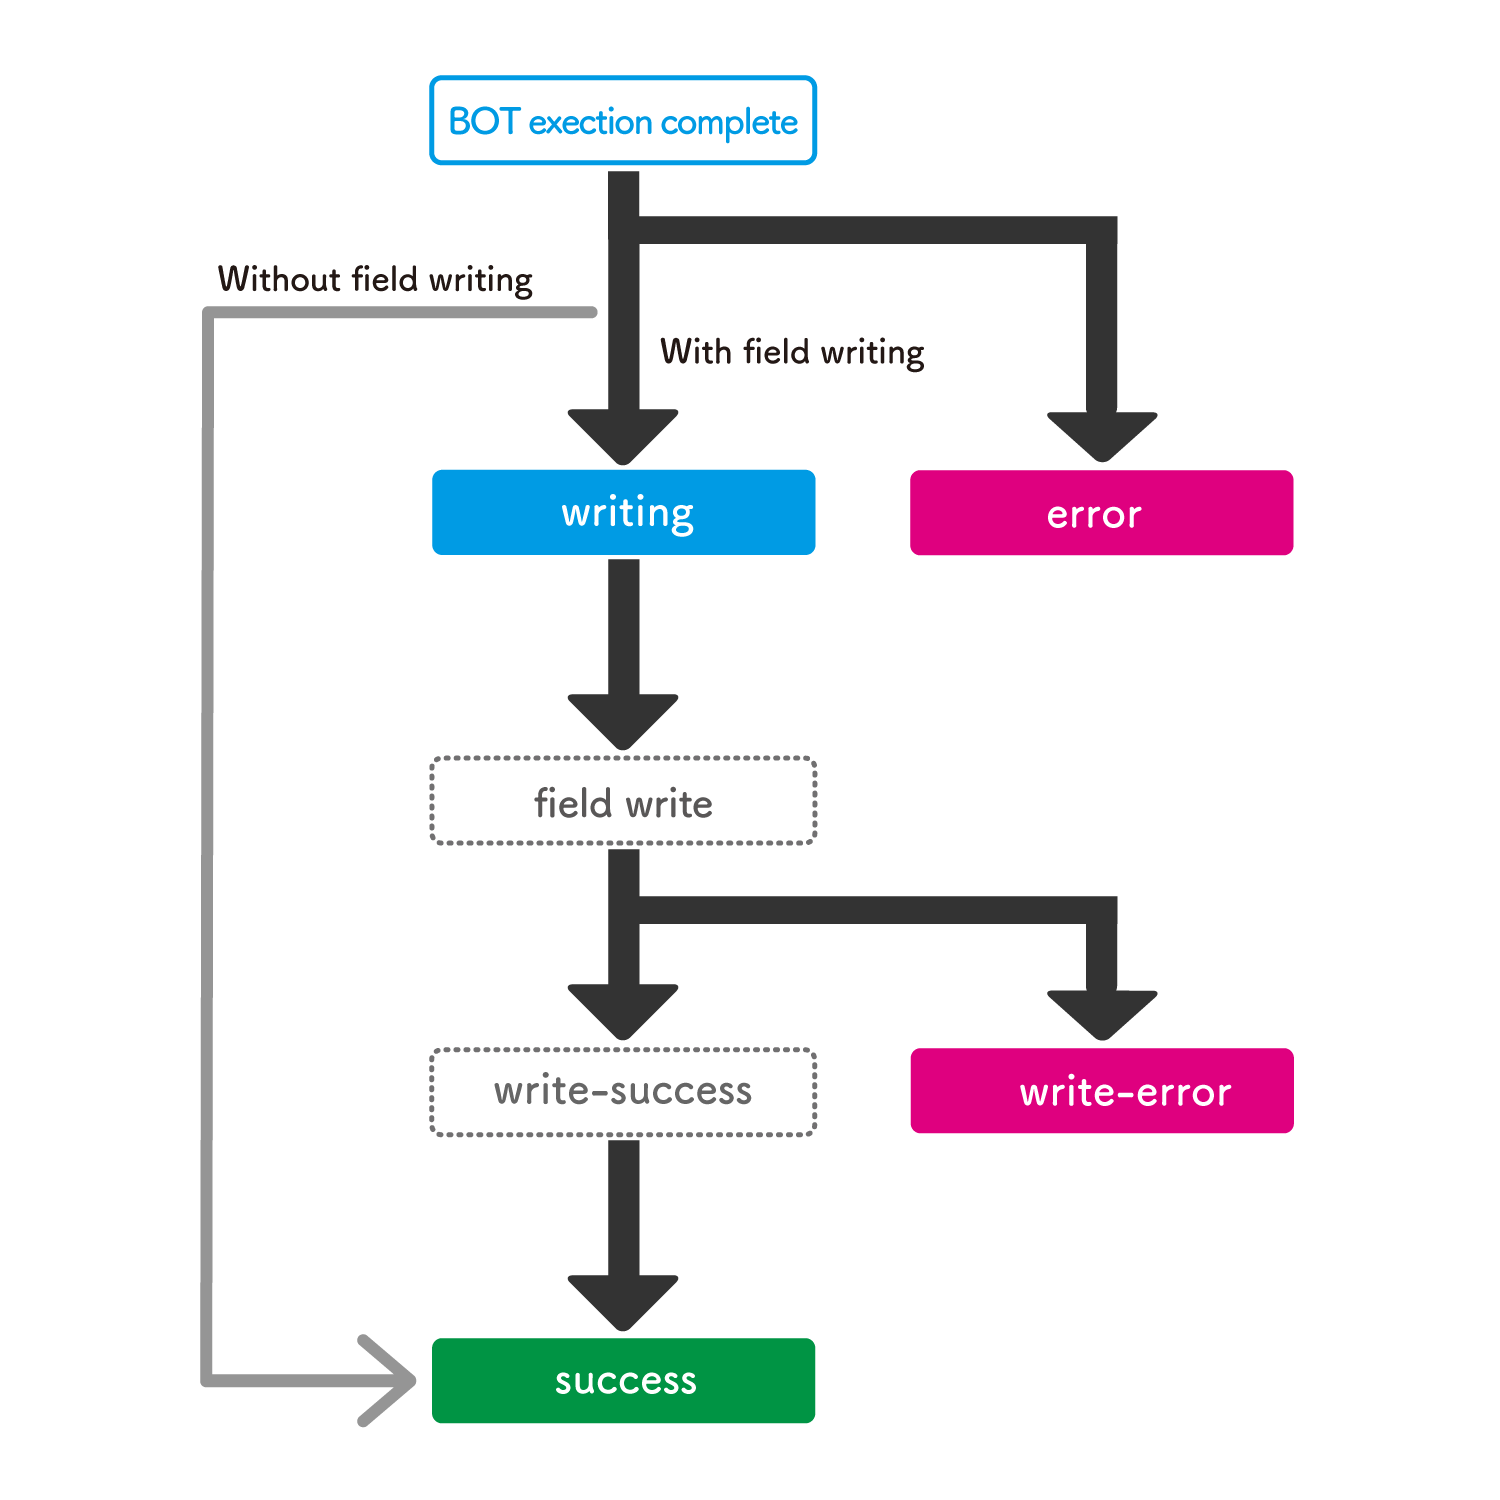
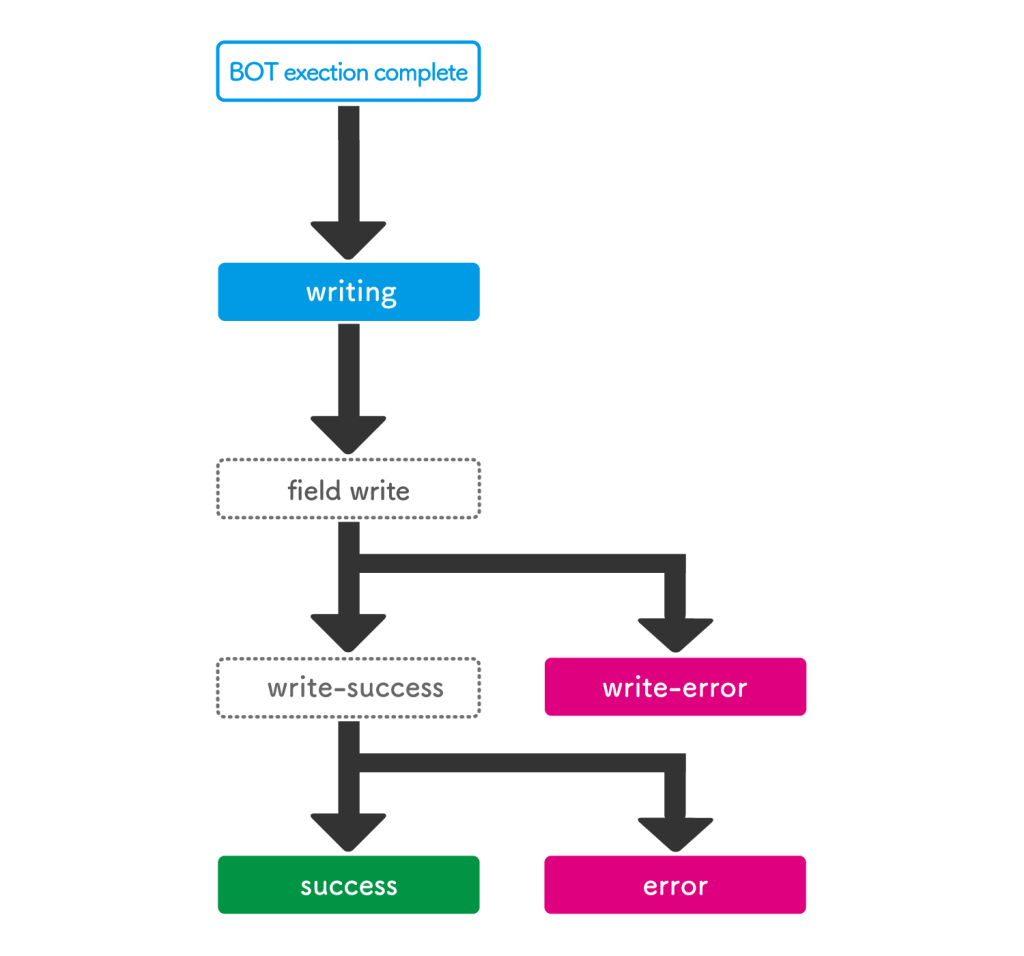
BOT実行完了後のステータス
オプションの「BOTエラー時にも出力値を格納する」によってステータスの遷移が異なります。
>> オプションについてはこちら
・「BOTエラー時にも出力値を格納する」が無効
・「BOTエラー時にも出力値を格納する」が有効
レコード一覧画面から実行する
レコード一覧画面から、複数のレコードを対象にBOTを実行できます。
※実行するレコード数によっては、BOTの実行開始までに時間がかかる場合があります。
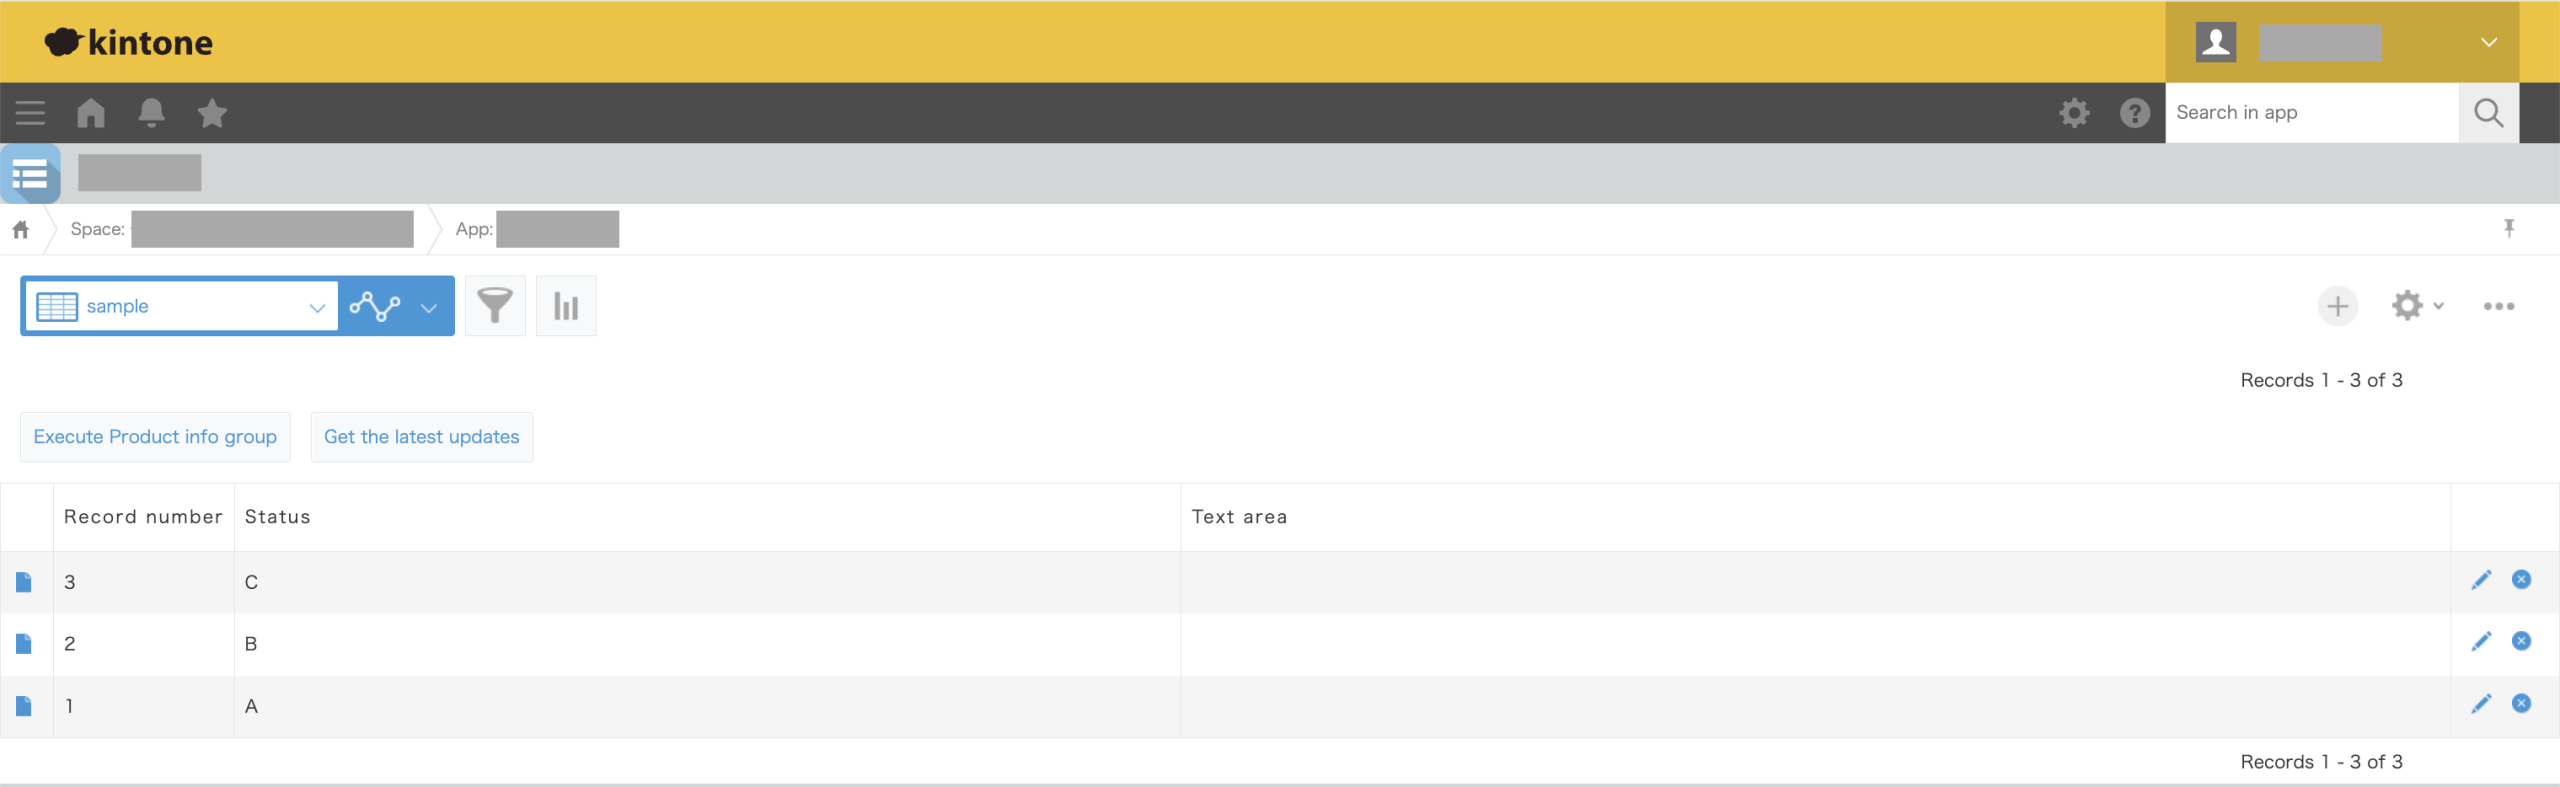
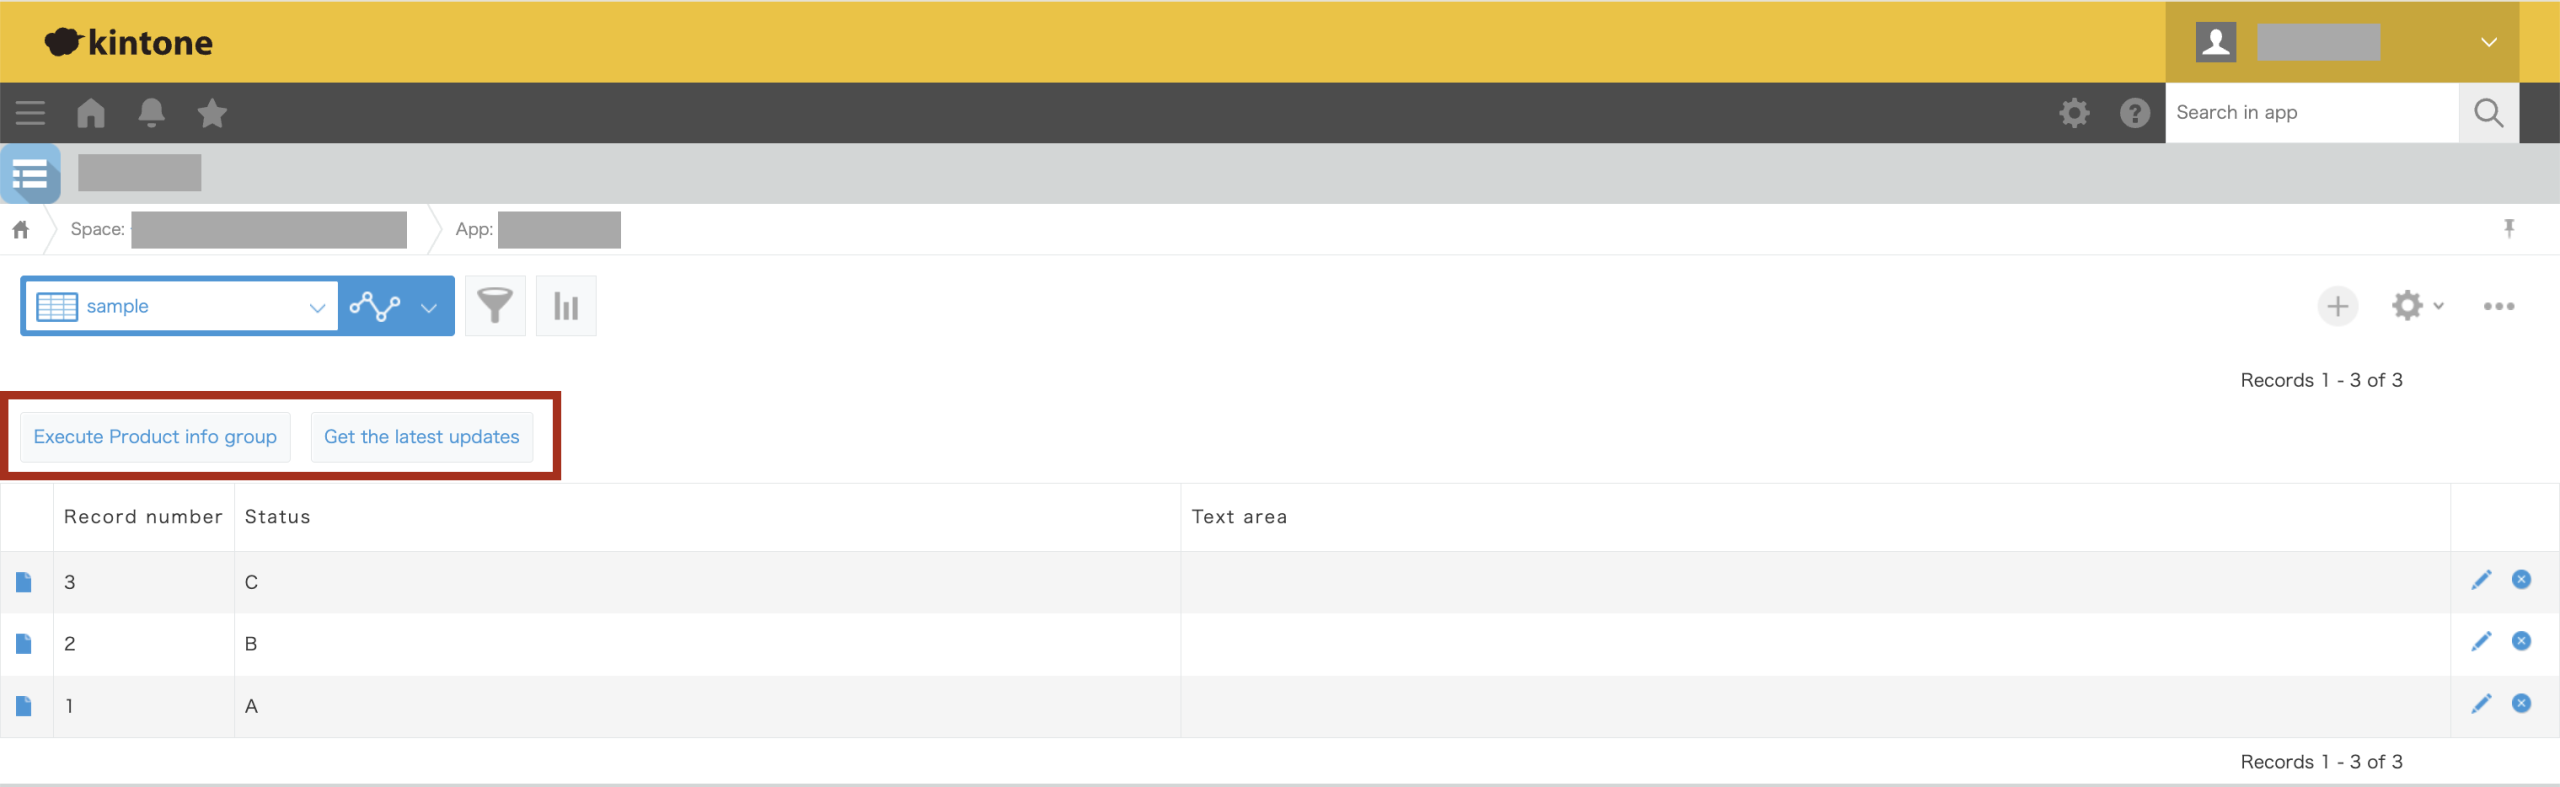
一括実行ボタン
一括実行ボタンを押すことで、レコード一覧画面からBOTを実行できます。
※一括実行ボタンは、BOT設定ごとに表示されます。
BOT実行画面
一括実行ボタンを押すと、BOT実行画面が表示されます。
画面左上のプルダウンから、以下の項目を選択できます。
※ログイン中のユーザーが閲覧できるレコードを実行対象に指定できます。
- 現在の検索条件を使用
現在の検索条件に一致するレコード全てが実行対象になります。
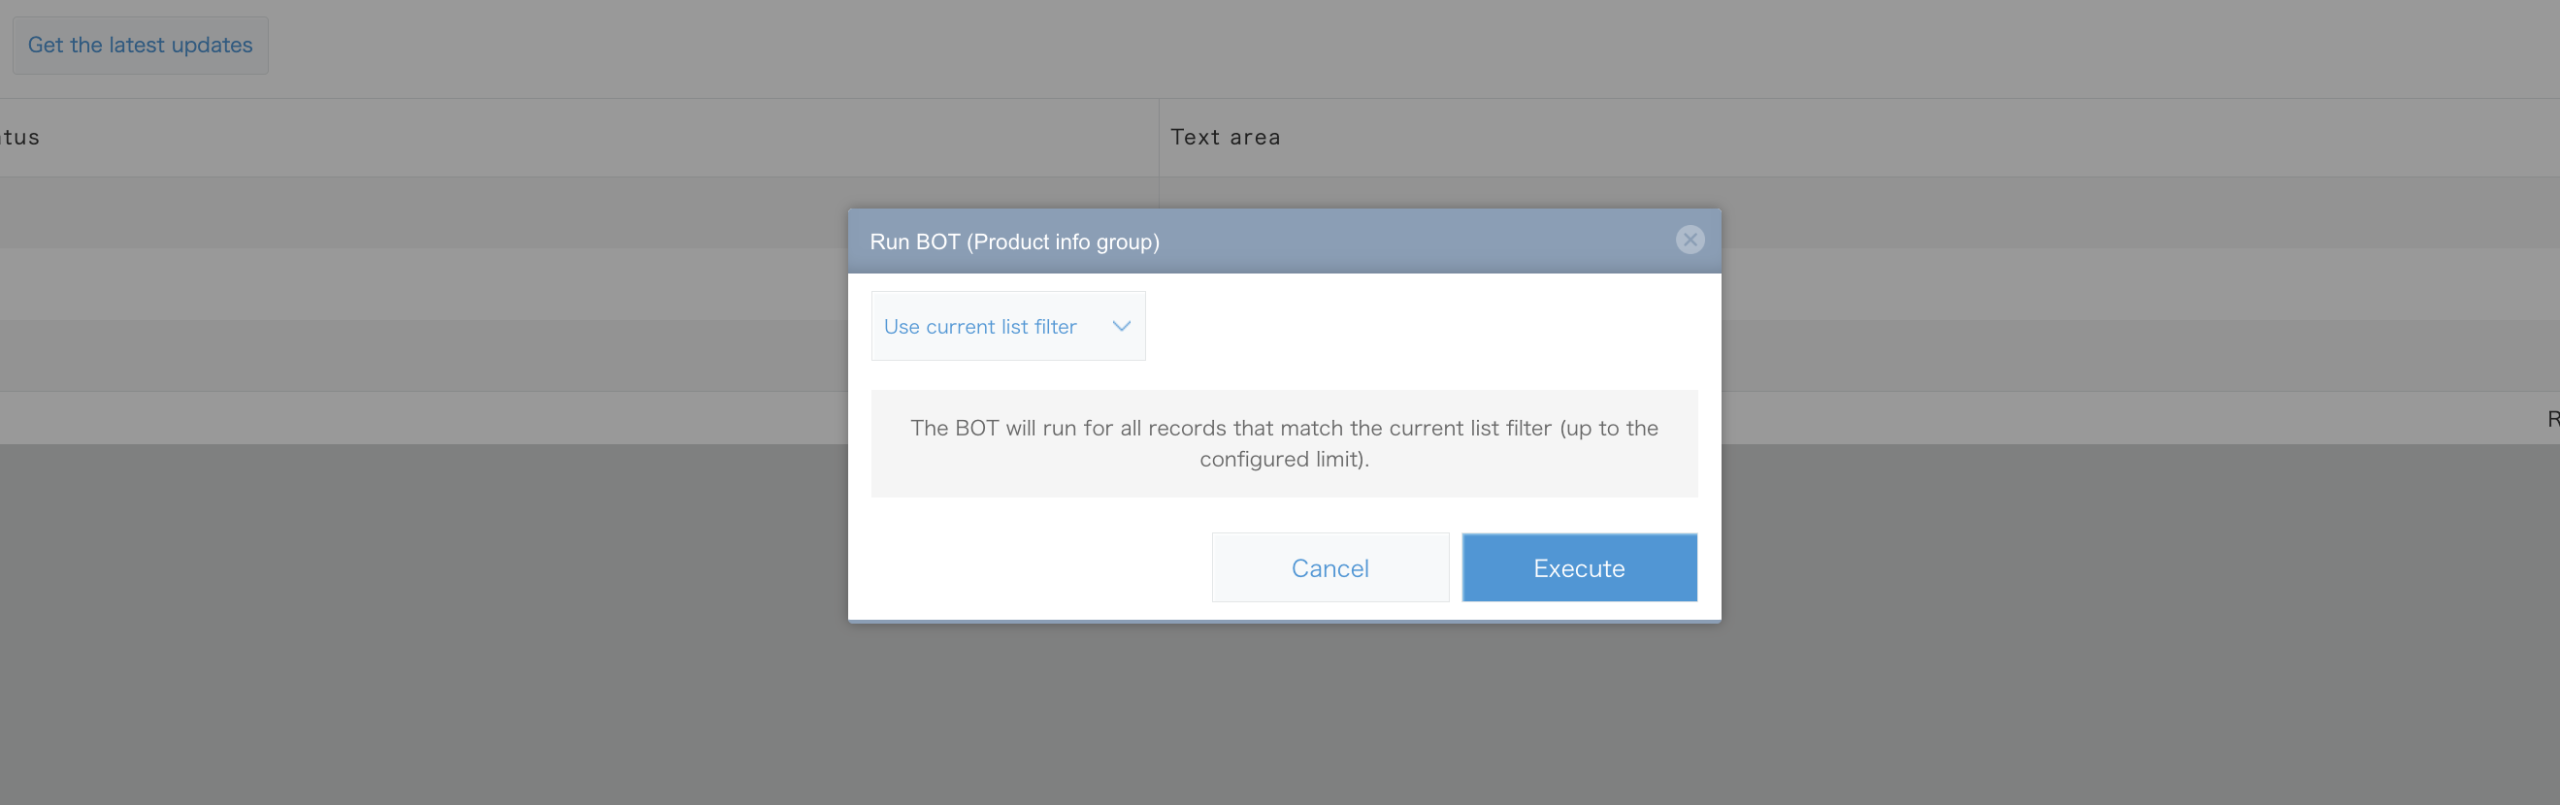
- 任意のレコードを選択
表示されたレコードの中から、実行するレコードを選択します。

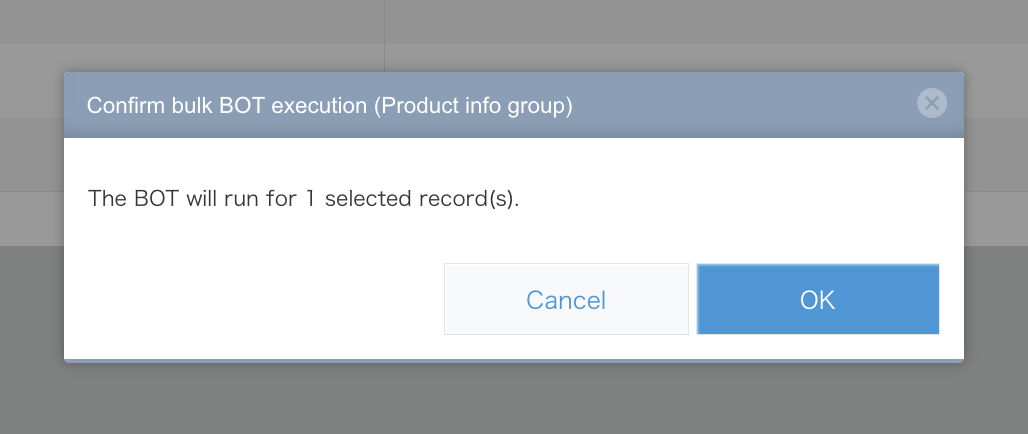
BOT一括実行の確認
「実行する」ボタンを押すと、BOT一括実行の確認画面が表示されます。
内容を確認し、「OK」ボタンを押すことでBOT実行を受け付けます。
・「現在の検索条件を使用」の場合
現在の検索条件に一致するレコードを全て実行する確認画面が表示されます。
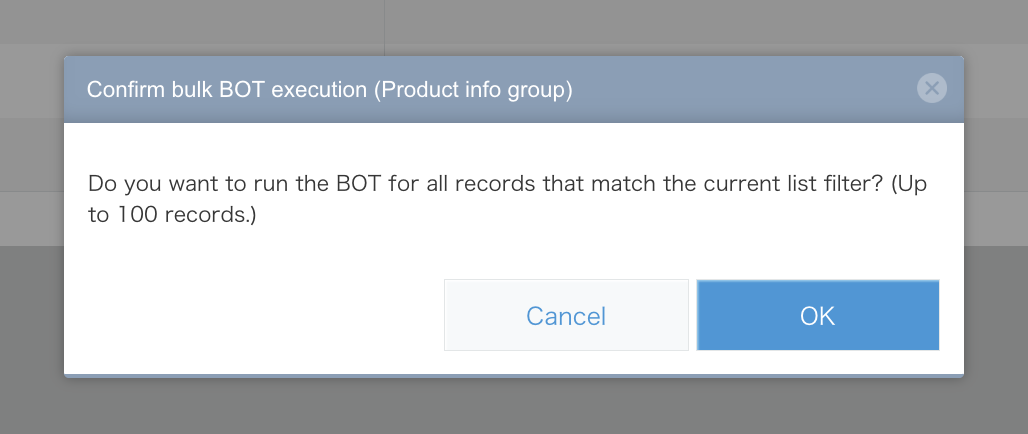
・「任意のレコードを選択」の場合
選択したレコードを実行する確認画面が表示されます。
一括実行上限件数
一覧画面から実行する場合は、一覧画面の設定の「一括実行上限件数」が適用されます。
一括実行上限件数を超えるレコードは、一括実行できません。
「現在の検索条件を使用」で実行する場合は、検索条件に一致するレコード数を確認してください。
「任意のレコードを選択」で実行する場合は、選択したレコード数を確認してください。
Generate the API Token
1. Go to the API Token page from the link under the "API Token" column in the connection settings.
2. Click the "Generate" button. "View records", "Add records", and "Edit records” access rights are required.
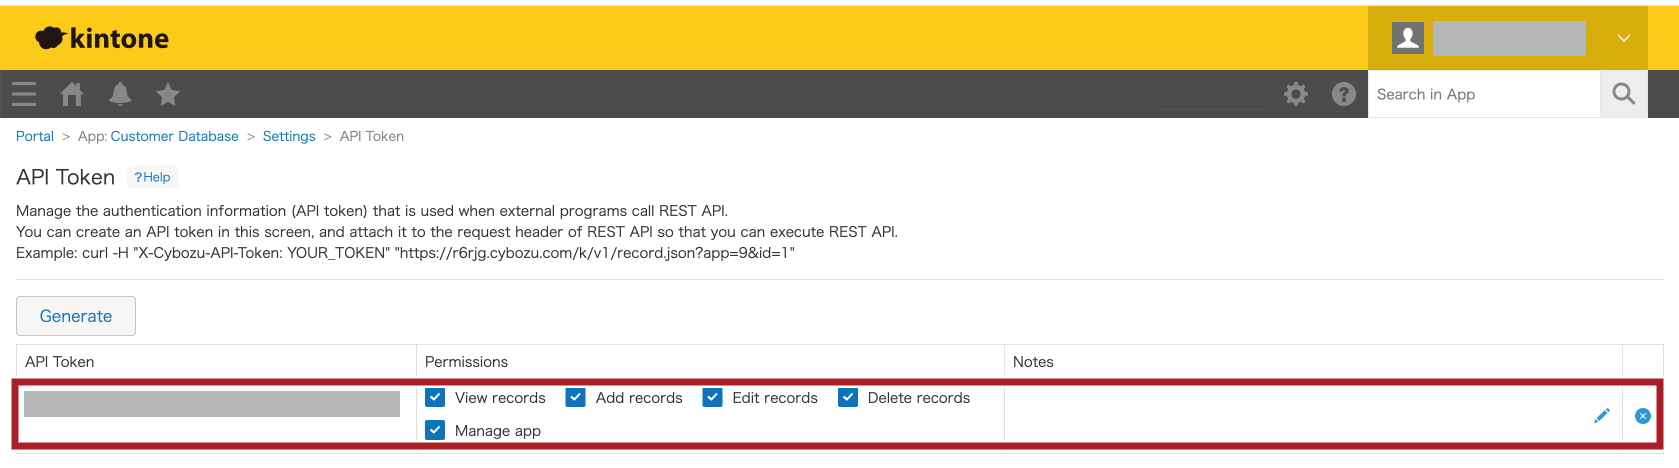
Be careful not to let others know the generated API Token.
3. Click "Save" on the top left. The API Token settings are saved.
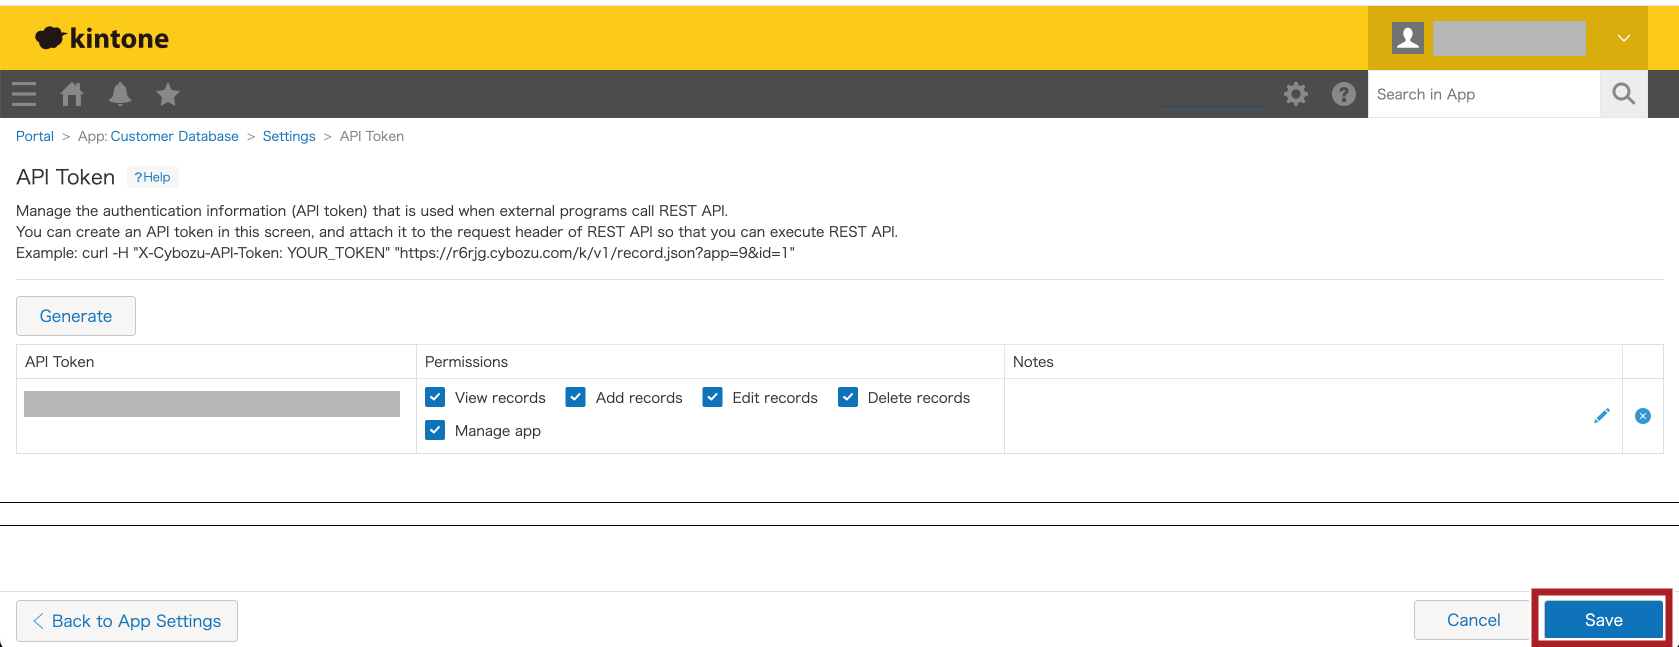
4. Click the "Update App" button to reflect the settings to the operational environment.
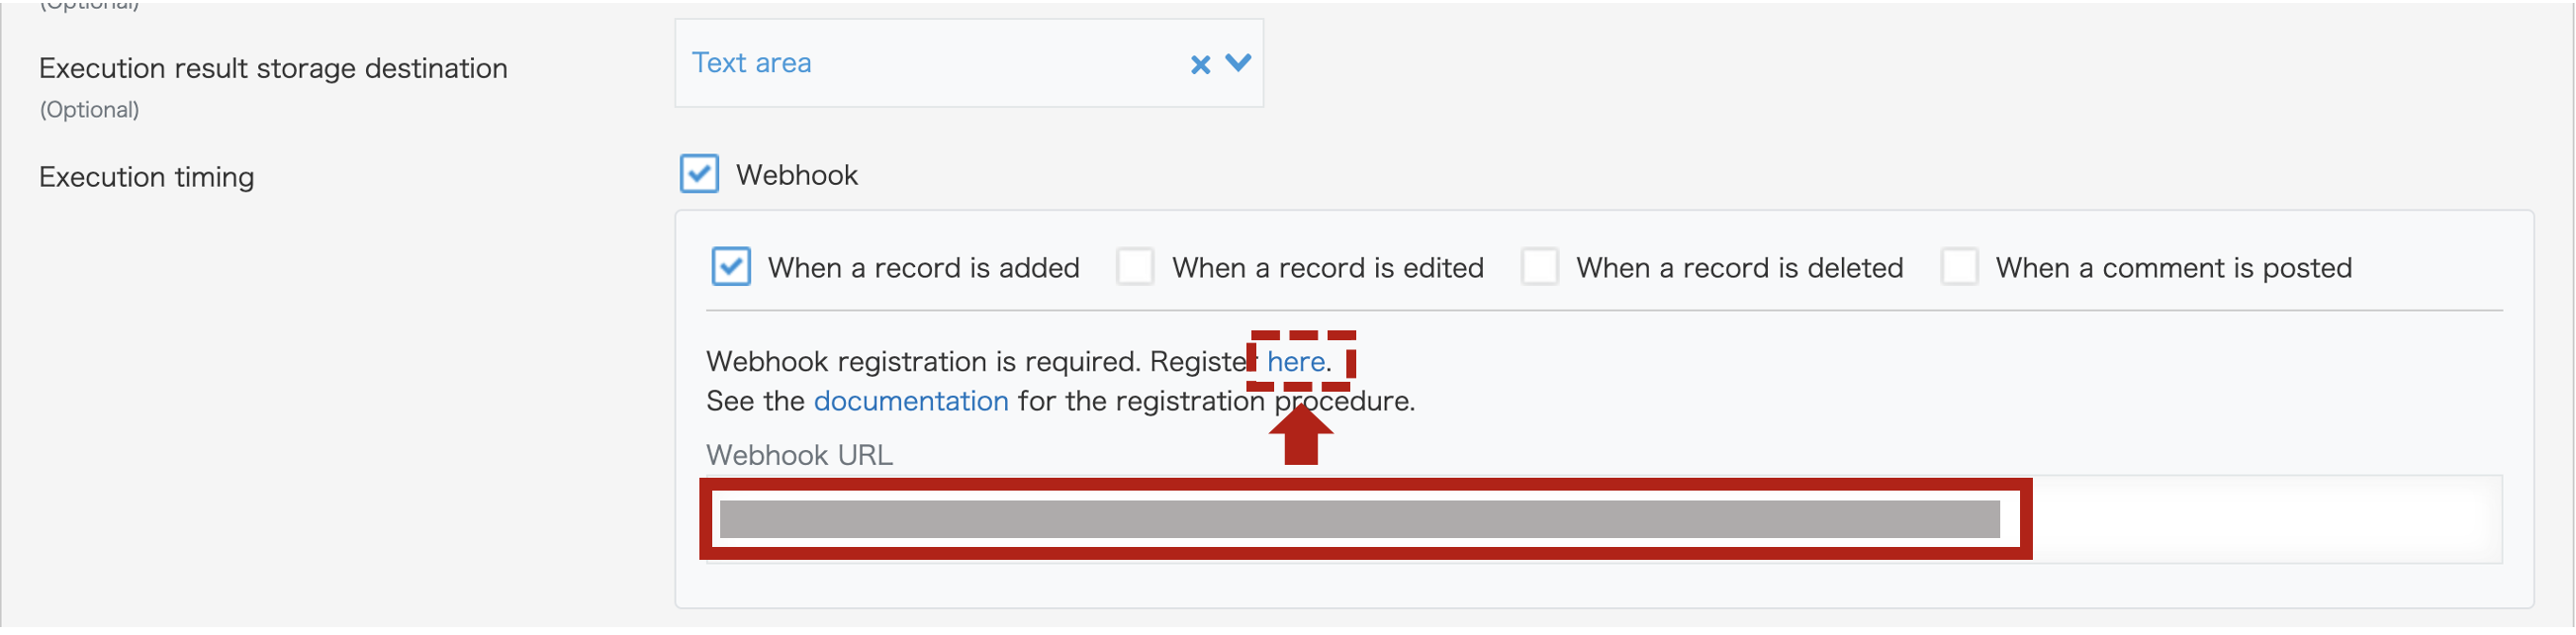
Register the webhook
By registering a Webhook, you can run the BOT when a specific event occurs.
1. Select "Webhook" on the "Execution settings" in the Cloud BOT Connector settings screen. Webhook URL is displayed.
2. Copy the Webhook URL then click the webhook registration page link.
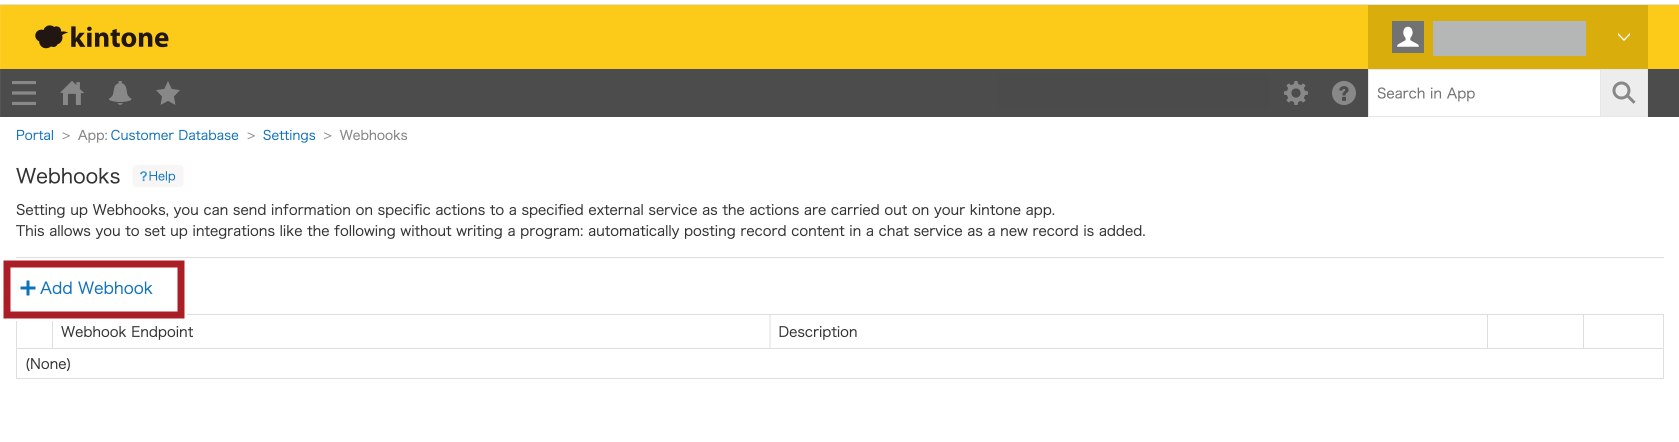
3. A separate window is open. Click "+" at the top right to add the webhook.
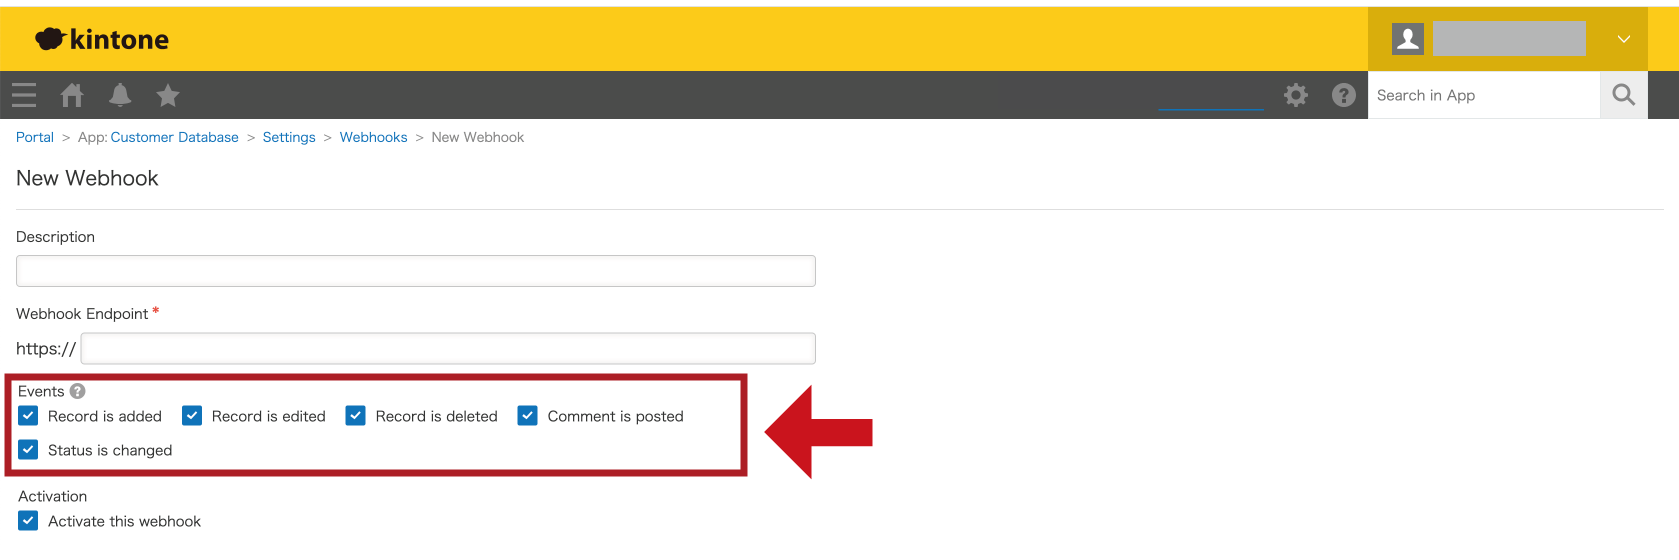
4. A separate window is open. Paste the copied URL in the "Webhook Endpoint" field.
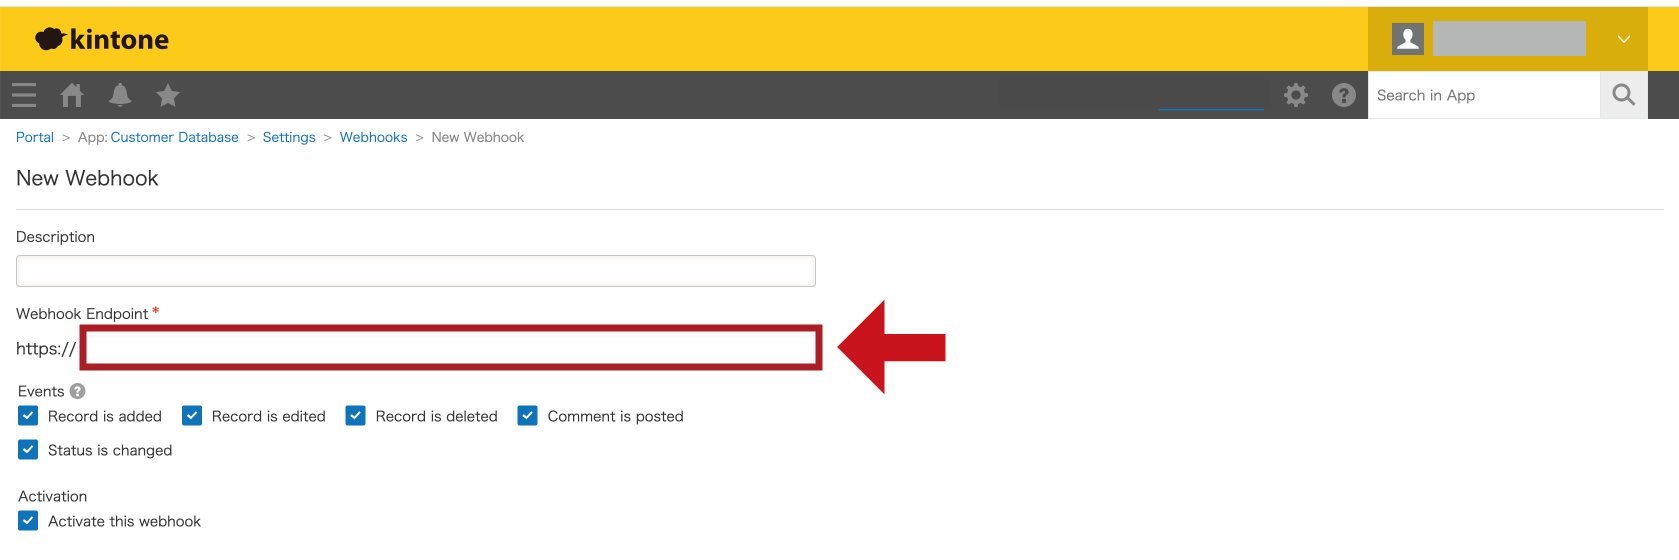
5. Specify all "Events".
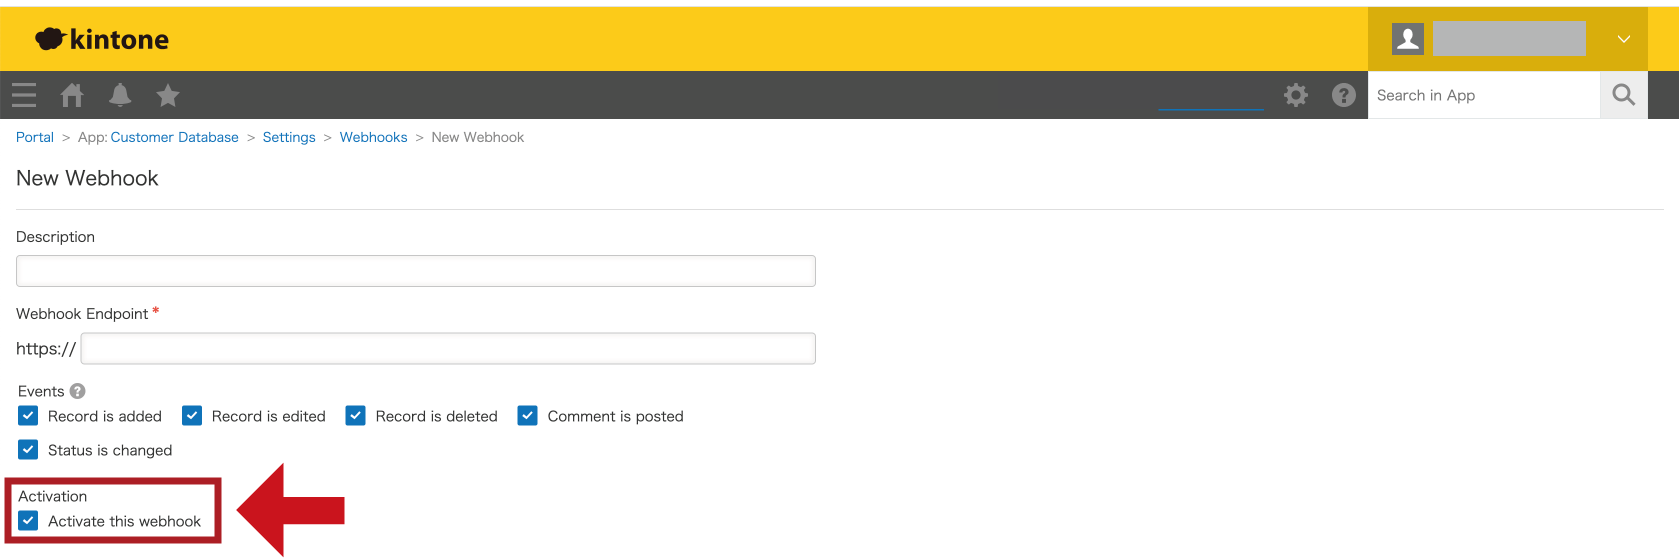
6. Finally, select [Activate this webhook] and click the [Save] button to register the webhook.
Supplementary note
Cloud BOT’s data types to kintone’s field types mapping
| Cloud BOT’s data type | kintone’s field type | 備考 |
|---|---|---|
|
Text |
Text | - |
| Text area | - | |
| Number | - | |
| Calculated | - | |
| Rich text | - | |
| Drop-down | - | |
| Radio button | - | |
| Lookup |
|
|
| Date |
In the BOT output value storage settings, the value should be in the following format.
|
|
| Data and time |
In the BOT output value storage settings, the value should be in the following format.
|
|
| Link | - | |
| Time |
In the BOT output value storage settings, the value should be in the following format.
|
|
| Multiple texts | Multi-choice | - |
| Check box | - | |
| User selection |
In the BOT input value settings, the following items will be displayed for the kintone app field.
In the BOT output value storage settings, please set it to the values produced by the BOT execution results.
|
|
| Department selection |
In the BOT input value settings, the following items will be displayed for the kintone app field.
In the BOT output value storage settings, please set it to the values produced by the BOT execution results.
|
|
| Group selection |
In the BOT input value settings, the following items will be displayed for the kintone app field.
In the BOT output value storage settings, please set it to the values produced by the BOT execution results.
|
|
| Assignee |
Activate "Process Management" in the app settings to enable this feature. |
|
| File | Attachment | - |
| Group | Table | - |
Output format of execution results
Outputs BOT execution results and logs with data stored in the kintone application records.
* Items with no data to display will not be displayed.
Bot execution result :
 Status : Succeeded
 Code : 201
 Bot name : Customer List
 Start time : 2012-12-12 13:00:00
 Elapsed time : 15
 Message :
Storage List :
 - Destination : Customer Management Group data rows Customer Registration
 Number of processing results :
  Success :
   Number of additions : 1
   Number of updates : 1
   Number of filters : 1
  Error :
   Number of addition errors : 1
   Number of update errors : 1
   Number of skips : 0
  Total : 5
 success :
  Keys of added records :
   - 101
  Keys of updated records :
   - 102
  Keys of filtered records :
   - 103
 Error :
  Update failed record keys :
   - 104
  Addition failed record keys :
   - 105
 Error message : Missing or invalid input.
 Error details :
  - Key : 104
  Row number : 3
  Contents :
   mail address :
    - E-mail address format is not valid.
   Table
    Row number : 11
    Contents :
     add :
      - This value already exists in another record.
BOT execution results
Output the results of the BOT execution.
- Status
Outputs execution status.
- Code
Outputs HTTP status code.
- Bot name
Outputs the name of the executed BOT.
- Start time
Outputs the date and time the BOT was executed.
- Elapsed time
Outputs the elapsed time from the execution of the BOT to the end of the BOT.
- Message
Outputs error messages that the BOT is still running or that the BOT has failed to run.
Storage List
Outputs a log containing the BOT output data in the kintone application record.
- Destination
Outputs a log with data stored in the records of the kintone application.
- Number of processing results
Outputs the number of processing results.
Success
- Number of additions
Outputs the number of records added.
- Number of updates
Outputs the number of records updated.
- Number of filters
Outputs the number of cases that did not match the "update conditions" and were not stored.
Error
- Number of addition errors
Outputs the number of failed record additions.
- Number of update errors
Outputs the number of failed record updates.
- Number of skips
Outputs the number of cases that failed to be stored and were not yet processed.
Total
Outputs the total number of successes and failures.
success
- Keys of added records
Outputs the key of the added record.
| Storage method | Value |
| new | Outputs the record ID of the added record. |
| update | - |
| new & update | Outputs the value of the key specified in the first update condition. |
- Keys of updated records
Outputs the key of the updated record.
| BOT output value storage destination setting | value | note |
| Stored in the same record | Outputs the record ID of the same record. | - |
| Stored in the record of the specified app. | Outputs the value of the key specified in the first update condition. | Output only when "Update" or "New & Update" is specified as the storage method. |
- Keys of filtered records
Outputs the keys of records that did not match the "update conditions" and were not stored.
* If the "Storage Method" is "New & Update" and does not match the "Update Condition", a new record is created without filtering.
Error
- Addition failed record keys
Outputs the keys of records that failed to be added.
- Update failed record keys
Outputs the keys of records that failed to update.
| BOT output value storage destination setting | Value | Note |
| Stored in the same record. | Outputs the record ID of the same record. | - |
| Stored in the record of the specified app. | Outputs the value of the key specified in the first update condition. | Output only when "Update" or "New & Update" is specified as the storage method. |
Total
- Number of successes
Output the number of successes.
- Number of errors
Outputs the number of errors.
Error message
Output error messages.
Error details
- Key
Outputs the keys of records that failed to be stored.
| BOT output value storage destination setting | Value | Note |
| Stored in the same record. | Outputs the record ID of the same record. | - |
| Stored in the record of the specified app. | Outputs the value of the key specified in the first update condition. | Output only when "Update" or "New & Update" is specified as the storage method. |
- Row number
Outputs line numbers that result in an error in storing the number of group data lines.
* The "number of additional records" from the setting of "store in the record of the specified application" in the destination setting of the BOT output value is output only for the setting of "group data row".
- Contents
Store the BOT output data in the kintone application record and output the name of the field that causes the error and the cause.
* If the field in the kintone application that causes an error is a field in a table, the table name and the number of the row that causes the error are also output.
Execution timing restrictions
If the following conditions are met at execution timing, the input value to the kintone app field will be "not specified".
| Input value | Execution timing | Process administration settings |
| All form field values | After deleting a record | - |
| Comment | "Execute" button When a record is added When a record is edited When a record is deleted When a status is updated | - |
| Posted by | "Execute" button When a record is added When a record is edited When a record is deleted When a status is updated | - |
| Comment number | "Execute" button When a record is added When a record is edited When a record is deleted When a status is updated | - |
| Status | - | Disabled |
| Status | After deleting a record | - |